Beginner photographers tend to overlook the process of giving clients back their photos.
In fact, this is a critical step in providing excellent customer service, which allows you to stand out among the crowd of photographers.
There are many solutions available in the market, free or paid, for you to choose from. If this massive array of choices overwhelm you, this is the right article for you!
I will run you through my process of giving my clients their photos in great detail, and break down my thought process for you. We will also look at a few photo sharing services I have personally used, and the best scenarios to use them respectively.
Here is a brief overview of my client management workflow in relation to returning photos.
Firstly, cull shots to remove technically-flawed images, then export them as jpg format. Upload the jpgs onto Pixiset by creating a client gallery, and share the gallery with the client. The client selects their favourite shots and notifies me about it. I edit their selected shots, export them as jpg and transfer through Google Drive. I then delete the photos after 30 days after they have been made available.
Other methods I occasionally use include WeTransfer, Dropbox and Adobe Contact Sheets function.
If you find this helpful, SUBSCRIBE to my channel via the box on the left to make the most out of my blog! Also, do share it with people who might be interested. Shoot me an email/ DM to share your thoughts too.
Also, Pin this article to your Business of Photography boards in Pinterest if you find it helpful!


For demonstrations, watch the video in which I walk through my entire client management workflow.
What to Look for in a Platform?
As we mentioned, there are as many options as there can be out there, so it is important to know what you are looking for in a platform before setting out to make a decision.
Here are some questions you should ask yourself, that not only helps you decide on which platform to use, but also helps you gain more clarity on your working style as a photographer.
Do you Let Clients Choose Photos?
If you let your clients choose photos, ideally you will need a platform with the capability to create markups or any feedback function.
In relation to this, my take is that there isn’t an absolute answer on the matter.
I personally let my clients choose (but not with collabs), though doing so has its share of drawbacks, and the arguments against giving clients the ability to choose are equally sound.
The main advantage of letting your clients choose the final shots is that it increases their involvement in the entire process of using your services. This is a powerful way to create a seamless customer experience, which is the key to differentiating yourself from your competition.
I have personally have clients tell me what they loved the most about working with me - the process feels professional because of the high level of transparency I provide them with. It feels like they are heard in every stage of the process. I have been doing more of this ever since, and it has won me nothing but super happy clients.
Another reason I do this, as counter-intuitive as it sounds, is to simply my workflow.
What? You say. Isn’t that inviting trouble?
Well yes and no.
Indeed it requires more back and forth between you and your client, because they will take some time to decide on the selects, and might ask you for your advice before making up their minds. They might even change their preferences once or twice in the process.
It costs you time to let clients pick, but it probably costs you more to not do so.
I used to select and edit the shots myself in one go, and simply notify the client of the upload. But this has backfired a couple of times in which the client, feeling unsure of the final selections, asks to see the other Raw files.
If you are to keep your client happy, you will see that it is highly probable that you will have to show the Raw files anyway.
So why not share it right at the beginning? And since they are the ones who made the selection, there is little grounds for them to demand you to re-edit another shot later on.
This is how I came to decide that I will let my clients pick their best shots, which is why I will need to generate online photo proofs.
What is Photo Proofing?
Photo proofing, simply put, is the process of presenting your shots for your client’s selection.
This is mostly done online nowadays, using digital platforms. Though for certain genres of photography, such as wedding photography or any occasion for which prints are required, photographers still sit down with their clients and present the digital files in person. Sometimes, small prints are also presented to offer a preview of the print quality.
The idea behind is that the client can find all their shots conveniently in one place, as opposed to receiving a bunch of individual shots that look virtually identical, and have no way of differentiating them but a long chain of file names.
You need a platform that puts it all together in a clear and presentable manner.
What Platforms have such Capabilities?
Method I: Pixiset favourite list function
This is my go-to photo sharing solution, and it is completely free. It has a paid premium version with more services available, but I find their basic offerings more than enough, even as a professional photographer.
This feature of Pixiset allows the client to create a favourite list out of all the Raw files, by hitting the heart button.
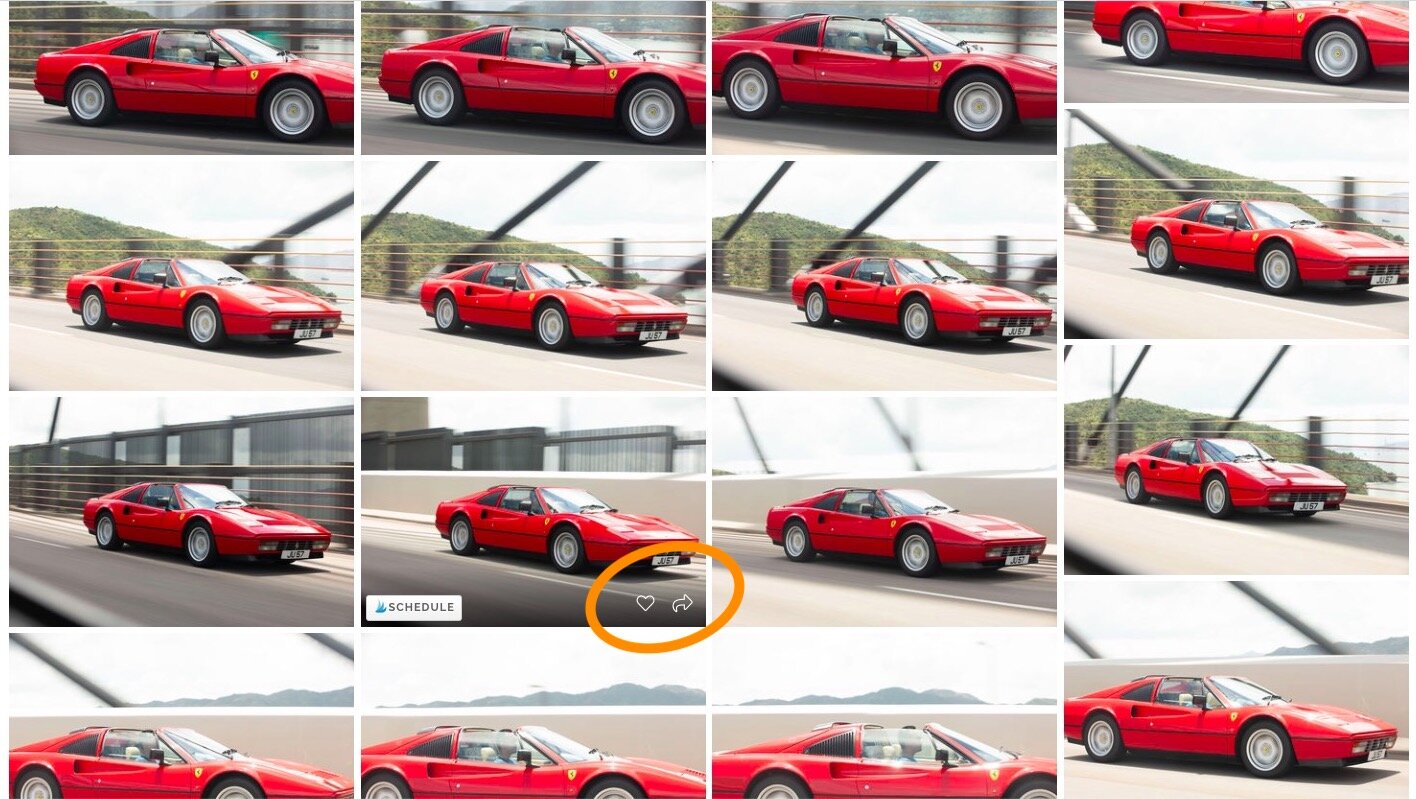
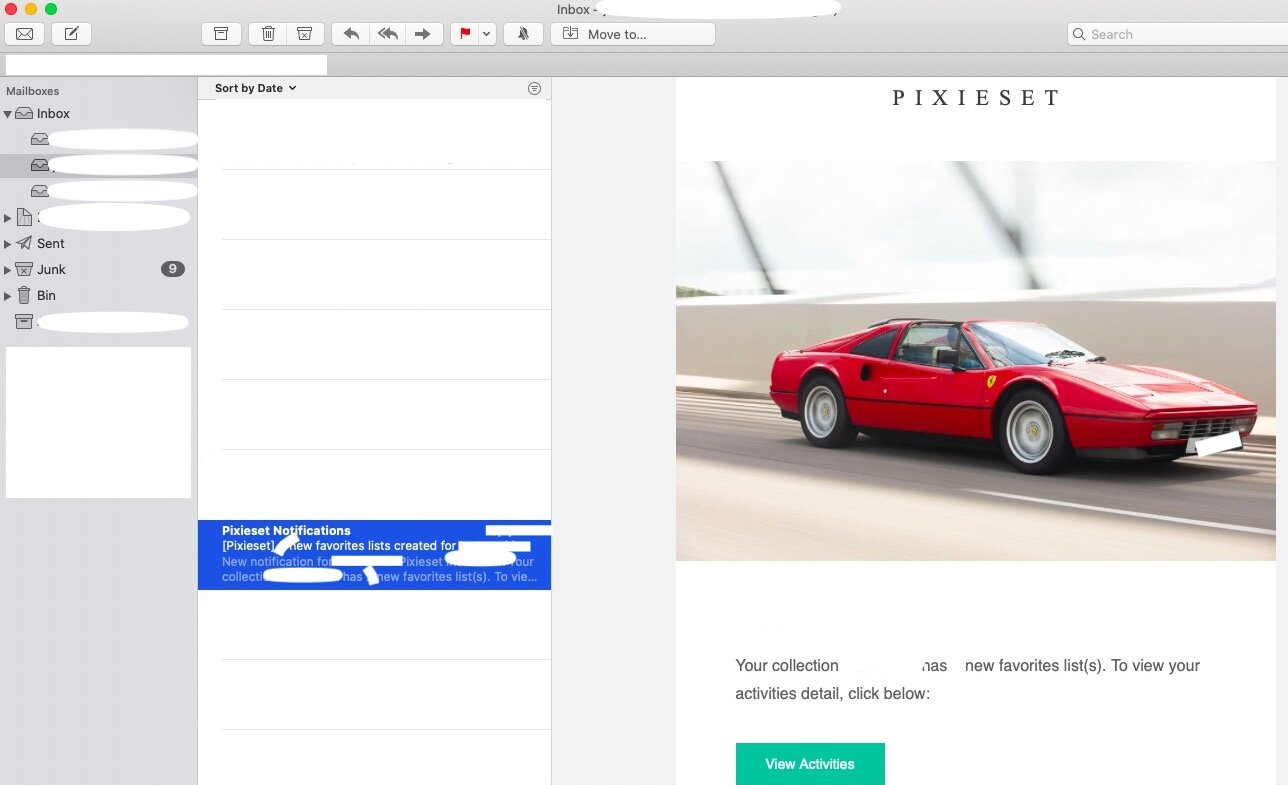
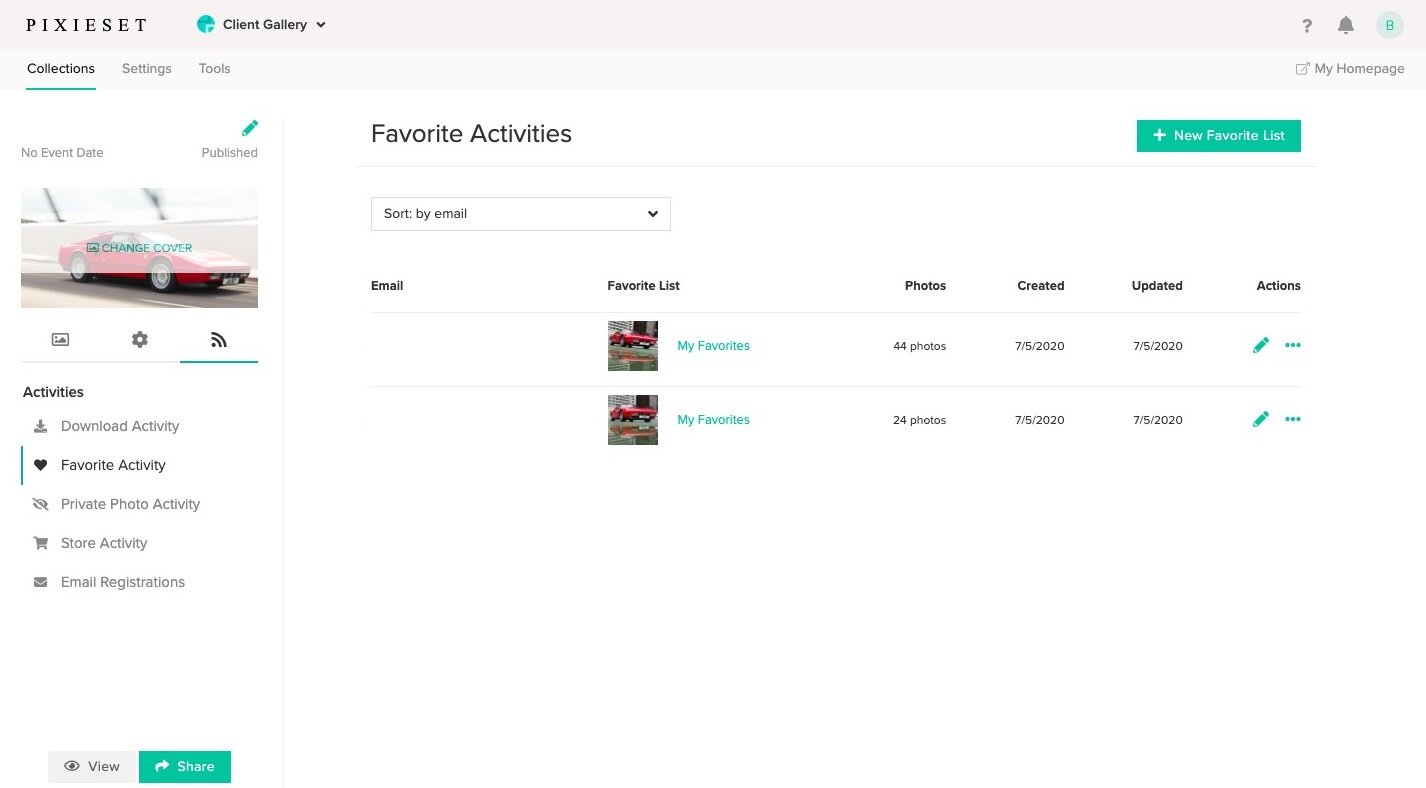
Pixiset then notifies the creator of the gallery, aka the photographer in this case, of the creation of the list of selects via email.
The biggest pro of the Pixiset platform is that it allows the users to view each individual shot in enlarged forms.
On Pixiset, you can extend the view to fit the window.

This added element of user interaction with the interface also adds to the experience of working with you. Such tiny details is the key to getting yourself booked over and over again.
It also saves the hassle of having to manually communicate the filenames - technically it is no big deal, but it is still an added complication that can potentially create room for error.
The corresponding con of this is that you will have to spend time handling the massive Raw files - first exporting them in jpg format, then uploading the still very large jpgs onto Pixiset.
Method II: Adobe contact sheet exporting function
I mostly use Adobe Bridge, but other tethering softwares developed by the Adobe family, usually Lightroom, also has the same capacity to generate contact sheets.
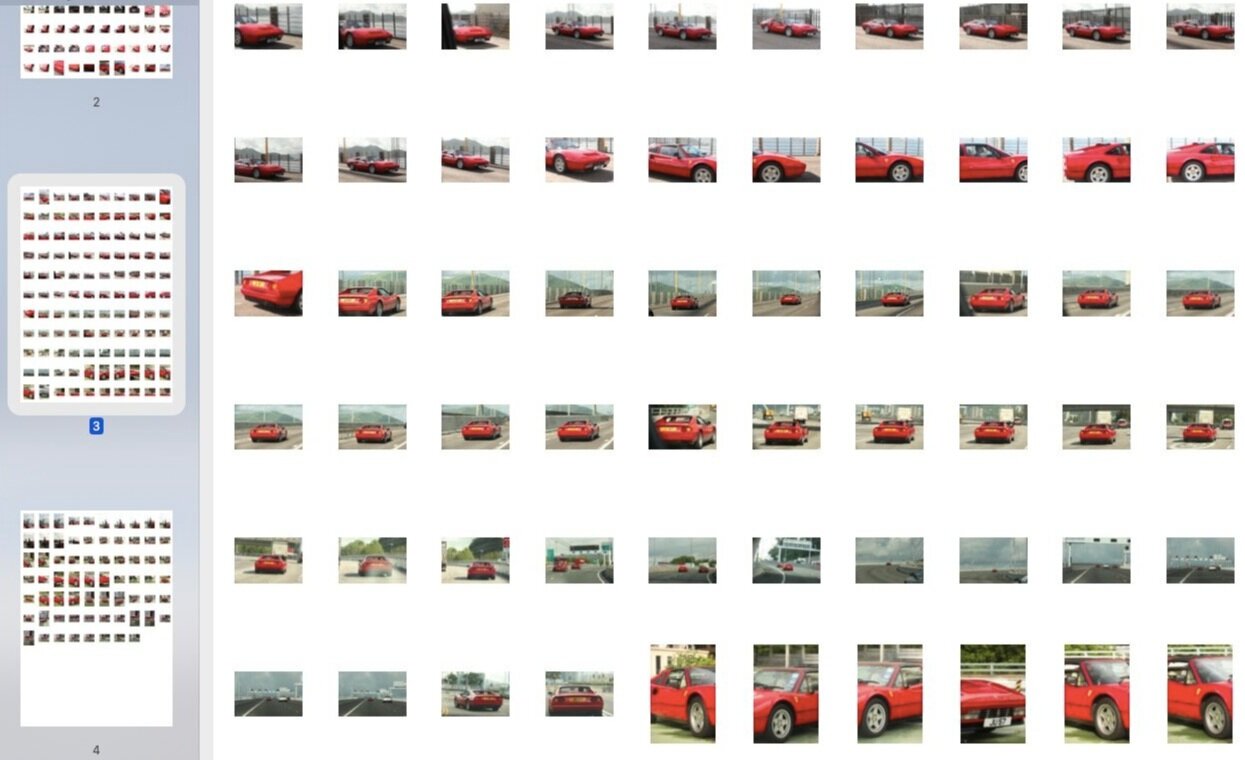
Contact sheets are pages containing multiple Raw files in smaller icons. This allows the client to briefly skim through the shots, and make selections based on the compressed view of the images. See below for an example.
The main advantage of using this method is that you don’t have to export and upload every single photo. This can save you quite a bit of time.
However, in my experience, being able to flick through each image and view them in clear, enlarged formats is something valuable to clients. They might want to zoom in to review their expressions or certain details that are not apparent in thumbnails.
Also, using this method relies on the communication between you and your clients about the file selection. This requires extra care because the shots can look really similar at the size of a thumbnail. It is better to double check a few more times to make sure you have noted the correct shots before diving into editing.
In the output module in Adobe Bridge, you are able to customise your contact sheets. Under the Grid and Margins settings, you could select how large you want the thumbnails to be.

You then send your clients the contact sheets, which would take up much less space too, and wait for them to get back to you about their selects.
This comes with the Adobe Creative Cloud Photography plan, which is what I have opted for, considering the need to to find retouching in Photoshop, render and manage individual files on Bridge/ Lightroom, and minimal storage requirements. Adobe does offer other bundles at various price points, so do check out the link to find out the best fit for your specific needs.
Do you Share Raw Files?
This is an important question to consider, as I have explained in an earlier blog article “The Polite Response to Clients' Requests for Raw Files”.
In this article I explained why it is generally not advisable for photographers to return Raw files, and I shall not repeat myself again here.
If you decided not to deliver Raw files, as is with my case, you will need a platform that can limit downloads.
So that clients have the authority to view the files but not actually download them.
What Platforms have such Capabilities?
Method I: Pixiset Download Control
On Pixiset, you could either disable downloads all together, or enable download upon entering a passcode.
Either way, you get control over the download activity on your client’s end.
I have also checked that you can’t save the images directly from the display. This is quite a robust safeguard against unauthorised downloads of files uploaded.
Method II: Google Drive View Only Access
It is good old Google Drive - we all know about it. But you might not have noticed that it also offers protected sharing modes.
Google Drive allows you to delegate authority to the people who has access to the files in three tiers, editors, commenters and viewers.
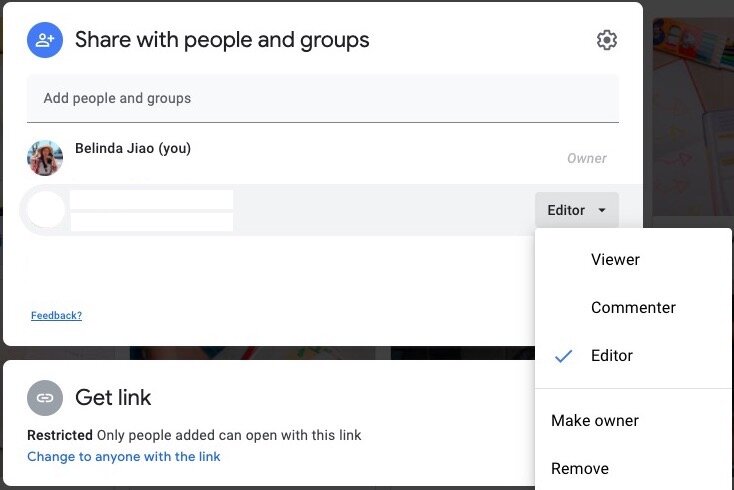
Editors can pretty much do anything they like - they can change the contents in the drive, download the contents, and share it to more people.
Commenters and viewers have relatively less authority, depending on what you allow them to do.
To control what the people sharing the files can do, click on the share button and a window will show up as follows.

Click on the settings button on the top right, and you will be taken to another menu as follows.
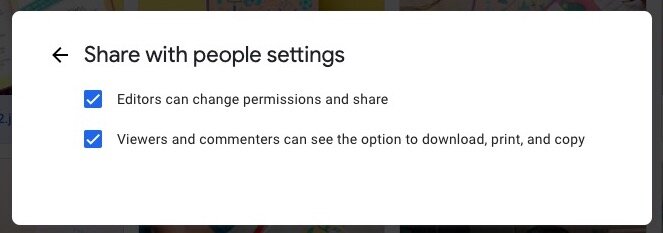
Uncheck the second box to restrict download activity from people who share the photos.
How Many Photos, and at what Size, are you Sending?
Your answer to this question has a bearing on your storage mechanism and thus costs incurred.
Depending on the type of work you shoot, some genres of photography usually involves more retouched files than the others. For instance, weddings, events or e-commerce shoots usually yield way more photos than portrait sessions.
Most platforms impose a limit on the size of files you can store via their infrastructure at a certain given point in time.
That is to say they either impose a limit on the transfer size, or a time limit before the uploads are discarded. Or both.
If you are not returning a huge number of files, this might be less of an issue for you, because you will be able to serve more clients before actually needing to clean up your storage platform.
Also, subject to the agreement between you and your client, the retouched photos will be available for their download for at least a certain period of time. You need a storage system that would host your files for that length of time.
What Platforms have such Capabilities?
Method I: Google Drive
This is arguably the most straightforward way of delivering final photos to clients. You are familiar with it, clients are, people in the creative industry are as well.
This is an obvious perk - to eliminate technical difficulties the clients might experience with a platform he doesn’t know well.
Another perk is that you have the option of creating sub-folders for the purpose of organising various types of shots, or various resolution levels of the shots.
A potential con is that you only get 15GB of free storage. This can be troublesome if you are handling a number of clients simultaneously, each with large storage needs.
An extension of that is the costs incurred. To service your clients adequately, you can consider purchasing extra storage space in form of a monthly subscription. This would in turn require you to review your pricing structure and make sure this expense is covered.
Method II: WeTransfer
WeTransfer is also a commonly used platform among creatives, though less so among outsiders.
Technically, the storage is unlimited. They impose a 2GB per transfer, but you are allowed to make unlimited transfers.
Also, it doesn’t take up storage space under your account. The number of clients you can serve using the platform is unlimited therefore, in theory. Every transfer would yield a download link, that you can send to your clients.
Another special feature for WeTransfer is that, if you opt to have your download link sent directly via email to your clients, you will be notified of their download (in)activity.
You can then take steps to remind them to download the files, if they still haven’t done so; or you can have the peace of mind that the files have been well received by the client, as WeTransfer notifies the uploaded of the download on the receiving end via email.
On the flip side though, there is a time limit of 7 days for each transfer, after which the transfer link would expire.
Your client will then have to download the files within 7 days upon uploading to WeTransfer, or their link will expire and you will have to upload it again. They will also not be able to access the files readily in the future if they want to.
In comparison with Google Drive, there is no capability in organising uploads. All edited files will be sent in one pile, pooled together in the same link.
How many Photos to Deliver to Client?
How many photos do clients really want?
It makes a lot of sense to decide on the number of photos you are returning by considering what clients generally need.
However, this is quite a fruitless investigation in my opinion. Without difficulty, you should see that this number depends on the specific client.
Based on my experience (which is also deducible from common sense), clients want as many photos as they can have.
Though the catch is, you are the one who decides how much they can have, either through specifying the number of shots included in your packages, or in your communication and contracts.
In simple words, how many photos the client expects is not exactly the most relevant question. Of course you should stay in the ballpark, but you should decide for yourself how many photos you are comfortable with providing.
What your client wants from you is essentially what you lead them to reasonably expect from you.
As with many things about running a business, think about it this way - you own a casino, and your clients play at your premises. You have total ownership of this business, and everyone plays according to your rules.
As basic as it sounds, you must therefore figure out what you are capable of providing.
How do the platforms fare against each other?
Method I: Pixiset
Based on my experience, the free version of Pixiset is able to hold around 800 jpgs at a given point in time.
This depends on the resolution you exported your jpgs at. I usually do so at a slight discount on the quality, which should give you a rough idea of how much you will be able to upload.
Method II: Google Drive
Seldom have I reached the limit of the free storage available with Google Drive.
You have 15 GB in total. Assuming that your jpgs are on average 1KB, that would mean you could upload 15 million files before the space runs out.
15 MILLION!
The catch is though, usually there are other things saved on your drive.
But still, Google Drive is still the clear win in terms of the gross amount of storage you get for free.
Method III: WeTransfer
As mentioned, it gives you 2GB of free storage per transfer.
Doing the math, we know that it means around 2 million jpgs per transfer, which is way more than you need as well.
Summary
In this article, we talked about:
What to look for in a photo sharing platform;
Factors to consider before choosing a platform, including whether or not you let clients choose photos, if you deliver raw files, and how many photos are you sharing;
The capabilities of various platforms;
Comparison of the service offerings by these platforms.
More sharing coming soon!
SUBSCRIBE via the box on the left for more PRO tips, and follow me on Instagram (@_bjiao__) and let me know what you think in the comments!
Share this article on Pinterest too!
Keep shooting, keep creating!
The mission of this blog is to provide the best insider information in the photography industry, as openly as possible. You have direct access to my
first-person experience as an aspiring photographer who talks, but also works.
Honest opinion are rarely available as public resources because this is a competitive industry. Huge sums are made when such information is delivered in the form of mentorship and workshops.
This blog is a great way in which I cover my daily expenses, but also provide real value.
If you have learnt something that would be worth at least $10, please consider donating to the page. This enables me to keep creating content and helping more people sustainably.
Your continued support for the blog is appreciated!