Having to shoot at night outdoors with minimal level of available ambient light is a common problem faced by photographers, professional or amateur.
It is especially challenging where the sky darkens early in the afternoon during winters in certain parts of the world.
Shooting on streets also largely means that tripods are seldom applicable, as it adds to the weight of your baggage, which compromises mobility significantly.
In this article, from my experience of shooting action on streets as a press photographer, I will share the common problems that night photos suffer from, namely grain and shake, and offer my two cents on the best practices by myself and fellow professional photographers on how to maintain a high quality of shots at night.
If you find this helpful, SUBSCRIBE to my channel via the box on the left to make the most out of my blog! Also, do share it with people who might be interested. Shoot me an email/ DM to share your thoughts too.
Also, Pin this article to your Night Photography/ Camera & Gear boards in Pinterest if you find it helpful!
Why are my night time photos blurry?
Blurriness in night shots are typically due to motion blur or missed focus. Slower shutter speeds are often used at night, at or even below one’s slowest handheld speed. Moving subjects will most likely cause a blur in this case. The autofocus on cameras tend to lag as it struggles to focus under dim light; the time elapsed results in an out-of-focus shot where moving subjects are involved.
Motion blur at night
Motion blur is characterised by a drag in the image. Though oftentimes subtle, it is sufficient to create an impression of blur.
To identify if it is motion blur that your shots suffer from, zoom all the way into the image to around 200%. If you see parallel streaks or a somewhat faint shadow around the intended object, you can conclude that there was camera shake in relation to the subject.
This is the most evident in specular highlights, defined edges with high contrast. The below are some examples of parts of the image that are the most telling in relation to motion blur.
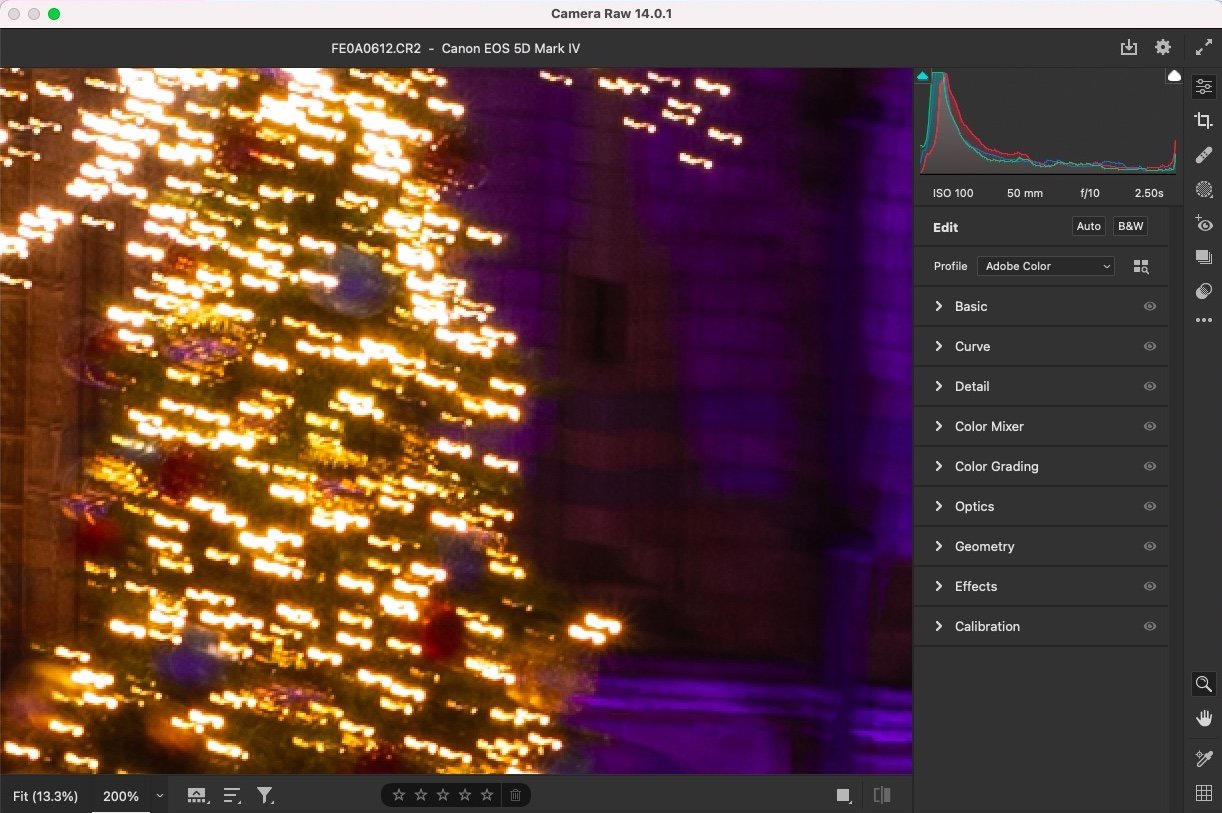
Specular Highlights
This pair of screen captures demonstrate how specular highlights behave when there is shake.
The screen on the left shows the image at normal displaying size, the one on the right 200%.
From the right screen you can obviously tell that there was almost a light painting effect; and because the background was relatively dark, you can identify the shake quite easily.

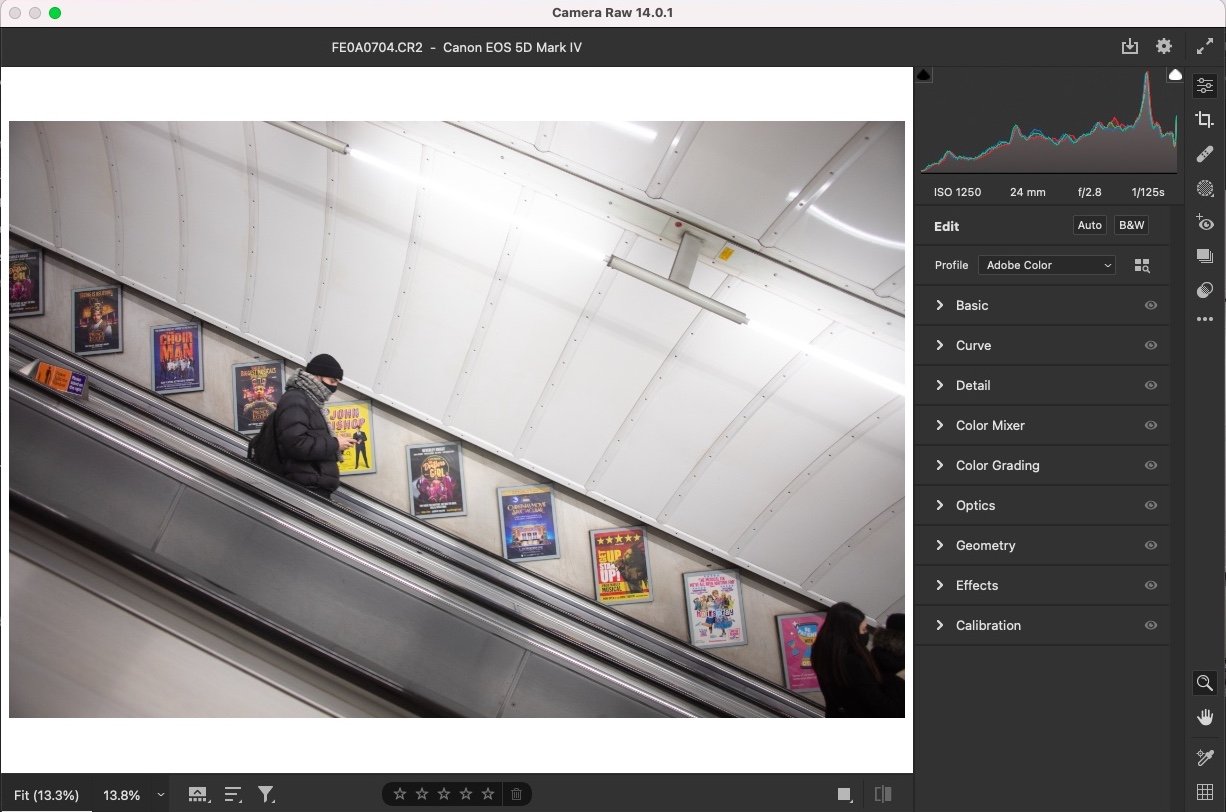
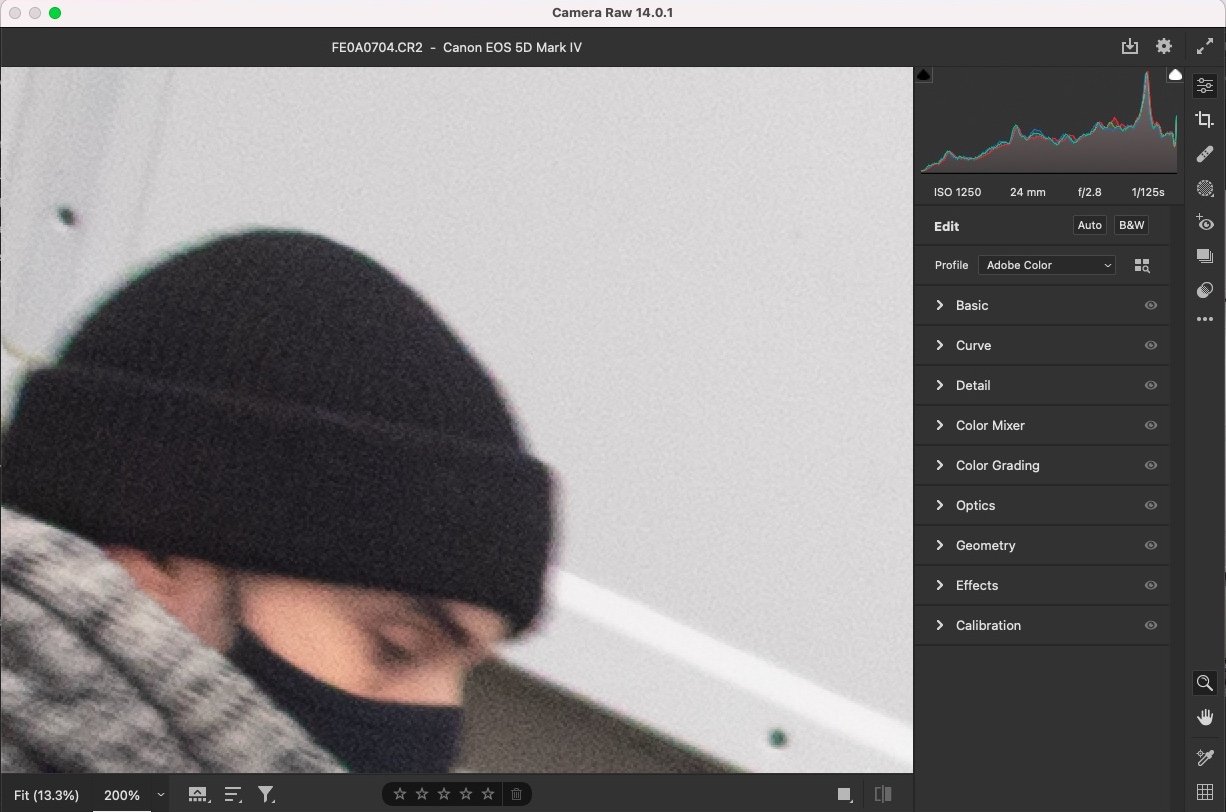
Edges with high contrast
If there are no specular highlights in your shot, look closely at the edges, preferably where black transitions into white.
In the pair below, where motion is frozen, the man’s black hat should be separated from the background white by a clear, distinct line.
The fact that you could see a halo effect around the edge tells you that the blur was caused by motion.
Motion blur becomes visible whenever the subject is moving faster than the shutter speed relative to your camera.
In other words, there are two things contributing to motion blur: 1) the subject’s movement and 2) your hands shaking.
Motion blur - solutions
In relation to the first cause, the only way out is to go for a faster shutter speed that is a match with the rate at which the subject is moving across the frame; the underexposure will have to be mitigated via other compromises.
Typically, to freeze motion for people walking, use a shutter speed of 1/250s or quicker; to freeze motion of any sort of human action, use a shutter speed of 1/400s or above.
In relation to the second cause, that is camera shake, it happens to everyone but improves drastically with intentional practice.
There is a section below entirely dedicated to how to stabilise your hands and lower your minimum handheld speed - it puts you at a massive advantage to be able to shoot say, at 1/50s with manageable shake.
Missed focus at night
If you are on autofocus, which would probably be the case 90% of the time especially where action is involved, the camera does struggle to nail focus depending on how underexposed the scene is.
You can feel the lens shift back and forth more times than usual before it locks focus.
Worse still, sometimes the focus can be apparently off after the struggle.
It is usually less of a problem where the subject is not moving.
It complicates the task of the camera to re-focus as the subject moves, when it probably hasn’t managed to focus on the subject at all.
When you increase the brightness of the frame, this issue eases significantly.
Missed focus - solutions
The solution to this are twofold; you either 1) add light into the scene or 2) bump up exposure or ISO on your camera.
In relation to bringing portable lights with you, refer to the section below on some of the lights best fit for the purpose of lighting up outdoor scenes at night involving motion.
In relation to camera settings, you will have to experiment around and figure out where the best compromise lies on the exposure triangle for you.
It is recommended that you use the lowest shutter speed that you are competent at, which you should always stretch through training (as detailed below), and open up the aperture to the max on your lens.
You then test for the lowest ISO at which the focus speed reverts back to normal.
This will vary from camera to camera, from lens to lens.
Do bear in mind that even at the same ISO, cameras across brands and product lines tend to exhibit different levels of grain.
And at the same aperture, some lenses simply have a better capability to autofocus fast.
How to minimise grain in night shots?
Night shots appear very grainy largely because of using a high ISO in-camera, and excessive editing in post-production. To reduce grain in night shots, ideally bring external lighting and use a fast lens at or below f/2.8; otherwise, go with the lowest ISO that warrants the least amount of editing. You obtain the least grain with correct exposure in-camera and minimal editing.
Maximise in-camera exposure - fast lenses
There are two ways to increase the amount of light that enters the camera, both of which involves gear.
But if you foresee yourself shooting extensively in the night outdoors, they are well worth the investment.
Based on what I’ve seen photographers use in the industry for night shots, the baseline of the max lens aperture is f/2.8.
Many beginner or standard lenses stop down to f/4.0, some zooms can only manage f/5.6 under low light. But these are simply not going to cut it.
At f/2.8, the exposure is one full stop more than at f/4.0, all else being equal.
At f/2.0, the exposure is again one full stop more than at f/2.8.
The difference of two stops amounts to 4 times more light entering the sensor. This is a lot!
Being able to let in 2 more stops of light via widening the aperture spares you from increasing your ISO for two stops.
Better even if your lens opens up to f/1.8, though this is more common for prime lenses; the max aperture on zooms are typically f/2.8.
There is a helpful list of prime and zoom lenses that are widely recognised among working professionals as reliable workhorses for night photography - refer to that section below for detailed listings.
Maximise in-camera exposure - portable lights
Portable lights are a staple in the professional photographer’s camera bag - they are capable of great things when used skilfully.
I myself bring a LED light, which is continuous, as my primary light, and also a hot shoe flash as a backup.
Again for a detailed listing refer to the section below on the best lights for night photography. For now let’s go through the reasons why photographers work with portable lights so much and you can judge for yourself if you need one.
To increase the brightness of an image, there are many things you can do.
But there is a hierarchy - not all tools are born equal.
In my humble opinion, increase exposure > increase ISO > editing.
*Note that ISO is independent from exposure; exposure strictly refers to the amount of light entering the camera sensor, typically increased by opening up aperture, lowering shutter speed and bringing lights. ISO does not have an effect on the amount of light; it only affects the camera sensor’s sensitivity to light.
So as long as it is not too much trouble, I always prioritise adding more light before raising the ISO.
It also saves your photo from weird colour casts which so often plaque nighttime photos. If you solely rely on street lights as illumination, the scene becomes excessively warm; if you rely on city lights and billboards, they come in all sorts of bizarre colours.
Personally, apart from having more batteries to charge the night before, there is no downside to using portable lights at night on streets.
This is the type of look you get by lighting your subject with a LED light, held at the angle with one hand and shot with another.

I held my LED on my left hand, which explains why the light falls off from left to right, and shot with my right hand.
The settings were 1/160s f/2.8 ISO 3200. At the time the scene was pitch black - it was well into night time when I took the photo.
Was it not because of the LED light, which have provided approximately 1-2 stops of light, this shot would have been shot probably at ISO 6400 and handheld at 1/80s, and still probably end up having to lift the image in editing a ton.
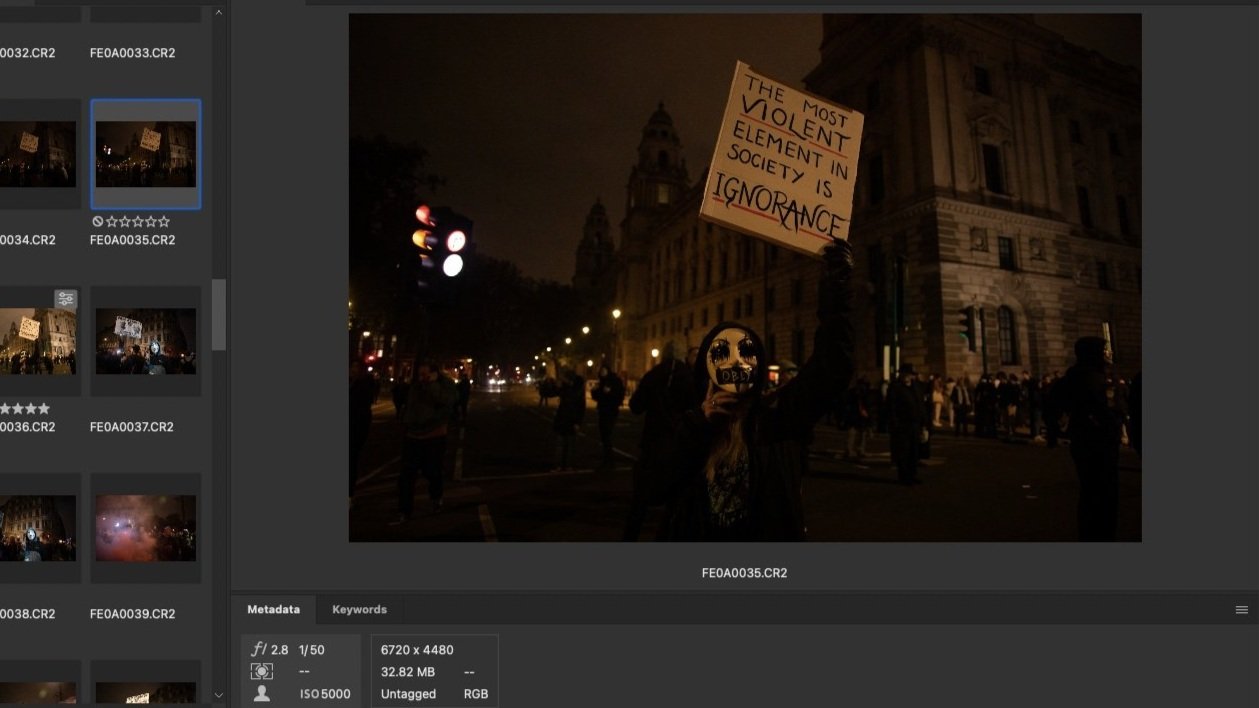
For your information this is a raw image shot under almost complete darkness at night outdoors, on my Canon 5D Mark IV. No lights, no flash, no nothing. Settings are 1/50s f/2.8 ISO 5000, which is basically the furthers I will ever stretch my camera.
Raising the ISO
Dialling up the ISO will increase grain in your night shots. FOR SURE.
ISO, after all, does not actually increase the amount of light entering the camera sensor, but merely increases the camera’s sensitivity to light.
The side effect of this is that the sensor is at the same time made more sensitive to other forms of radiation other than visible light. The sensor then records extra bits that look like grain to us.
But here’s the rub: exposure is a game of compromise. You can’t really have the best of all words, definitely not when shooting at night.
So do not be afraid to raise the ISO. Based on my experience, the tolerance for grain is generally understood to be higher for night time shots in the press photography world.
For instance, here is an image shot at night that went onto CNN business. The image was shot with the camera settings 1/125s f/2.8 ISO 3200.

The same photo was also published on Financial News London.

I feel that there is this stigma against shooting at high ISO which, while certainly justified where there is enough light, can be rather misleading especially at night.
Where light is sufficient, I go by the general wisdom of slightly underexposing to preserve the highlights, and then lift slightly in editing.
This is good advise especially in a not so contrasty scene, because the shadows, though relatively darker than the highlights, are still sufficiently lit.
However at night, the contrast in highlights and shadows is usually very high. You have artificial light sources that are rendered as near-whites, and the rest of the frame as near-blacks because the lights are seldom strong enough to spill over to the shadows.
The more there are shadows in the frame, the more disastrous it is to underexpose.
Regardless of how cameras are marketed for superb performance in high ISO values, they more or less go through the same struggles in low light.
You will get the cleanest image possible by exposing correctly in-camera, without needing to manipulate the brightness in editing.
Minimise editing
With night scenes, I tend to expose the image just right in-camera so that little adjustment is required in post-production.
You can think of images shot with a high ISO as ‘handle-with-care’ items - they are extremely fragile and are on the brink of falling apart. You do not want to do much with them.
But there is seldom a need to manipulate them heavily if the brightness and white balance are set properly when the shot was taken.
The most common adjustments that easily lead to grainy pictures are precisely these two, lifting shadows and correcting white balance.
In the case where the exposure or the white balance was bad and adjustments are needed, take care in limiting the extent of the manipulation.
Let shadows be shadows - not everything needs to be seen. This is true regardless of the time of the day, but more so at night.
Assuming that your goal is to bring the image closes to what you remember seeing, the image does not need that much shadow detail because you probably didn’t see much with your own eyes.
In short, the less editing the better. The process of editing is basically the computer recalculating various values in each pixel based on your instructions.
The more complex these calculations, the more artefacts generated in the process.
How do I take sharp pictures at night?
Ensuring sharpness of night photography involves maximising the amount of light in the scene and improving your hand-holding abilities. Professional photographers working on streets at night typically use lenses that opens up to f/2.8 or more, bring portable lights, most commonly flash or LED, raise ISO generously, and are able to handhold at 1/50s or lower. Knowing your camera and lens well will enable you to strike the best balance in your night photography.
To break down the potential solutions that you could take, which are manifold, the below sub-headings should give you a clear idea of which directions you might want to begin with.
Best lenses for night photography
Nikon 24-70mm f/2.8 S for Mirrorless
Nikon 50mm f/1.8 S for Mirrorless
This is by no means an exhaustive list, because I have only covered lenses designed for full-frame cameras, as you tends to get the most enlargeable/ croppable images on a full-frame sensor as opposed to smaller ones.
You can check out their current market price via the links - they will take you to Amazon.
But if you actually do not own a full-frame and wish to look for lenses specific to a smaller format for the time being, or have a camera of another brand, understand the general rationale behind this list and you can do the conversions yourself.
Tip #1 - All lenses, for reasons explained above, have a maximum aperture of at least f/2.8 on this list. The same apples across smaller format cameras.
Tip #2 - Unless where you are super tight on budget, go for lenses manufactured by the native camera manufacturer.
Many camera brands have other companies make lenses for them, for instance Sony; you see lenses that are made by Zeiss. Lenses made by third-party manufacturers are also widely available on the market, most commonly those from Sigma and Tamron.
Based on my experience it is seldom worth it to opt for non-native lenses to save costs; autofocusing is always the fastest on a lens native to the camera brand. This becomes of critical importance especially with night photography, as we have discussed.
Tip #3 - Most of the lenses recommended above incline towards the wider end of focal lengths. Wider lenses are understood to offer greater margins when handheld.
For one, they are less ‘cropped in’ as compared to longer focal lengths and therefore the same level of shake would be less evident in a wide shot.
For two, they tend to weigh less than longer lenses. The lighter your gear weighs, the more likely you can handhold without shaking.
Tip #4 - The newest does not mean the greatest. In more situations than you’d think likely, the newer versions of a piece of gear is actually of a lesser quality than its predecessors.
Camera manufacturers tend to release a new model every now and then and seem to have endless ‘improvements’ to market. However, while technology can certainly advance in terms of camera gear, many of these ‘upgrades’ are merely compromises, presented in the guise of a new feature.
The Nikon 50mm in the list, for instance, is not the newest lens you can find today in the market. But there is a reason why its preferred in the list over the newer version, the 50mm f/1.8 G - it has better build and ergonomics, but demonstrates noticeably more distortion, heavier, and double the price.
So here what Nikon did was basically come out with a lighter lens that appears to be more user-friendly, at the expense of the quality of the optics of the lens.
This is but one example that demonstrates how with camera gear, it is always give and take; this is something manufacturers wouldn’t openly admit, of course, which I do respect.
Do not be afraid to buy second-hand lenses as well - I’ve seen people do whatever they can to preserve their gear in excellent condition just so they can resale it if they no longer need it.
You can think of it as buying a new piece of gear without paying the premium mark-up imposed by the camera manufacturer.
Depending on the brand and also how recent its launch is, you can find some really good deals in second hand marketplaces. Prepared to be surprised!
Places with good lighting for pictures at night
Photographers commonly make use of the available lights in the environment, typically street lamps, billboards and storefront lights. You either place your subjects close to these sources, or wait for them to walk near and shoot when they are sufficiently illuminated. The advantage of doing so at night is that this allows for a lower ISO as these lights can often amount to up to 2-3 stops of light, and are readily available. The downside is that they can cause colour casts and allows a limited level of control as to the nature of the light.
Street lamps - if you live in a sufficiently populated neighbourhood there will surely be street lamps around you. When using it as a supplementary light source, look out for the white balance on your camera; make sure it is adjusted properly to offset the yellow cast or else you will have a hard time correcting it in editing.
Billboards - more commonly found in busy metropolis. They often make quite a decent light source - they are huge, powerful and typically hits from above. This make them a good quality light though they can be hard to come by; they usually flash, so you will have to work with timing your shots. Similarly with street lamps, look out for bizarre colours as often is the case and compensate for it with your in-camera white balance.
Storefront lights - these are convenient light sources in modern cities. Store signs, display windows are almost always on regardless of whether the stores are open. They are usually of neutral colours, with the exception of brands that light their stores with exotic colours as part of branding.
Best light for night photography
A light fit for night photography would ideally by portable, light and powerful enough. They can be broadly categorised into hot-shoe flashes and LED lights, the former a flash, the latter continuous. Flashes generally are brighter and their batteries drain less quickly; LEDs are softer, exhausts batteries sooner, but doesn’t impose limitations on shutter speed.
I have seen fellow colleagues use both flashes and continuous lights; both are perfectly workable solutions.
Which one to get is usually a matter of personal preference, other potential usage and budget. The below are the pros and cons of flashes vs continuous lights briefly listed:
Generally, flashes are more powerful than continuous lights given the same amount of electricity consumed. On a flash, all the available power is pooled towards the split seconds during which light is produced, whereas on a continuous light, power is constantly consumed every second it is turned on.
However, flashes take time to recharge, typically around the 3s mark. Some take longer, up to 5s based on what I’ve seen, and newer flashes could take as little as 0.1s. Continuous lights does not impose such an issue.
Flashes mostly run on AA batteries, whereas continuous lights are mostly charged via a USB connection.
Continuous lights do come with the capability to alter the colour via the RGB channels depending on the model whereas flashes typically come with limited room for colour manipulation.
Continuous lights can be used at any angle, on or off axis with the camera; to take a flash off the camera, you will need transmitters and receivers.
Hot-shoe flashes
This first list include flashes produced by the respective camera manufacturers.
Canon Speedlite 430EX III-RT Flash - mid-range in terms of price but has all that you need for street work.
Nikon Speedlight SB-5000 - the only among the Nikon product line in the market today that would be versatile enough to cover street photography
Sony HVL-F60RM2 - the only Sony flash on the market today that would be bright enough to cover streets at night
However, many photographers have preferred to go with third-party flash lights. For one, they usually come at a lower price.
Secondly, many have come with designs that substitute the AA batteries with a Lion battery. At the moment of writing this I thought of quickly show you my desk - it should sufficiently demonstrate my point.
I have been using flashes that take 4 AA batteries and as a result, everywhere I look - on my desk, in my bag, in my bookshelves - there are a bunch of AA batteries that may or may not have been exhausted.

This is but a fraction of the chaos, I tell you. It is not realistic to always be neat in classifying the batteries at the heat of moment, but that leaves you an impossible puzzle to solve.
So the Lion battery solution provided by the third party manufacturer would indeed be appreciated.
Finally, one consideration that you will need to make, especially if you are buying your first few lights, is that you are not just buying into one light, but an entire system.
It is the wisest financially to invest in the same lighting system, in which your lights can talk to each other.
In this regard, Godox is the clear winner among third-party manufacturers. As such, find below a list of recommended Godox speed lights:
All kits include the batteries with the price. If you do the math, not only have you saved hundred of dollars on the flash head itself; you have saved yourself the cost of buying pack after pack of AA batteries and needless to say, the hassle of regularly stocking up on these.
LED lights
This is the LED light that I personally use, the Phottix M200R RBG light. It is basically the size of an iPhone 13, and comes with a little stand pictured below.

I use it both as a light and as an external charger for my phone.
It can produce light of any colour as long as it can be represented by RGB values, which basically means any colour.
Based on my experience I can go out with certainty that the light will last 2h on max power - and it’s bright, very.
Training more steady hands for night photography
Having steady hands puts you at a massive advantage, especially when it comes to night photography outdoors. The more you can lower the shutter speed, the less you need to raise the ISO, the better your image quality. To get more steady hands, learn to borrow support by leaning on stable structures, place your camera and arms up against your body, checking your shots, and of course, loads of practice.
Most beginners should be able to hold the camera at (or around) 1/125s. YMMV, but this is the ballpark.
More experienced shooters should be able to handhold at 1/80s no problems, whereas most professionals and myself are more than comfortable to handhold at 1/50s where necessary.
I have also seen people handhold at 1/30s, though speaking from experience this is seldom required if your lens stops down to f/2.8; the risk of blurry shots also massively outweighs the slight increase in exposure at this point.
So now that you know what the industry standards are roughly like, here are a few tips that I myself adopt and how you could make it work for you.
Leaning on stable structures
This is perhaps the most effective hack. Especially if you are shooting on a windy night, leaning on a fixed structure is likely your best bet.
Examples of these include light poles, walls, fences, you name it. Or you could sit on stairs if you see any around.
I would recommend looking for structures that you could lean on the first thing you find yourself in a situation where lighting is bad and that you have to lower the shutter speed.
Even a person with extremely steady hands will develop fatigue after making a multitude of exposures consecutively. Your stamina will start declining and it will only go down as you hold your camera at the same position.
Having found a stable object that you can lend support from, you can know with certainty that your shot will turn out fine as long as your wrists are steady, which is a much easier problem to solve as opposed to ensuring your entire body is steady.
Pressing your camera and arms against your body
As trivial as this seems, it is something we often forget when shooting in the field. It also does way more than you’d realise.
What I often find myself doing is that I place the camera on my cheeks as I look into the viewfinder, with my elbows raised arbitrarily to an open position, away from my torso.
This posture does not provide the best stability to the camera because impeccable control is required of your upper arm muscles, which are not the strongest muscles you have.
The better way of doing it is to firstly place the camera on your cheeks.
What if you usually use the LED screen/ live mode? You’d ask.
Just don’t. By placing the camera away from your body, the overall stability of your posture decreases.
Secondly, tuck your elbows in so that they are supported by your abs. This is a crucial point because now you are concentrating your weight towards the centre as much as possible, and also not tiring your upper-arm muscles out.
Practicing and checking shots
Needless to say, it takes time for strength and muscle memory to build up.
And in many situations, it is a little hit or miss. Some days you can do 1/80s, some days you find there to be shake.
It is about pushing your limits as you slowly expand the range of shutter speeds that you can do.
Whenever time allows, always check your shots in-camera by zooming in. Shots often look decently clean when seen as displayed by the camera screen from a distance; it gets much less rosy when looked at closer up.
There has been quite a few occasions in which I did not retake shots while I still had the chance, thinking that the ones I took were alright.
Of course, they weren’t, and I only found out when I got home.
As a result, the shots I got were basically useless, and I also missed shots that I would not have missed had I checked.
A lot of testing
The above should give you a decent idea as to why shooting sharp photos at night takes a lot of testing - because there are many variables.
Most notably your slowest handheld shutter speed and how well your camera handles high ISO values.
Do note that the ISO reading does not necessarily correspond to the same level of noise across cameras; you would be safe to assume that each model handles noise slightly differently. You will have to test out what level of noise is acceptable for you, which tells you the max ISO you should shoot at.
Other things you typically should test out is your workflow of bringing in external lights, whether the extra weight and complexity is offset by the increase in your image quality.
Based on a series of tests I have gone through myself, I find it best to hold a LED light on my left hand and shoot with the right, for the following reasons:
I need to be able to quickly change the angle of the light as I shoot a lot of protests/ news events. Having a flash mounted on top of the camera hot shoe will not cut it.
I am familiar with the controls on my camera and am confident that I can handle it on one hand.
I also shoot video depending on the occasion and therefore will need continuous lights.
If you find it hard to figure out what works for you, leave a comment below and I’ll get back to you whenever I can.
Summary
In this article we talked about:
Why your night time photos are blurry;
How to minimise grain in night shots;
How to take sharp pictures at night;
Best lenses for night photography;
Places with good lighting for pictures at night;
Best light for night photography; and
Training more steady hands for night photography.
SUBSCRIBE via the box on the left for more PRO tips, and follow me on Instagram (@_bjiao__) and let me know what you think in the comments!
Share this article on Pinterest too!
Keep shooting, keep creating!
The mission of this blog is to provide the best insider information in the photography industry, as openly as possible. You have direct access to my
first-person experience as an aspiring photographer who talks, but also works.
Honest opinion are rarely available as public resources because this is a competitive industry. Huge sums are made when such information is delivered in the form of mentorship and workshops.
This blog is a great way in which I cover my daily expenses, but also provide real value.
If you have learnt something that would be worth at least $10, please consider donating to the page. This enables me to keep creating content and helping more people sustainably.
Your continued support for the blog is appreciated!