Film grain is an inherent characteristic of film photography. Some are absolutely obsessed, some detest it. You might sit somewhere in between.
But it has always been somewhat a myth.
Without getting overtly technical, this article walks you through the basic mechanism behind film grain, so that you can make the right decisions to achieve the look that you like in your work.
If you find this helpful, SUBSCRIBE to my channel via the box on the left to make the most out of my blog! Also, do share it with people who might be interested. Shoot me an email/ DM to share your thoughts too.
Also, Pin this article to your Film Photography boards in Pinterest if you find it helpful!
What is film grain? What does film grain look like?
The ‘film grain’ that you see in film photos are in fact the gaps between clumps of grains. You don’t see the film grain itself, nor the individual grain. Film grains are silver halide crystals embedded in the emulsion layer, which develop into silver if exposed to light. Silver crystals clump together to form clusters. When light is shone through the clusters, we perceive the appearance of grain.
Technically, we can’t see grains with our bare eyes; each grain is a silver particle. Grain particles make up clusters of various sizes. The larger clumps is what the human eye is able to see as ‘grain’.
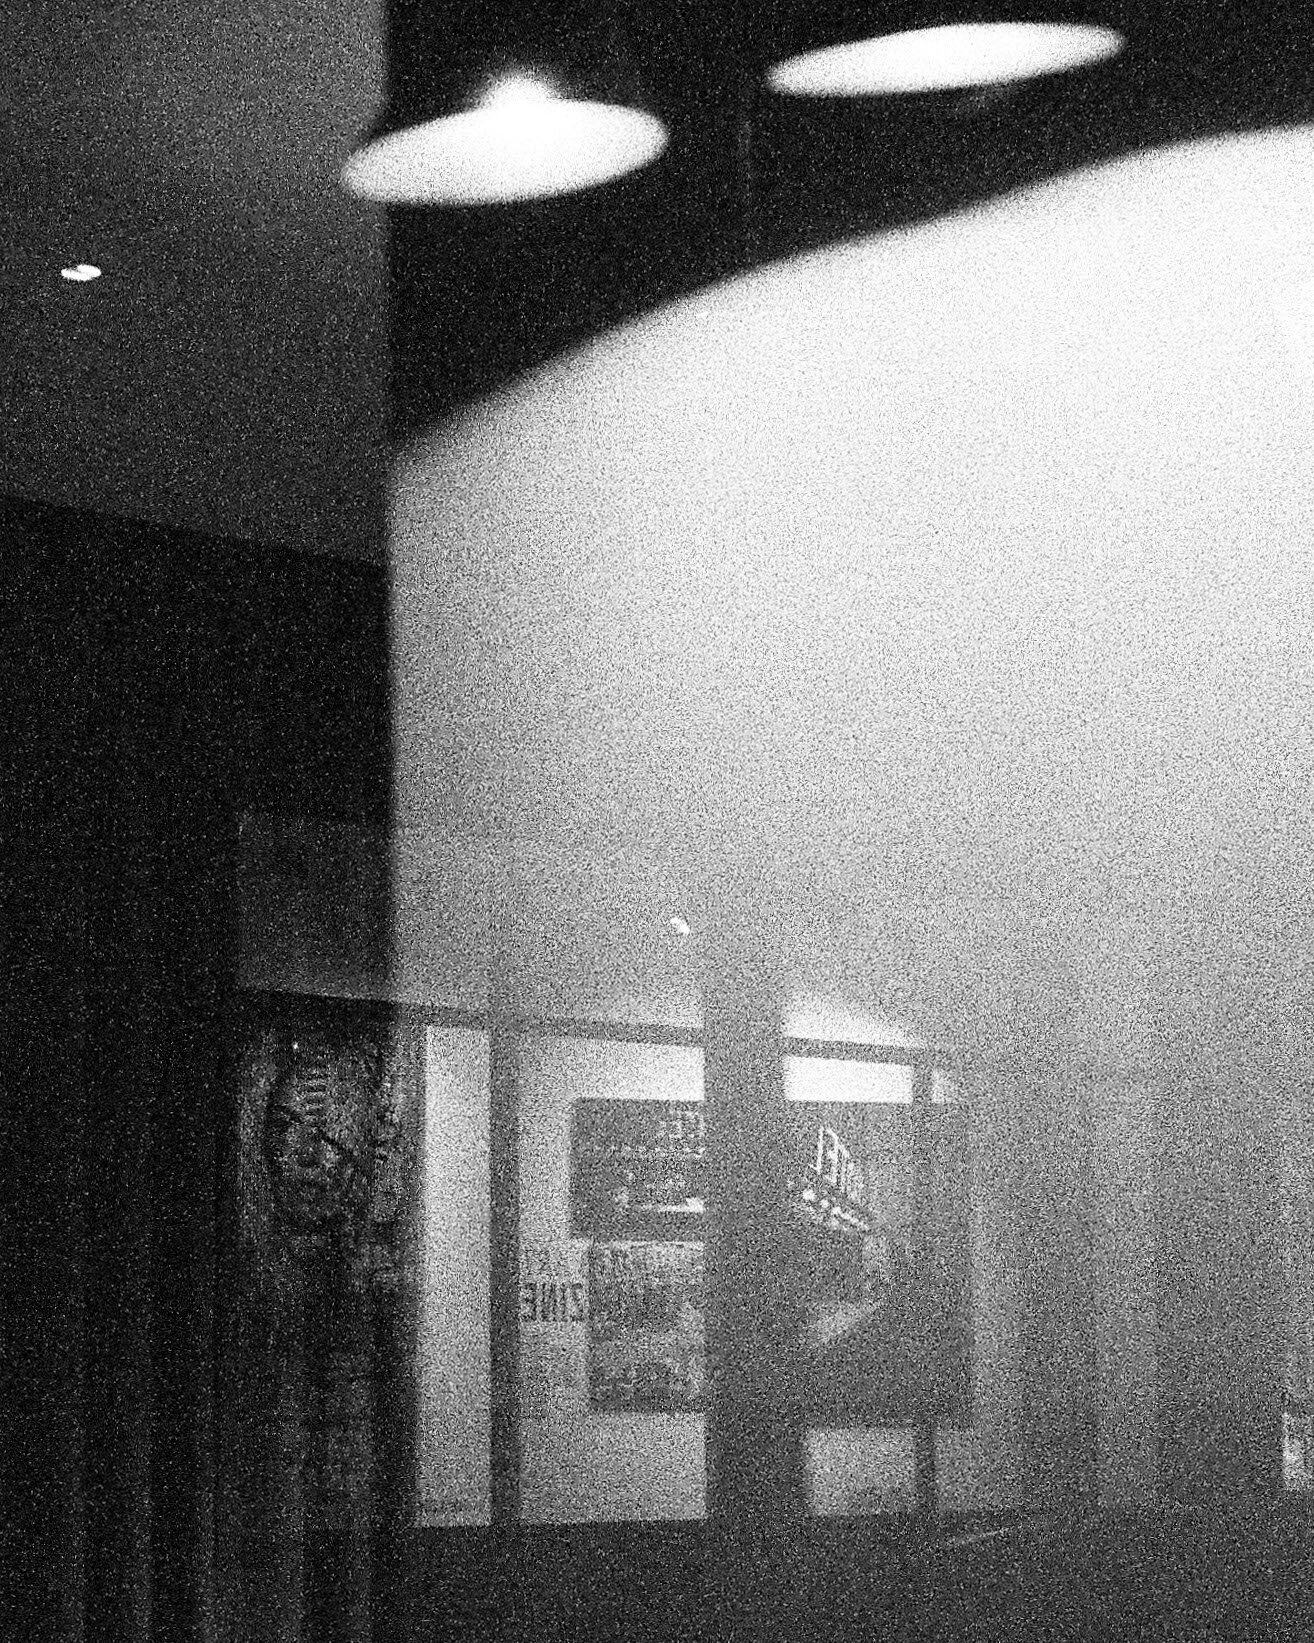
See this image below for an example of what we understand to be grain.
It is the randomly scattered texture formed by alternate areas of whites and blacks.
Also do bear in mind that the appearance of the granular structure that you see in a film scan is in fact the negative of what is on the negative.
Therefore to be precise, we are seeing the space between the grain clusters, but our brain automatically extrapolates that into the impression of grain.
If you want to take a closer look at grain, zoom into the shadow areas in a photo. Usually, grain is the most apparent in darker regions of a frame.
What causes grainy film photos?
Grain exists inherently in film photos, but common reasons they appear more accentuated than usual include a high film speed, underexposure, push development, high-grain developers and expired films. In general, larger grain particles give rise to an impression of rougher grain.
In the below sections, we will look at each factor in greater detail and their relation with graininess.
Why is fast film grainy?
Films with fast speeds contain grains that are larger on average in their emulsion layers. Larger grains have a larger area that can potentially catch light, and are therefore more light-sensitive. Less light is required for larger grains to react, which makes exposure possible for faster shutter speeds. The consequence of larger grain particles is a grainier look in resulting photos.
Imagine your film emulsion layer being filled with silver halide grains of various sizes, appearing like circles on a 2-D view. The larger circles represent larger grain, and vice versa.
The larger a circle is, the larger the chance of some light hitting it. Thus, the higher chance that it is triggered to react to become silver. This reaction is what it takes for details to be recorded.
During the development process, unreacted grains are washed off the negative. What you have left are the grains that had been activated by light.
The more grains being washed off, the more gaps there are between grains that remained. The larger these gaps, the greater the impression of grain, as I explained above in relation to what grain really is.
#Bonus
Using a faster film speed does not necessarily mean rougher grain. If you think about it, based on the explanation above, as long as there is enough light to activate all the grains, no grain would fall off during development.
In other words, the perception of graininess can still vary depending on how underexposed a frame is, given the same film stock.
This echoes what we will see below in relation to the effects of underexposure on increased graininess.
Why does underexposure increase graininess?
Silver halide crystals develop into silver if exposed to sufficient light. The reacted crystals adhere to the negative throughout development, while the unreacted ones are washed away. When underexposed, more grains remain unreacted and are then removed from the negative. This creates larger gaps between grains, which creates the visual sensation of more grain.
As we have learnt above, the determining factor of how grainy a photo looks to us is not the grain itself but rather, the space between the grain clusters.
The development process is basically a separation of grains that has been hit by light from ones that have not. The grains that are unreacted, thus washed off, result in empty spaces between those that have reacted.
When we scan/ print the negative, we pass light from below it. The empty gaps allow light in, whereas the reacted grains block light from passing through.
After reversing the whites and blacks, we end up seeing the gaps in black, and the remaining grain in various shades of grey. This combined is what we perceive as a grainy texture.
#Bonus
Here is a catch, for those of you who want to think a little harder.
An underexposed negative can be understood as a frame in which the majority of it has been rendered as darker than intended.
Theoretically, if you do not shine light through the gaps, you don’t see much grain. The entire area will turn out to be pure blacks (almost, anyway).
The key is that you did intend it to be brighter, and therefore would try harder to shine light through the gaps to get back as much detail as you can in your scan.
Therefore, under exposing itself does not necessarily lead to grainier photos. Trying to rescue it during scanning or printing, however, forces more light through the already rough pores, which is why the underexposed bits come out grainier.
If you are happy to leave the underexposed parts on the negative underexposed in the scan, the grain would not be as pronounced.
The grain only becomes more apparent when you try to bring the shadows up to where you intended it to be.
Why does pushing film increase graininess?
Pushing film involves underexposing the film in camera, then developing the film for longer than standard. Grain particles exposed to sufficient light adheres to the negative during development while the rest falls off. The less light that hits, and the longer the film stays in the developer, the more distinct the separation between exposed and unexposed grains. Clumping of grains also lead to a grainier look.
Pushing film is a combination of two things. One, underexposing film. Two, overdeveloping film. The latter compensates for the former.
As discussed above, underexposing film alone, even without extended development, would lead to increased graininess.
But with pushing, you couple the effects of underexposure with overdevelopment.
Developing film is basically a process in which you separate the crystals that have been exposed to light, from those that haven’t. The longer you develop, the more crystals turn into silver and stays on the negative.
Effects of pushing film, specifically overdeveloping film.
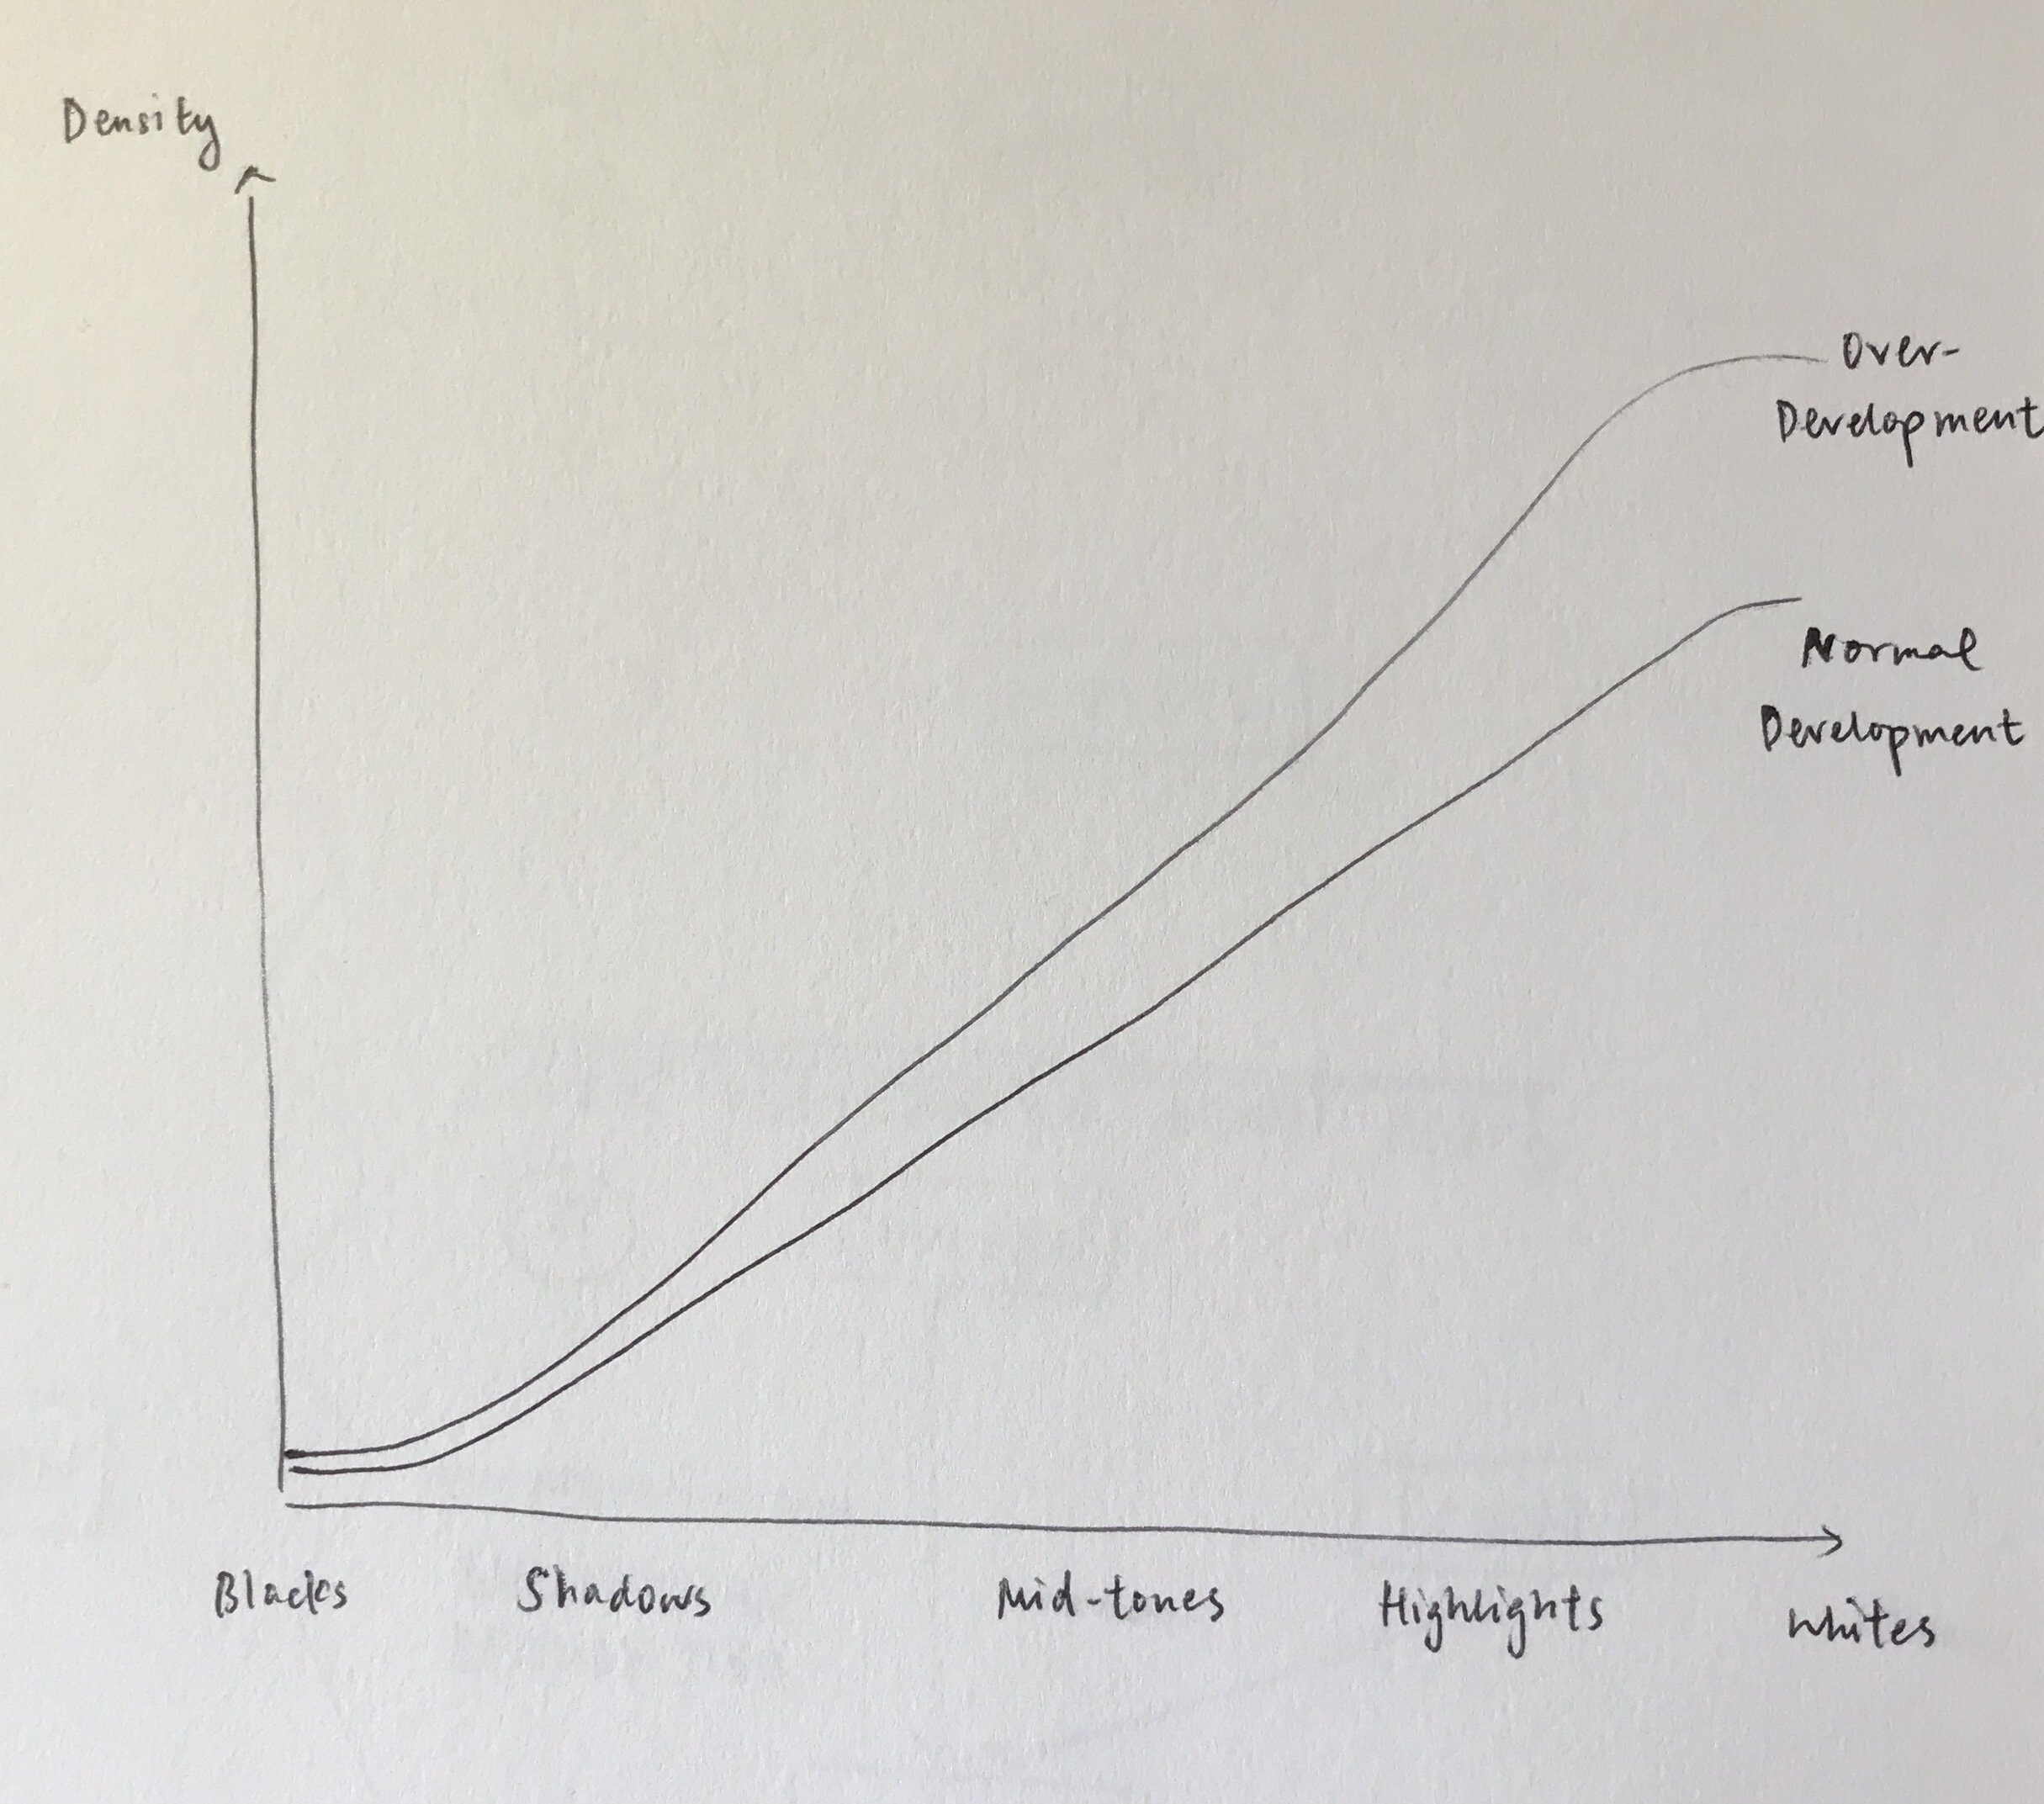
But this does not happen uniformly across highlights and shadows. Refer to the following graph that illustrates the effects of overdeveloping film.
The horizontal axis refers to the various brightness levels on a negative. The vertical refers to the amount of silver on the negative, also known as ‘density’.
The lower line shows the spread of silver crystals across various brightness tiers that would be on a negative that underwent standard development.
The line on top, labelled as ‘over-development’, shows the spread of silver crystals where development times were made longer.
You can tell that the increase in density is not uniform across various brightness levels on the negative. The brighter an area initially is, the greater the increase in its brightness.
The immediate result of this is increased contrast, both local and global. An extension of an increased local contrast is that the grains become more articulate - the bright grains got brighter, thus more clearly separated from the darker areas.
How does developer affect graininess?
Graininess varies with the type of developer used, and the dilution. Developers known to give relatively more distinct grain overall include Rodinal and T-MAX, which are widely available today, and high-acutance developers like FX-1, which are less common. Generally, using a more diluted solution does not affect graininess as long as the development time is adjusted accordingly.
Type of developer
It is hard to spell out a defined group of high-grain developers because the final appearance of grain depends on a myriad of factors, most notably the film stock.
That said, it is quite impossible (nor profitable) to try out every single film-developer combination out there just to study the grain rendition. You can expect subtle differences in most cases.
For slow speed films, say those below ASA 125, the choice of developer does not have a substantial effect on the appearance of grain. Because the grain structure in the film is so fine that even the roughest rendition still looks fine.
For medium speed films and onwards, the developer bears a much more significant role in relation to graininess. Different films react to developers to different extents, but Rodinal (linked to Amazon for latest price) is widely understood to be the go-to developer for a grainy look, across the board.
Kodak ranks their developers, from grainiest to finest, as follows (linked to Amazon for latest price): T-MAX (1:4) —> D-76 (Full strength) —> HC-110 (Dil B) —> XTOL (Full Strength).
Ilford names Ilfotec DD-X, ID-11, and Perceptol as exceptionally fine grain, while the rest of its developers (Ilfotec HC, Ilfotec LC29, Ilfosol S and Microphen) are moderate in this respect.
You can find the full charts here. You can check the prices today on Amazon via the hyperlinks above.
There are developers manufactured to give extra high acutance, known as ‘high acutance’ developers. More well-known examples would be FX-1, manufactured by Photographers' Formulary. These were made with the aim of producing extra sharp negatives, but the rougher grain comes as a by-prodcut.
Dilution of developer
In practice, the dilution does not have a major impact on the grain rendition because the development time will change with the dilution, as a recommended practice at least.
Just look at any dev chart and you will notice that higher dilutions (more diluted) are usually paired with longer development times. The longer times counters the effect of the dilution.
That being said, the case of fine grain developers is an exception. The principle behind fine grain developers is that they dissolve the edges of grain particles to give a smoother look.
They effectively decrease the size of the grain, which results in a loss in detail.
Using a more diluted version of fine grain developers tend to undermine this effect, even with longer development times, to produce sharper negatives.
Why does expired film give more grain?
The grain loses sensitivity to light over time, but the manner in which the crystals deteriorate is not very predictable, especially when not stored under optimal conditions. When shooting expired film, it is highly likely that the effective ISO is way lower than what the photographer thinks it is. This results in underexposure, which produces a grainy look.
The main reason why shooting expired film typically results in more grain has to do with underexposure. This isn’t quite the case with properly stored film, which you can pretty much shoot as if fresh.
Here is a set of sample images made on a roll of Konica XG 100 expired in 1996. It was stored frozen, I rated it at 25 and fired a flash to help the exposure. It had some colour shifts but that’s it.


But when dealing with expired film with unknown history, or even film with known bad history, it is highly likely that you will overestimate its actual ISO the first time you shoot it.
Here is a set of sample images made on a roll of Kodak Gold 200 expired 2001. It was left to expire in open air through 20 humid summers in Hong Kong. I rated it at 50, which was a bad decision. The grain is significantly more.


So underexposure, as explained above, is usually the ultimate reason.
How do you get more grain in film photos?
There are combinations of film stock, exposure and development that would result in more grain. The most straightforward way is to use a high speed film, ideally not fine-grain but standard. Choose a developer that gives the roughest grain with your film of choice, Rodinal can most certainly do the job. If you are down for more advanced mechanisms in value control, try pushing your film.
As we discussed above, there are a handful of factors that would enhance grain in your film photos, and it is just a matter of doing more of those things.
To recap, we have studied the effects of 1) shooting high speed film, 2) underexposure, 3) pushing film, 4) using developers that give distinct grain, and 5) shooting expired film.
Not all of these things are feasible, certainly not all at the same time, in a given scenario. For instance, you are not advised to shoot important commercial jobs/ documentary work with expired film.
Or, it is not economical to buy high speed film in large amounts, nor is paying a lab to push your film every single time.
So you will have to work out a compromise that gives you the grain that you like, within the scope of what is possible for a certain assignment.
Summary
In this article, we talked about:
What is film grain and what it looks like;
What causes grainy photos, namely fast speed films, underexposure, pushing, high-grain developers, and expired films; and
How to get more grain in film photos.
SUBSCRIBE via the box on the left for more PRO tips, and follow me on Instagram (@_bjiao__) and let me know what you think in the comments!
Share this article on Pinterest too!
Keep shooting, keep creating!
The mission of this blog is to provide the best insider information in the photography industry, as openly as possible. You have direct access to my
first-person experience as an aspiring photographer who talks, but also works.
Honest opinion are rarely available as public resources because this is a competitive industry. Huge sums are made when such information is delivered in the form of mentorship and workshops.
This blog is a great way in which I cover my daily expenses, but also provide real value.
If you have learnt something that would be worth at least $10, please consider donating to the page. This enables me to keep creating content and helping more people sustainably.
Your continued support for the blog is appreciated!