A good negative is one that is capable of creating a good print or scan. It contains a rich range of tonalities, decent reflection of grain structure and is free from blemishes. Generally, its tonalities should touch on a majority of zones, as posited by Ansel Adams, from whites to highlights, midtones, shadows, and to the blacks. When handled properly, it should not have scratches, dust, watermarks which can lead to difficulties in printing.
This article is divided into two main sections, 1) on how to read your negatives in relation to the tonalities it contains, and 2) on typical blemishes and damages that can be found on negatives and how to avoid them.
If you find this helpful, SUBSCRIBE to my channel via the box on the left to make the most out of my blog! Also, do share it with people who might be interested. Shoot me an email/ DM to share your thoughts too.
Also, Pin this article to your Film Photography boards in Pinterest if you find it helpful!
Well Balanced Range of Tonalities
Ideally, a good negative can readily produce a wide range of tones in the printing/ scanning process without much manipulation.
That said, I would like to begin by borrowing the concept of the Zone system proposed by Ansel Adam, which explains what a good negative should consist of.
We will then proceed to look at various errors or deviations from the ideal scenario, commonly occurring when developing your own negatives.
The Zone System proposed by Ansel Adams
As put forward by Ansel Adams in his book ‘The Negative’ (which is the 2nd volume of his 3-volume series), film as a photographic medium is able to record varying levels of brightness spanning across 10 stops.
Zone I being complete blacks, Zone V being the middle values, and Zone X being complete whites. Ansel asserts that usually, save for deliberate artistic reasons, you would want the subjects in your frame to touch on a wide range on the scale from I to X which creates a sense of balance in your final print (or scan, as I would add).
Since a negative is a negative of the final image, whites in the final image appear as blacks, and blacks appear as transparency on your negatives.
It follows that you would want to check that your negative spans across various shades of blacks, from absolute blacks to absolute transparency.
This is what the zone system is about in highly simplified words.
How to read your negatives
Hold up the shiny face of the negatives towards yourself. The darker regions on the negative represents the brighter regions in the final image, vice versa. A larger variety in densities indicates a larger variety of brightness values, which means more detail capable of being reflected in the final image. Underexposure translates into a highly transparent negative and vice versa; underdevelopment translates into a flat negative, and overexposure translates into a contrasty negative with potentially a loss of detail in dense regions.
In the following sections, we will address the concept of density of a negative, evaluation of exposure and development, and how to differentiate between exposure and development issues.
What is a dense negative?
Density refers to how much blacks there is on a negative. The more black there is, the denser it is. Alternatively, it can be understood as opacity. Denser areas on negatives transmits less incident light through during printing or scanning. Therefore, density is directly proportional to brightness of the resulting image. Denser areas make up the highlights, and less dense areas make up the shadows.
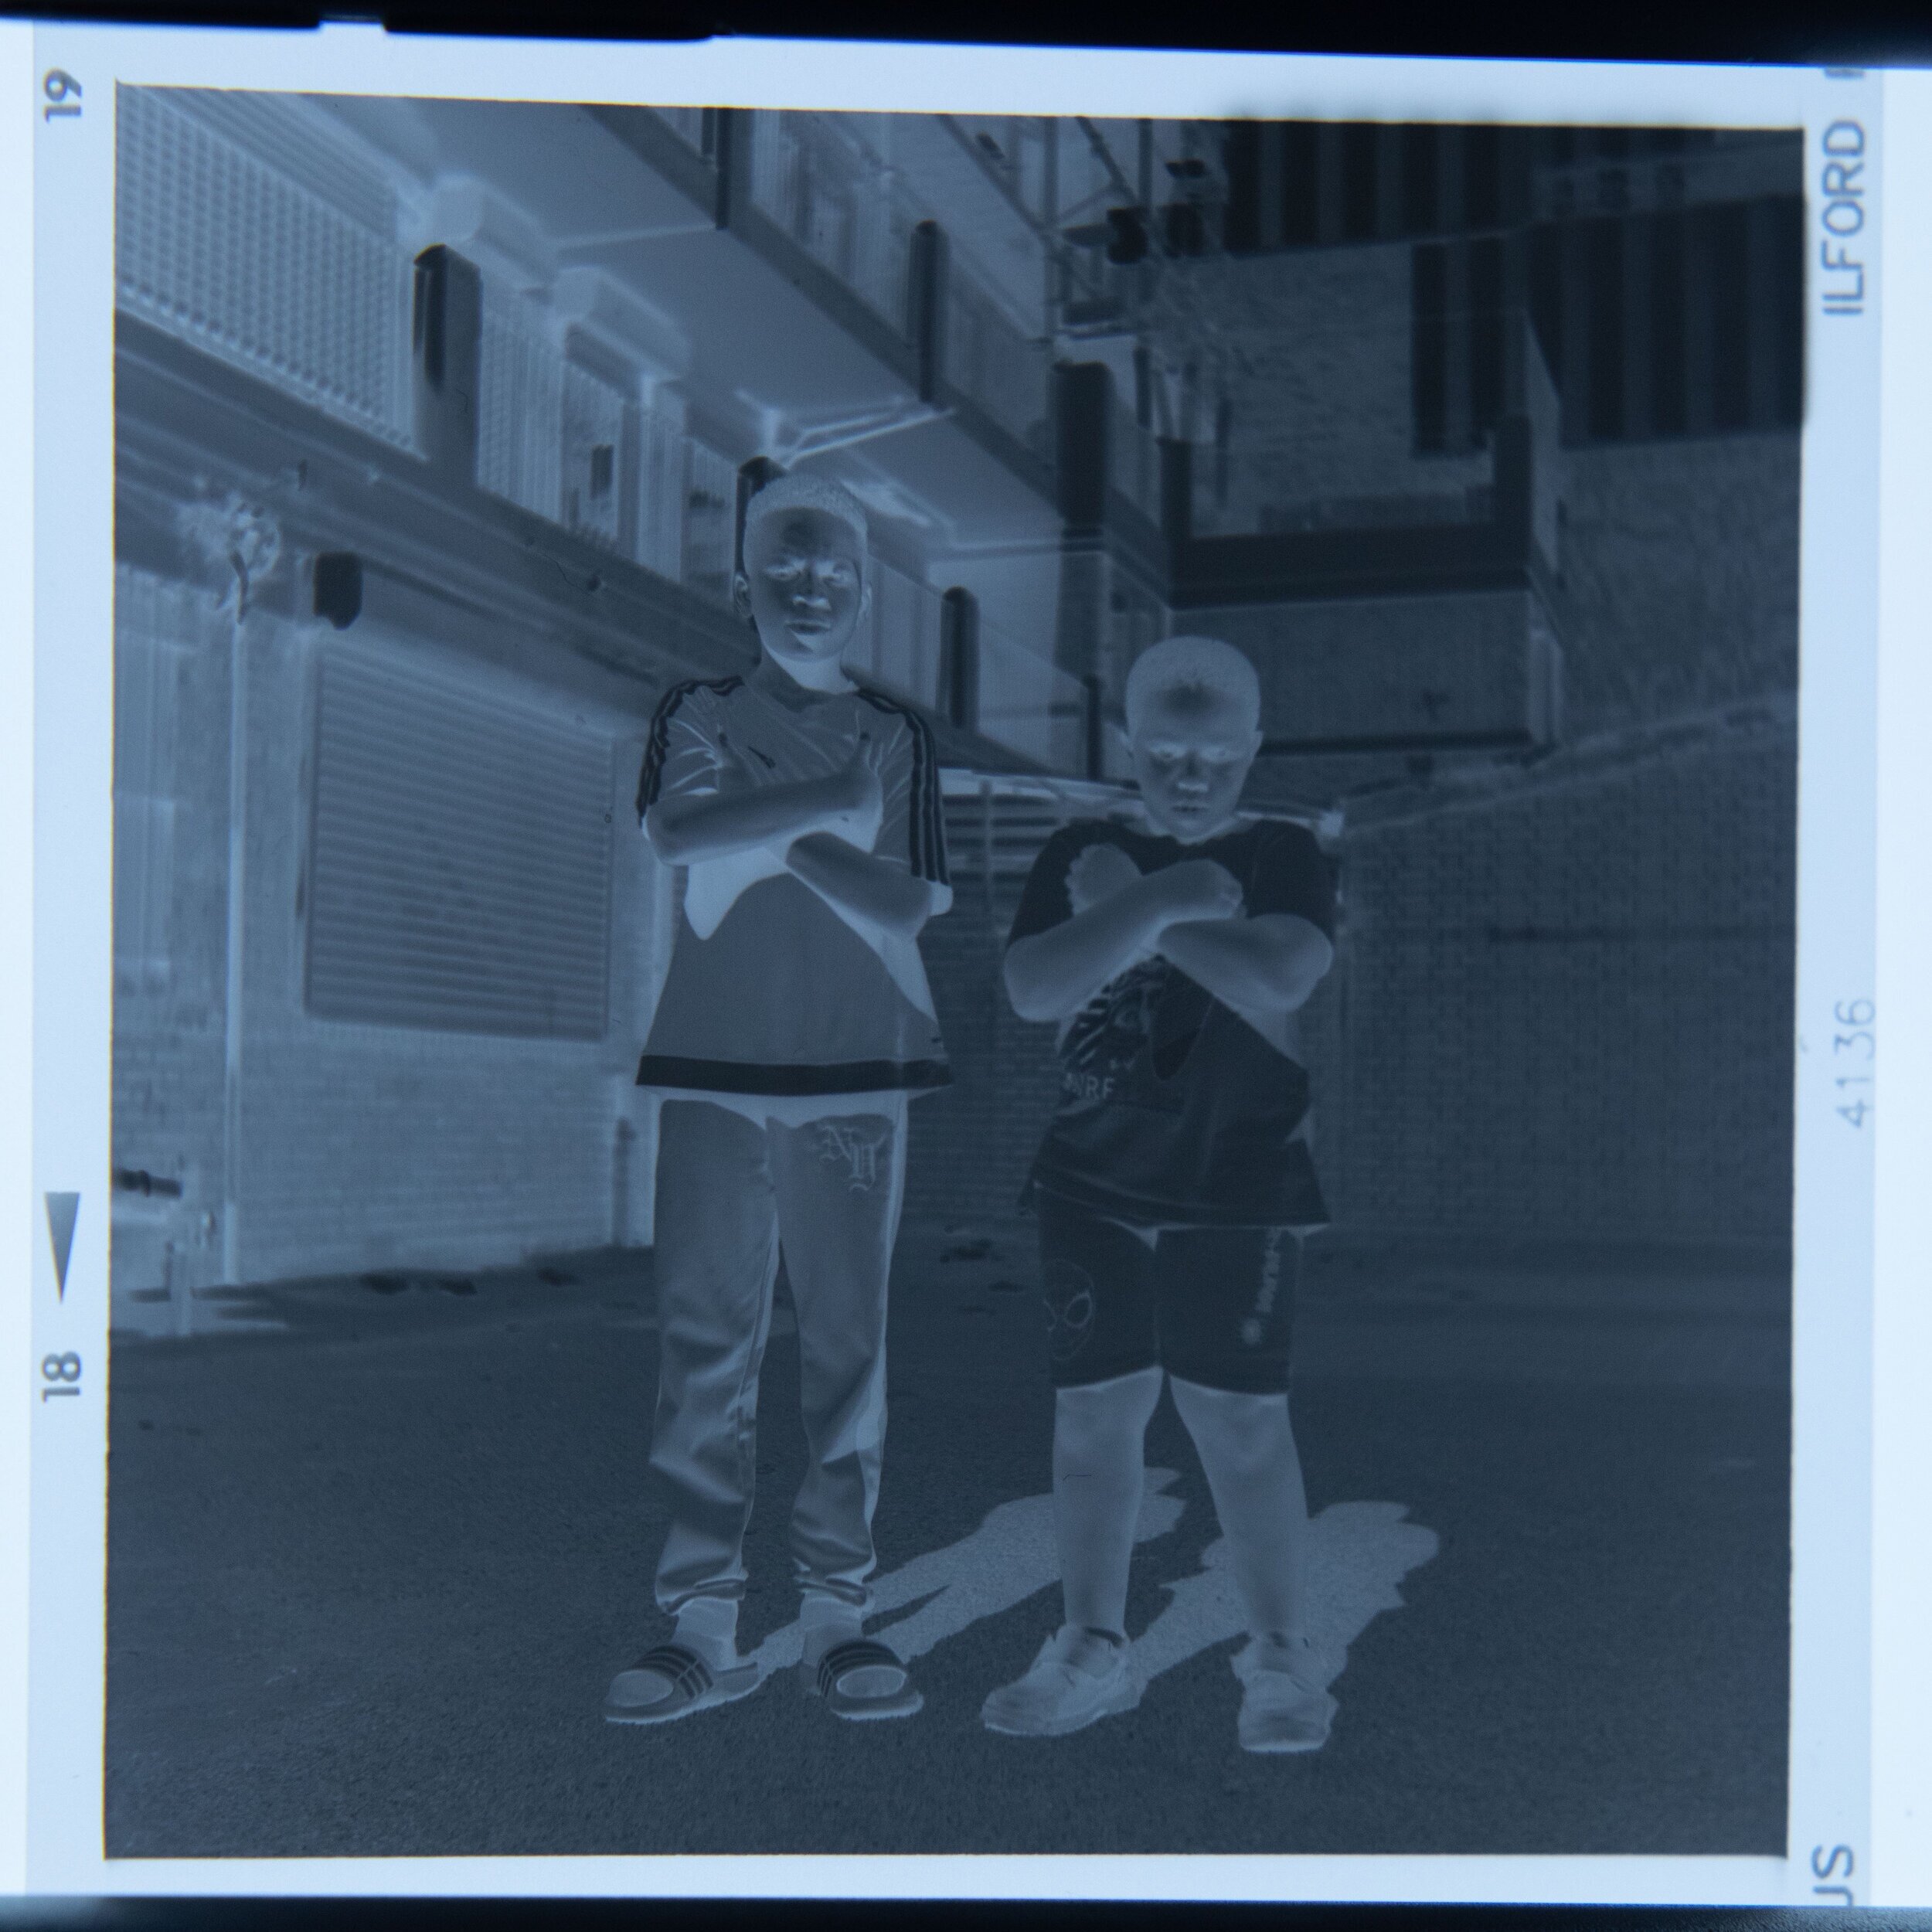
This photo below shows a relatively dense negative - you can see that it is for the most part very dark.
Here is a simplified breakdown of the chronology of what is in fact happening to the film throughout the entire cycle of shooting, to developing and finally through scanning or printing, as extracted from Ansel’s ‘The Negative’.
The science behind photographic film
To begin with, the structure of photographic film consists of a top layer of silver halide crystals suspended in some gelatin, generally referred to as the emulsion.
Once exposed to light, the electrical charge within the silver halide crystals are changed, rendering them reactive to the developer. The extent of this change depends on how much light has reached a particular crystal, which is what enables a varying level of brightness to be rendered in the image. After the exposure, a latent image is formed in the film.
The film then goes through the development process, during which it comes into contact with chemicals including developer, stopper and fixer. Without getting into too much technicality, the reactive silver halide crystals reacts with the developer and becomes metal silver, whilst the unreacted crystals get washed away.
The resulting black areas we see are therefore metallic silver, whereas transparent areas are a result of unexposed crystals being washed away.
This is how the concept of density is derived - we are in fact referring to the density of metallic silver deposited in the negative.
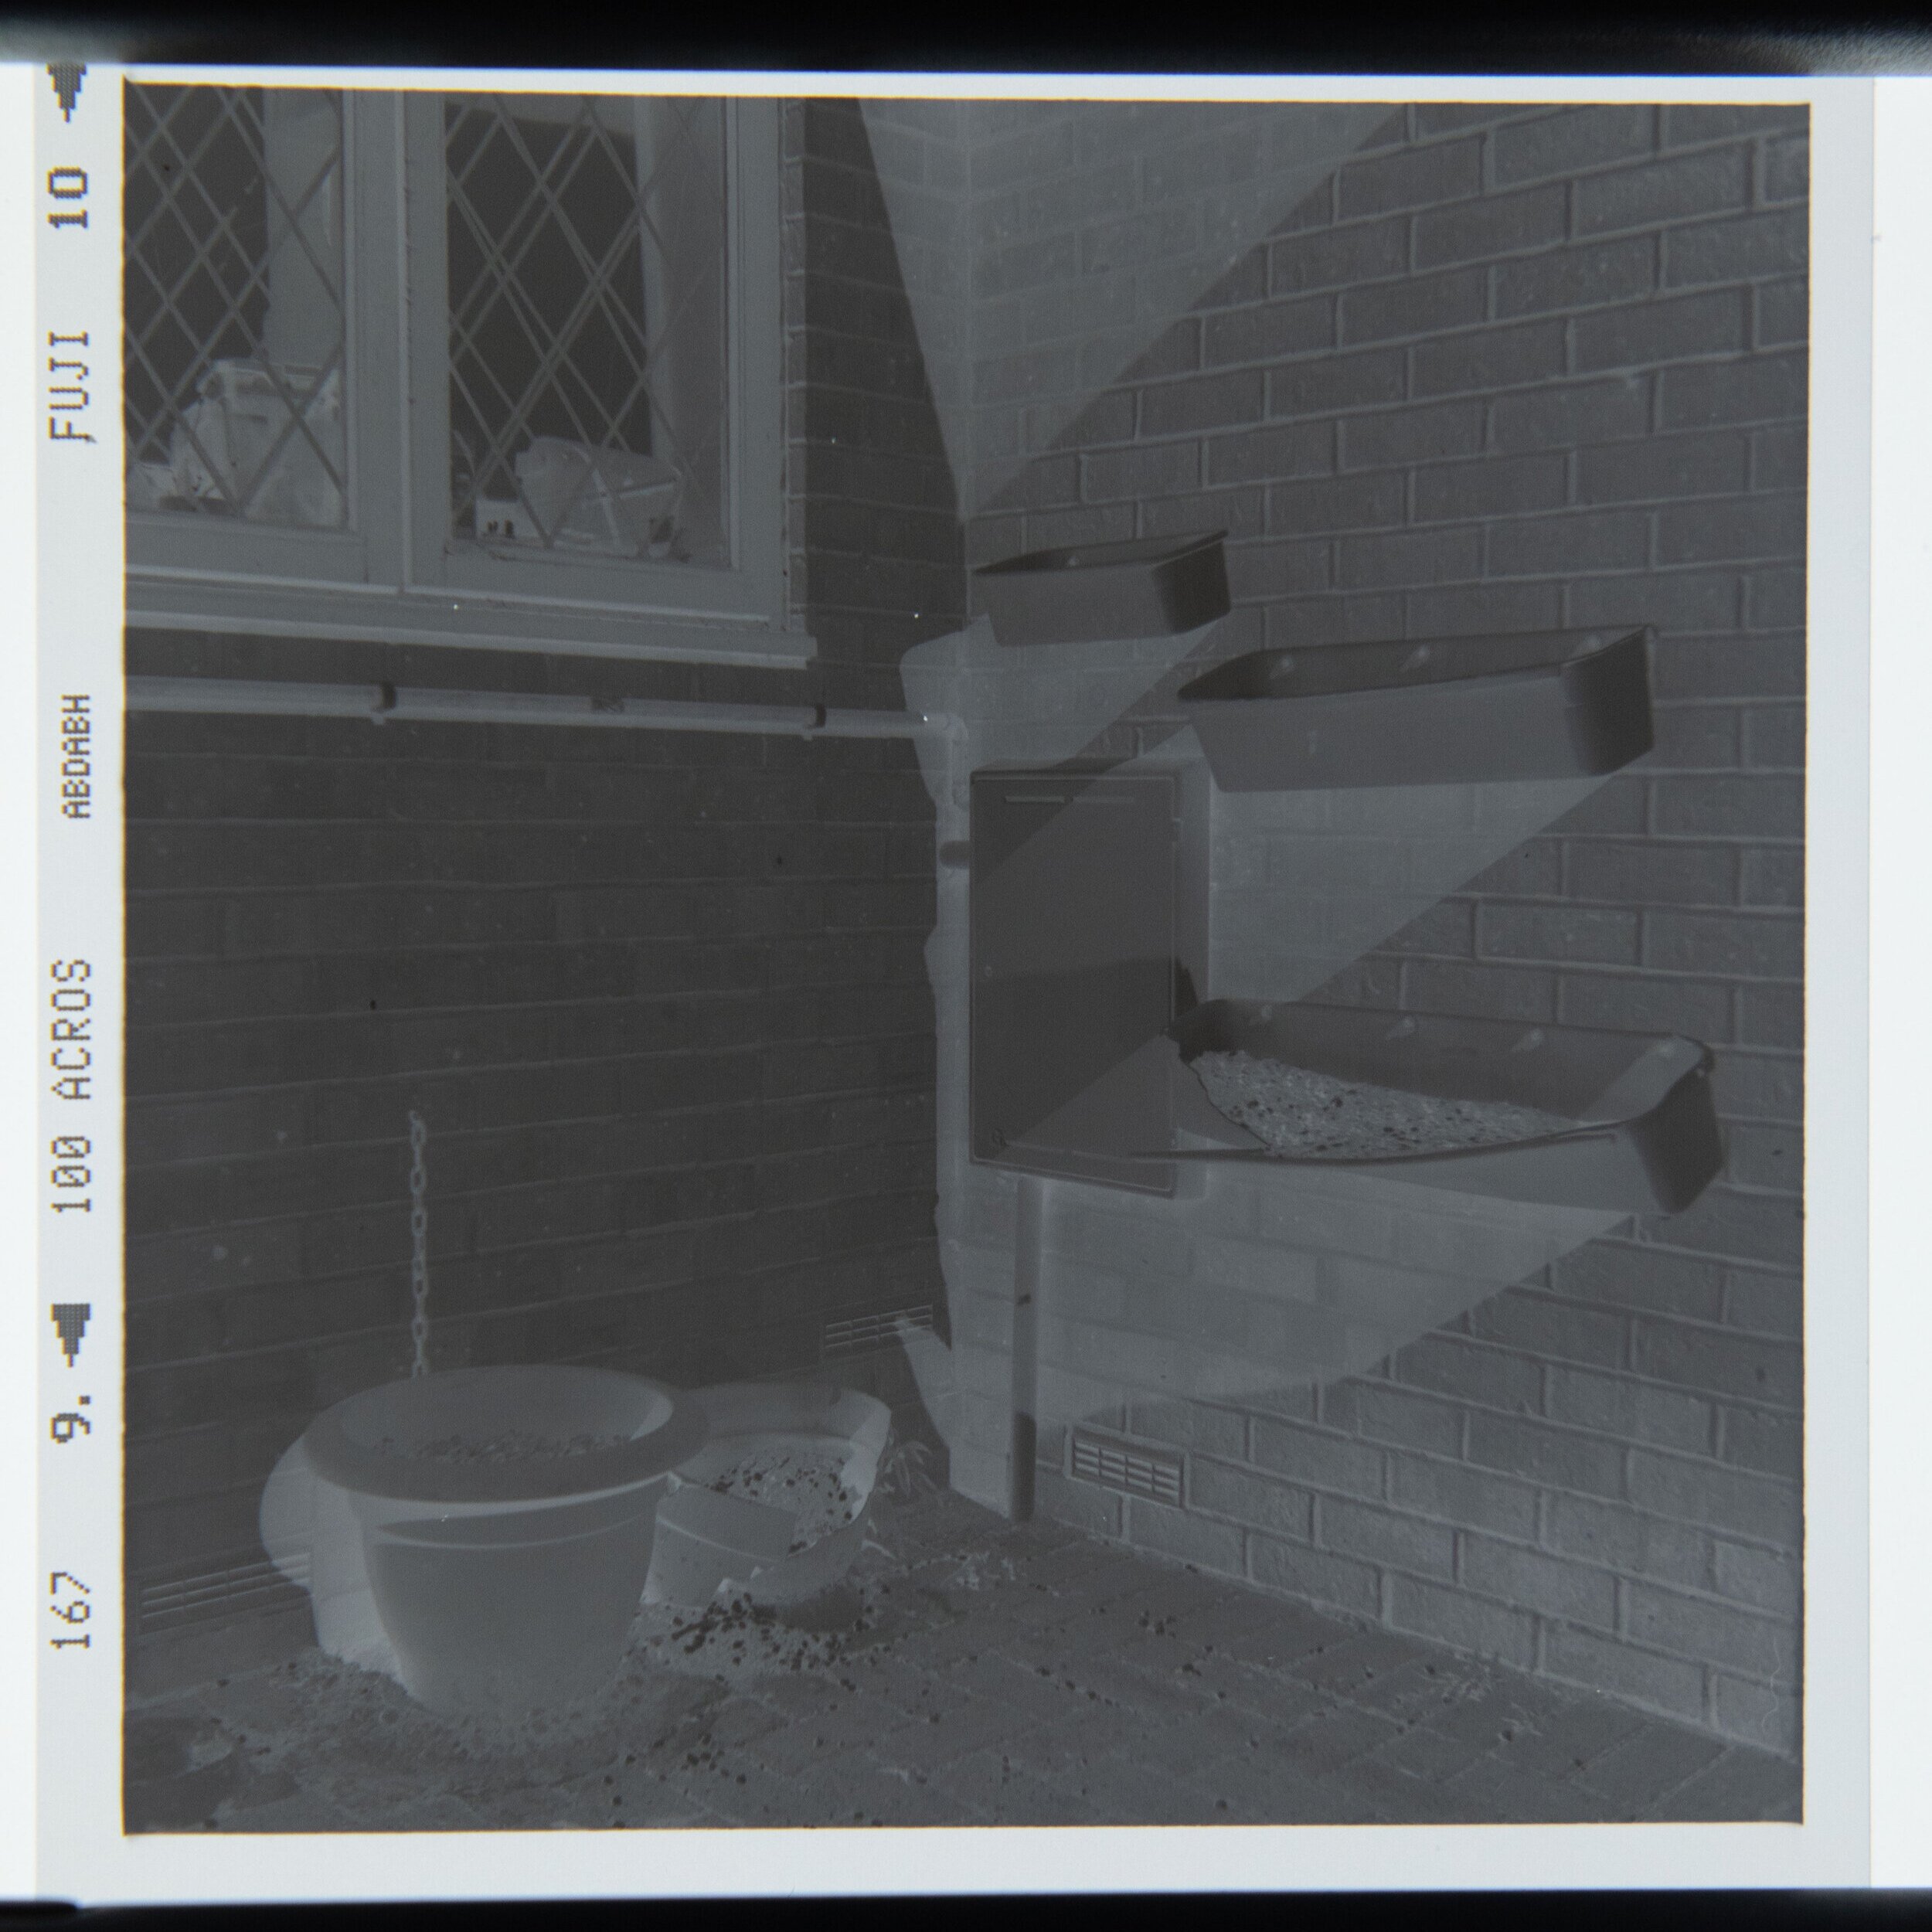
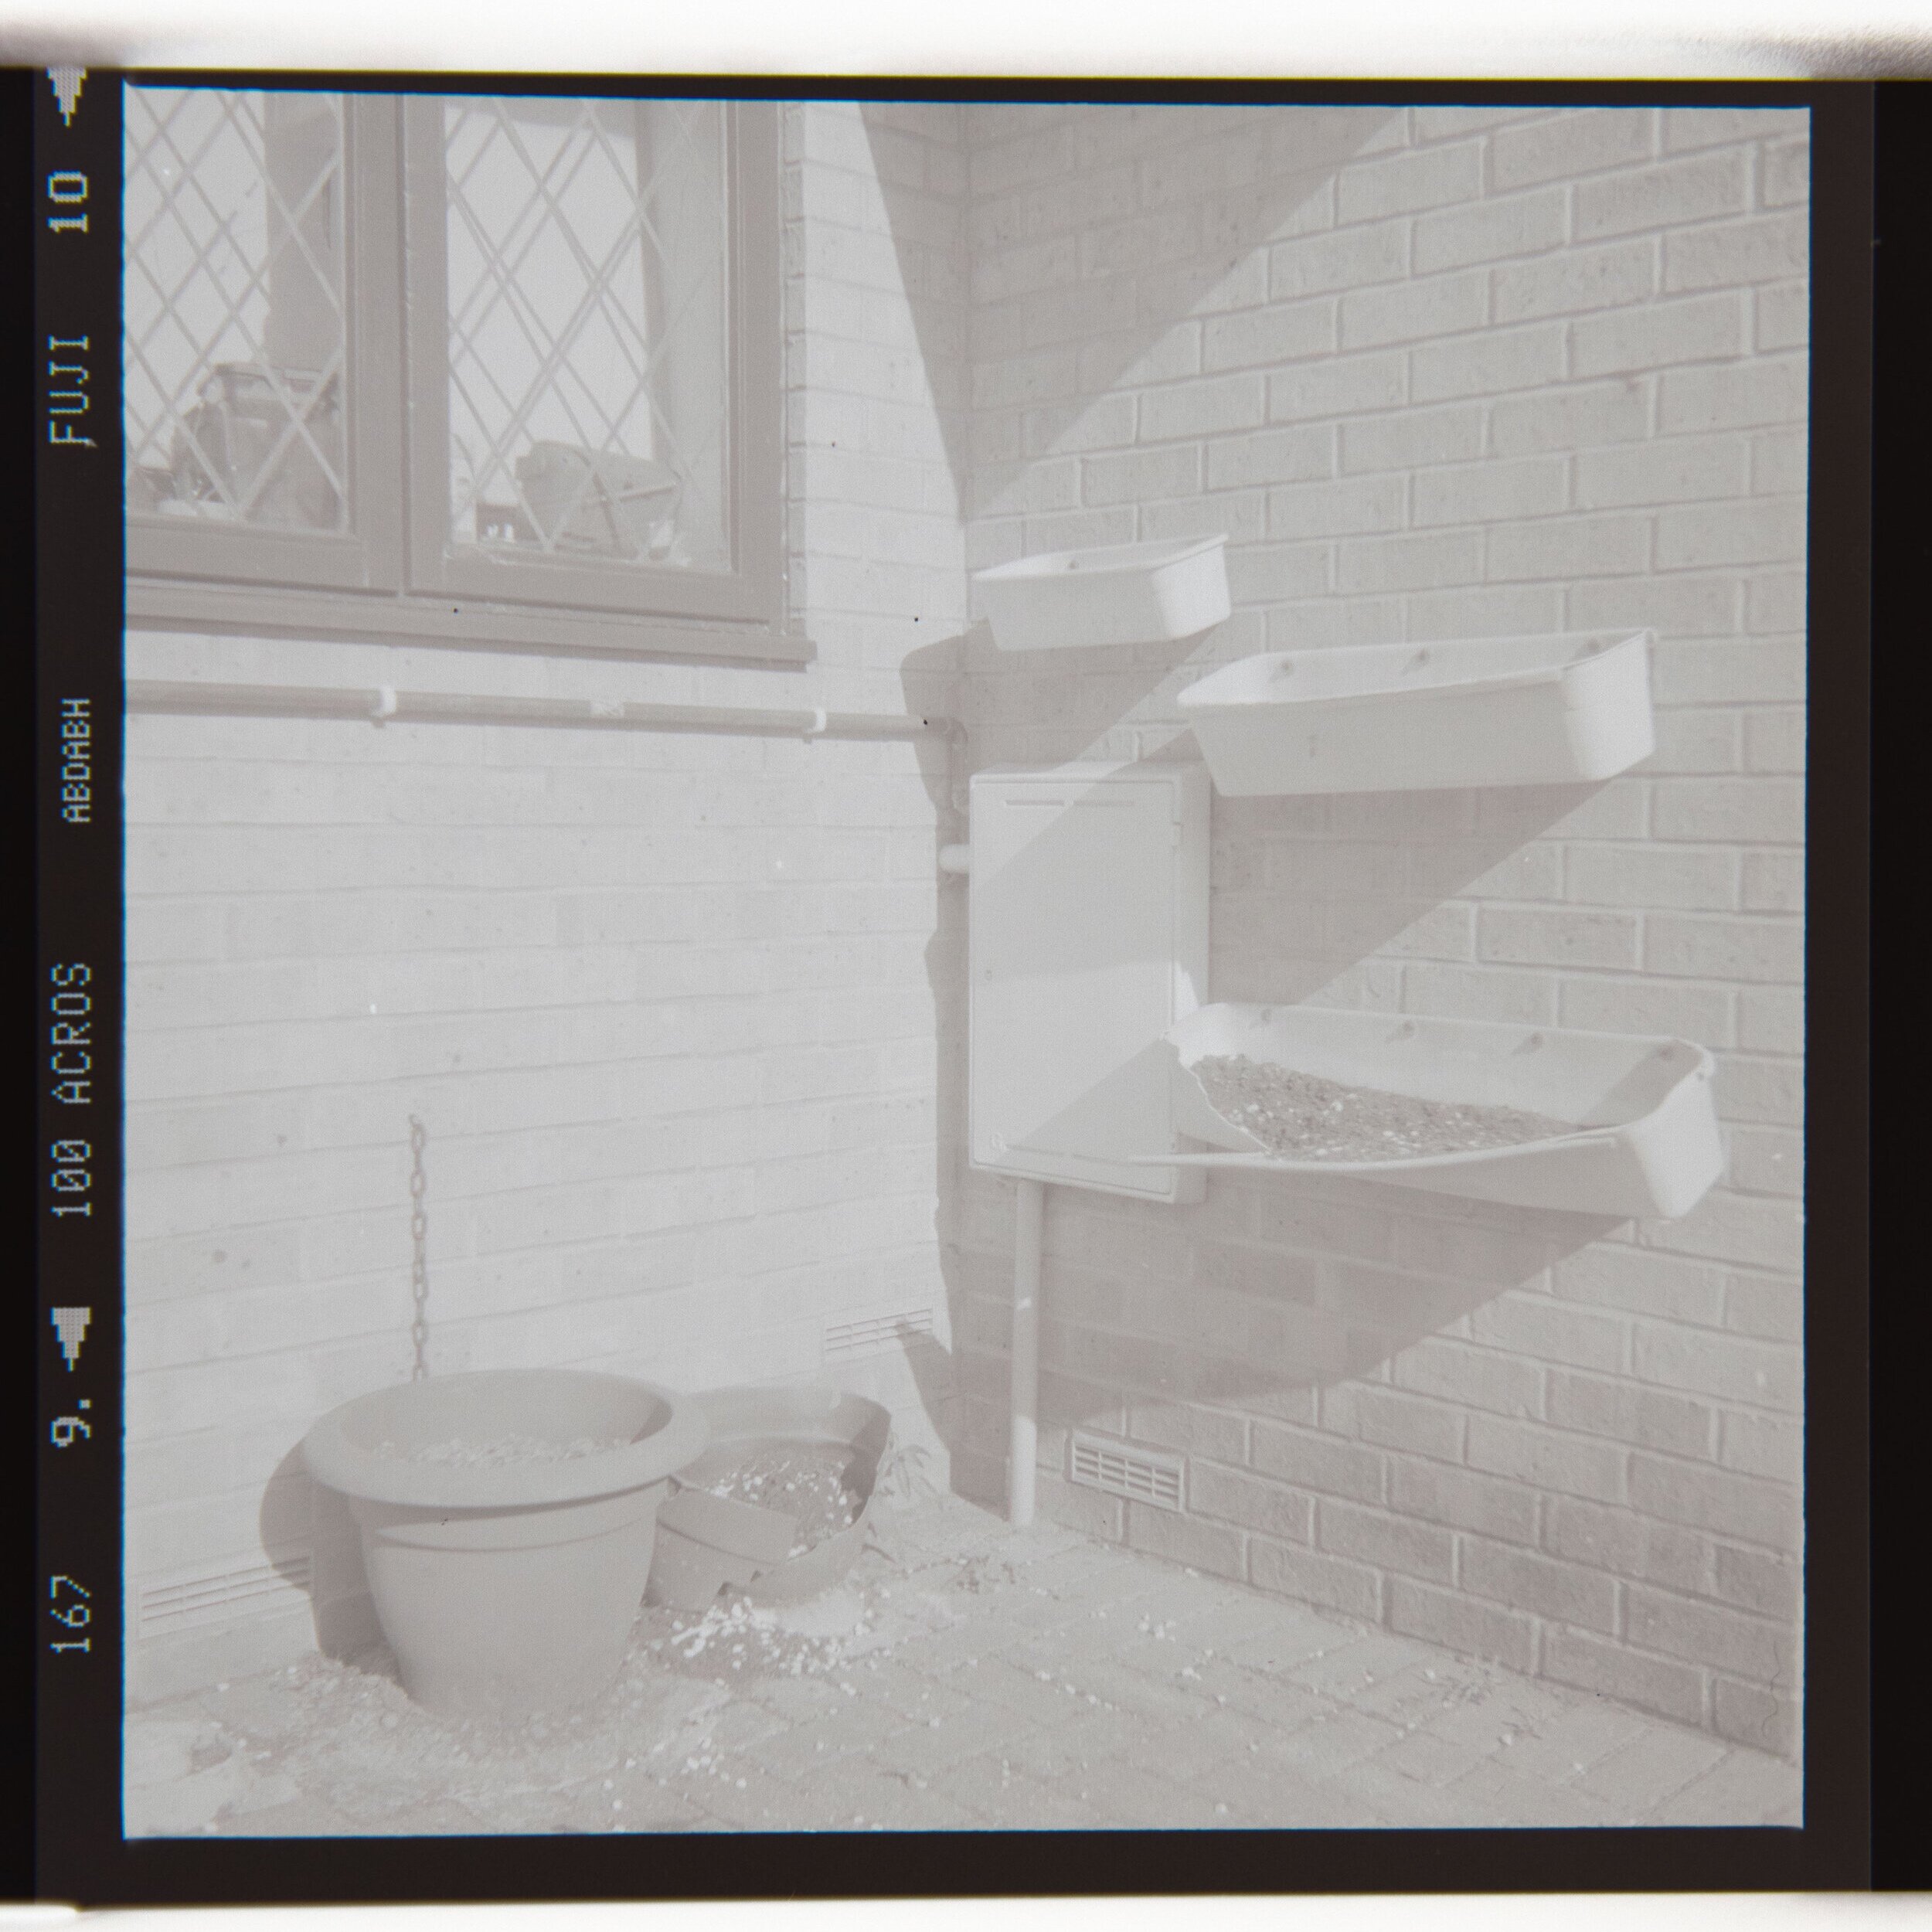
‘Thin’ vs ‘Thick’/ ‘Dense’ negatives - Overexposed vs Underexposed film photos
A thick, or dense, negative appears dark, whereas a thin negative appears transparent. If a negative appears to be very dark overall with limited see-through areas, it has a high density and is an indication of overexposure. If a negative appears to be mostly transparent, in most cases as transparent as the film borders, it is an indication that the frame was underexposed. Dense regions produce highlights whilst transparent regions produce shadows.
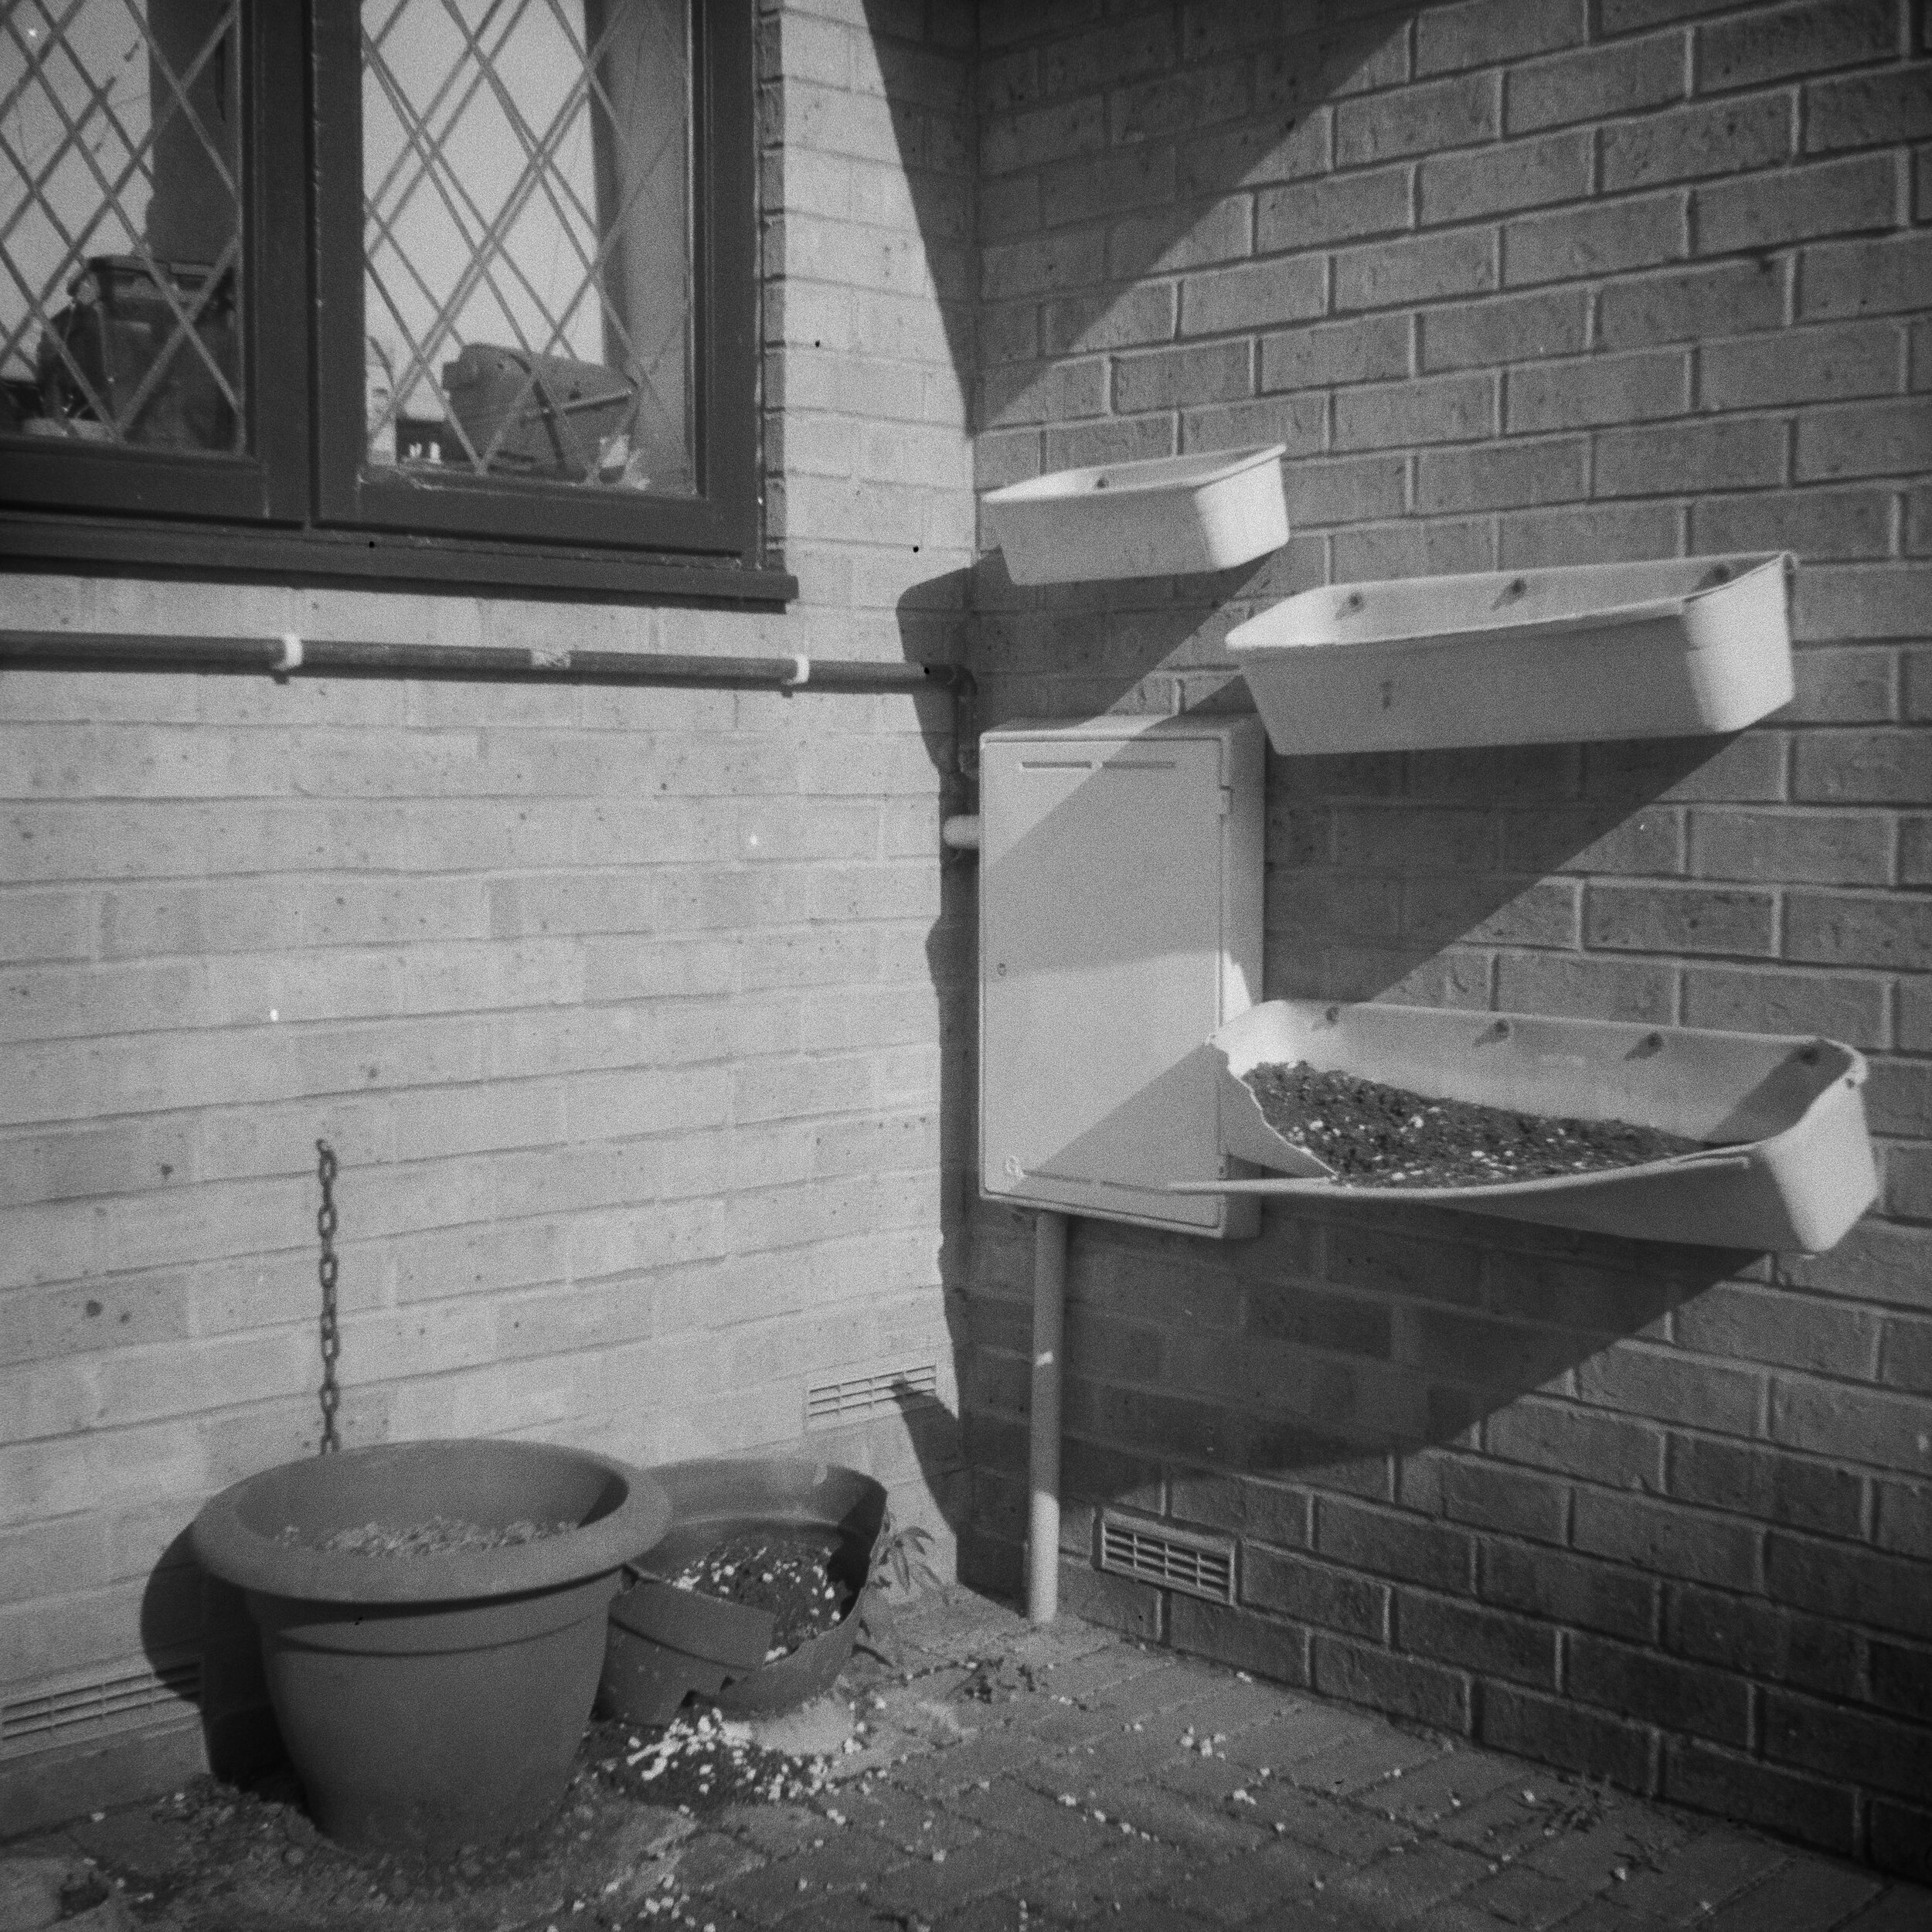
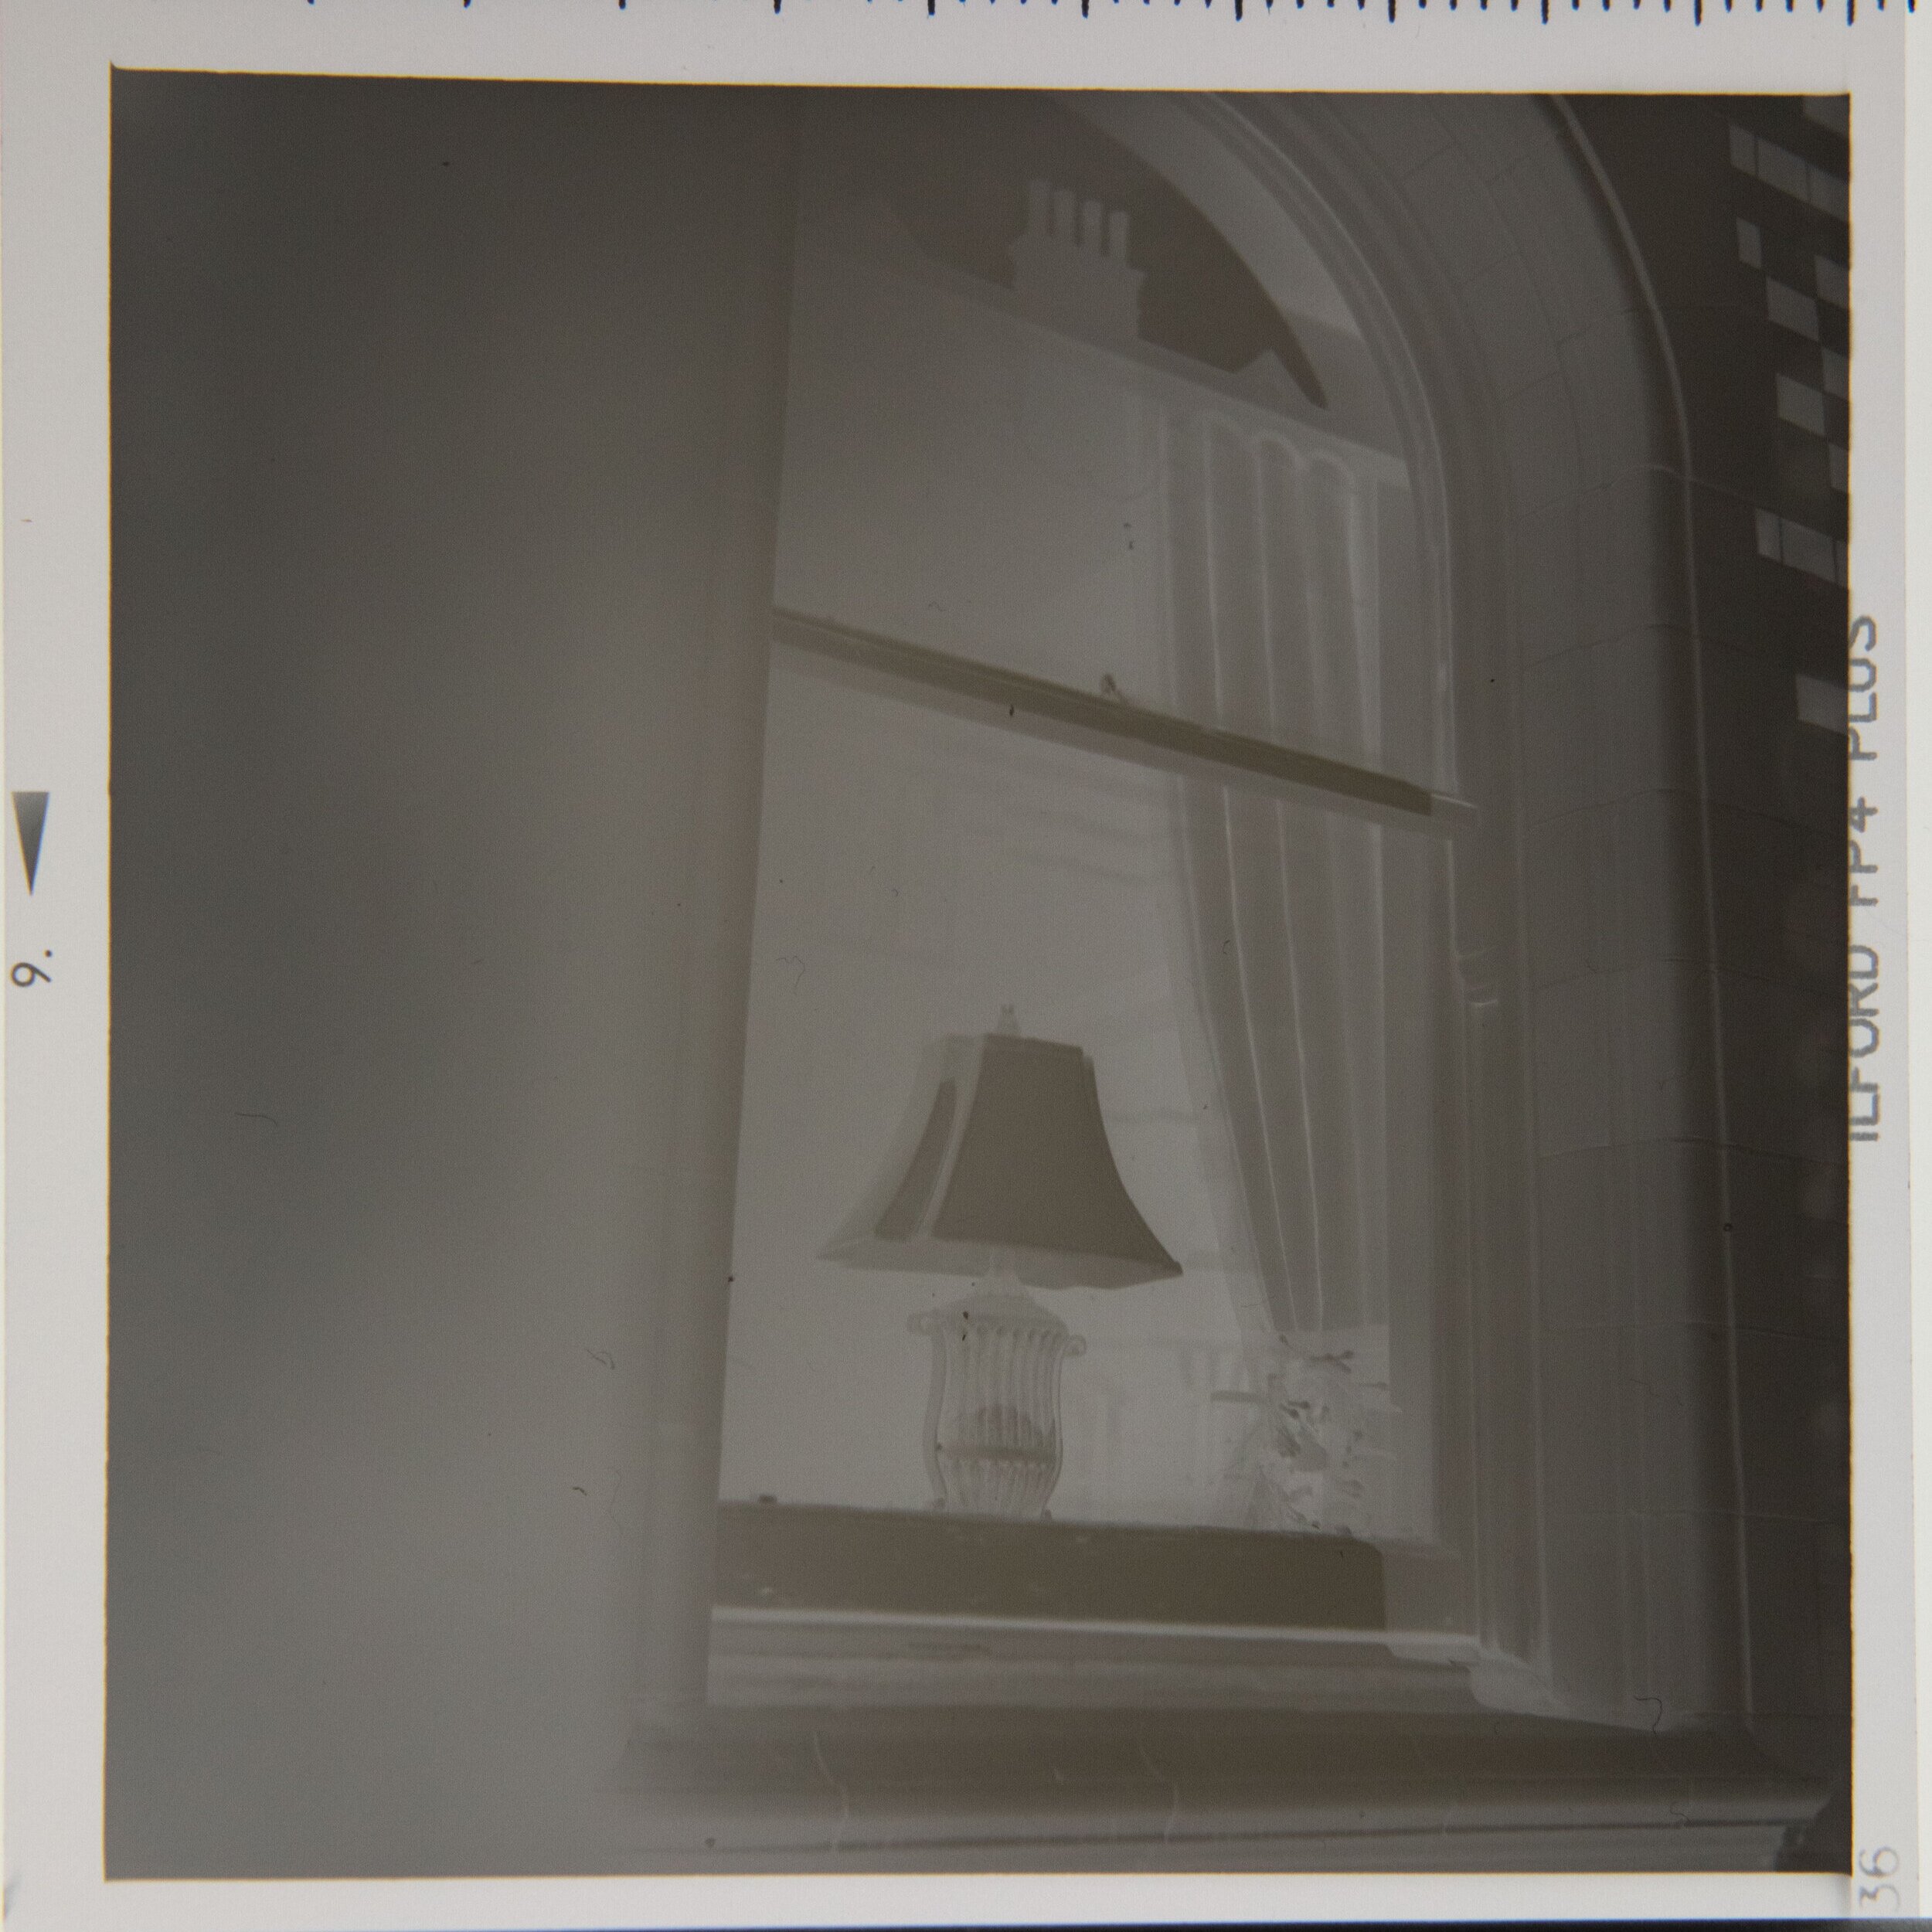
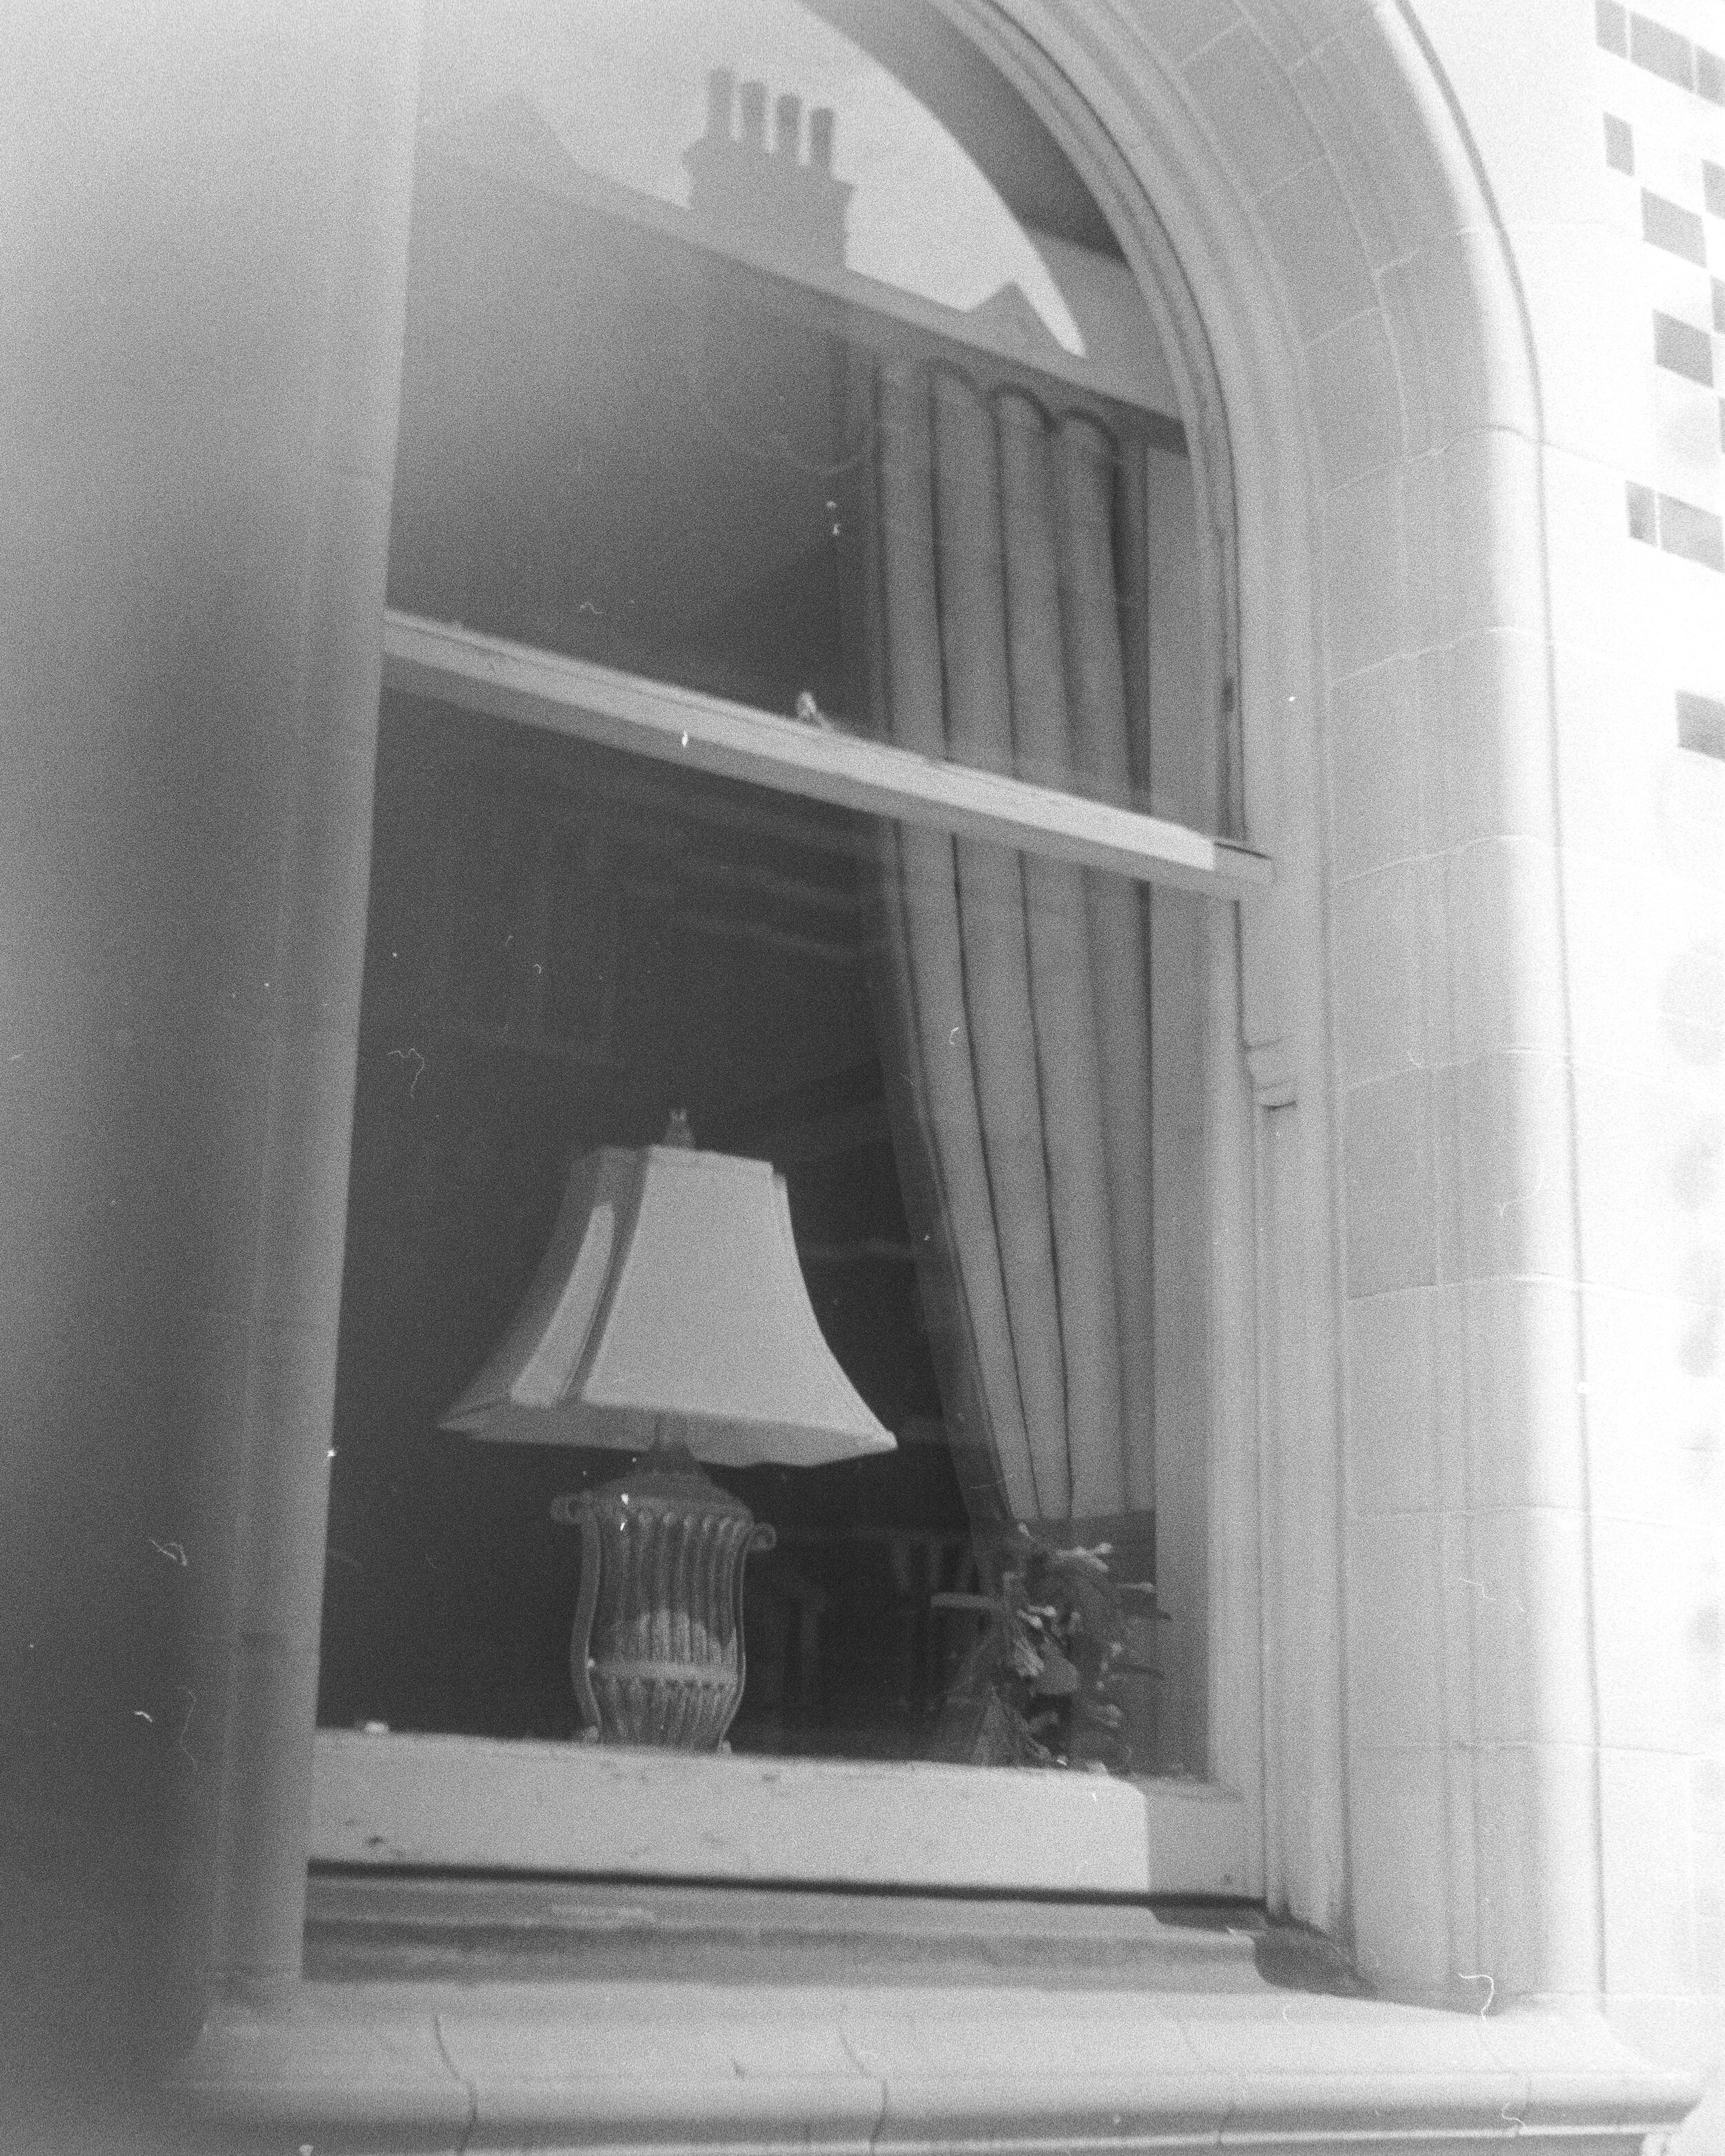
As alluded to above, a properly exposed (and developed) negative should fair somewhat in between - it should have a good balance of blocked and transparent areas in the frame. This translates into a good mix of tones in the final images, touching on shadows to midtones to highlights.
Here is an example of a properly exposed negative. You can see that it has an even distribution of black and transparent areas.
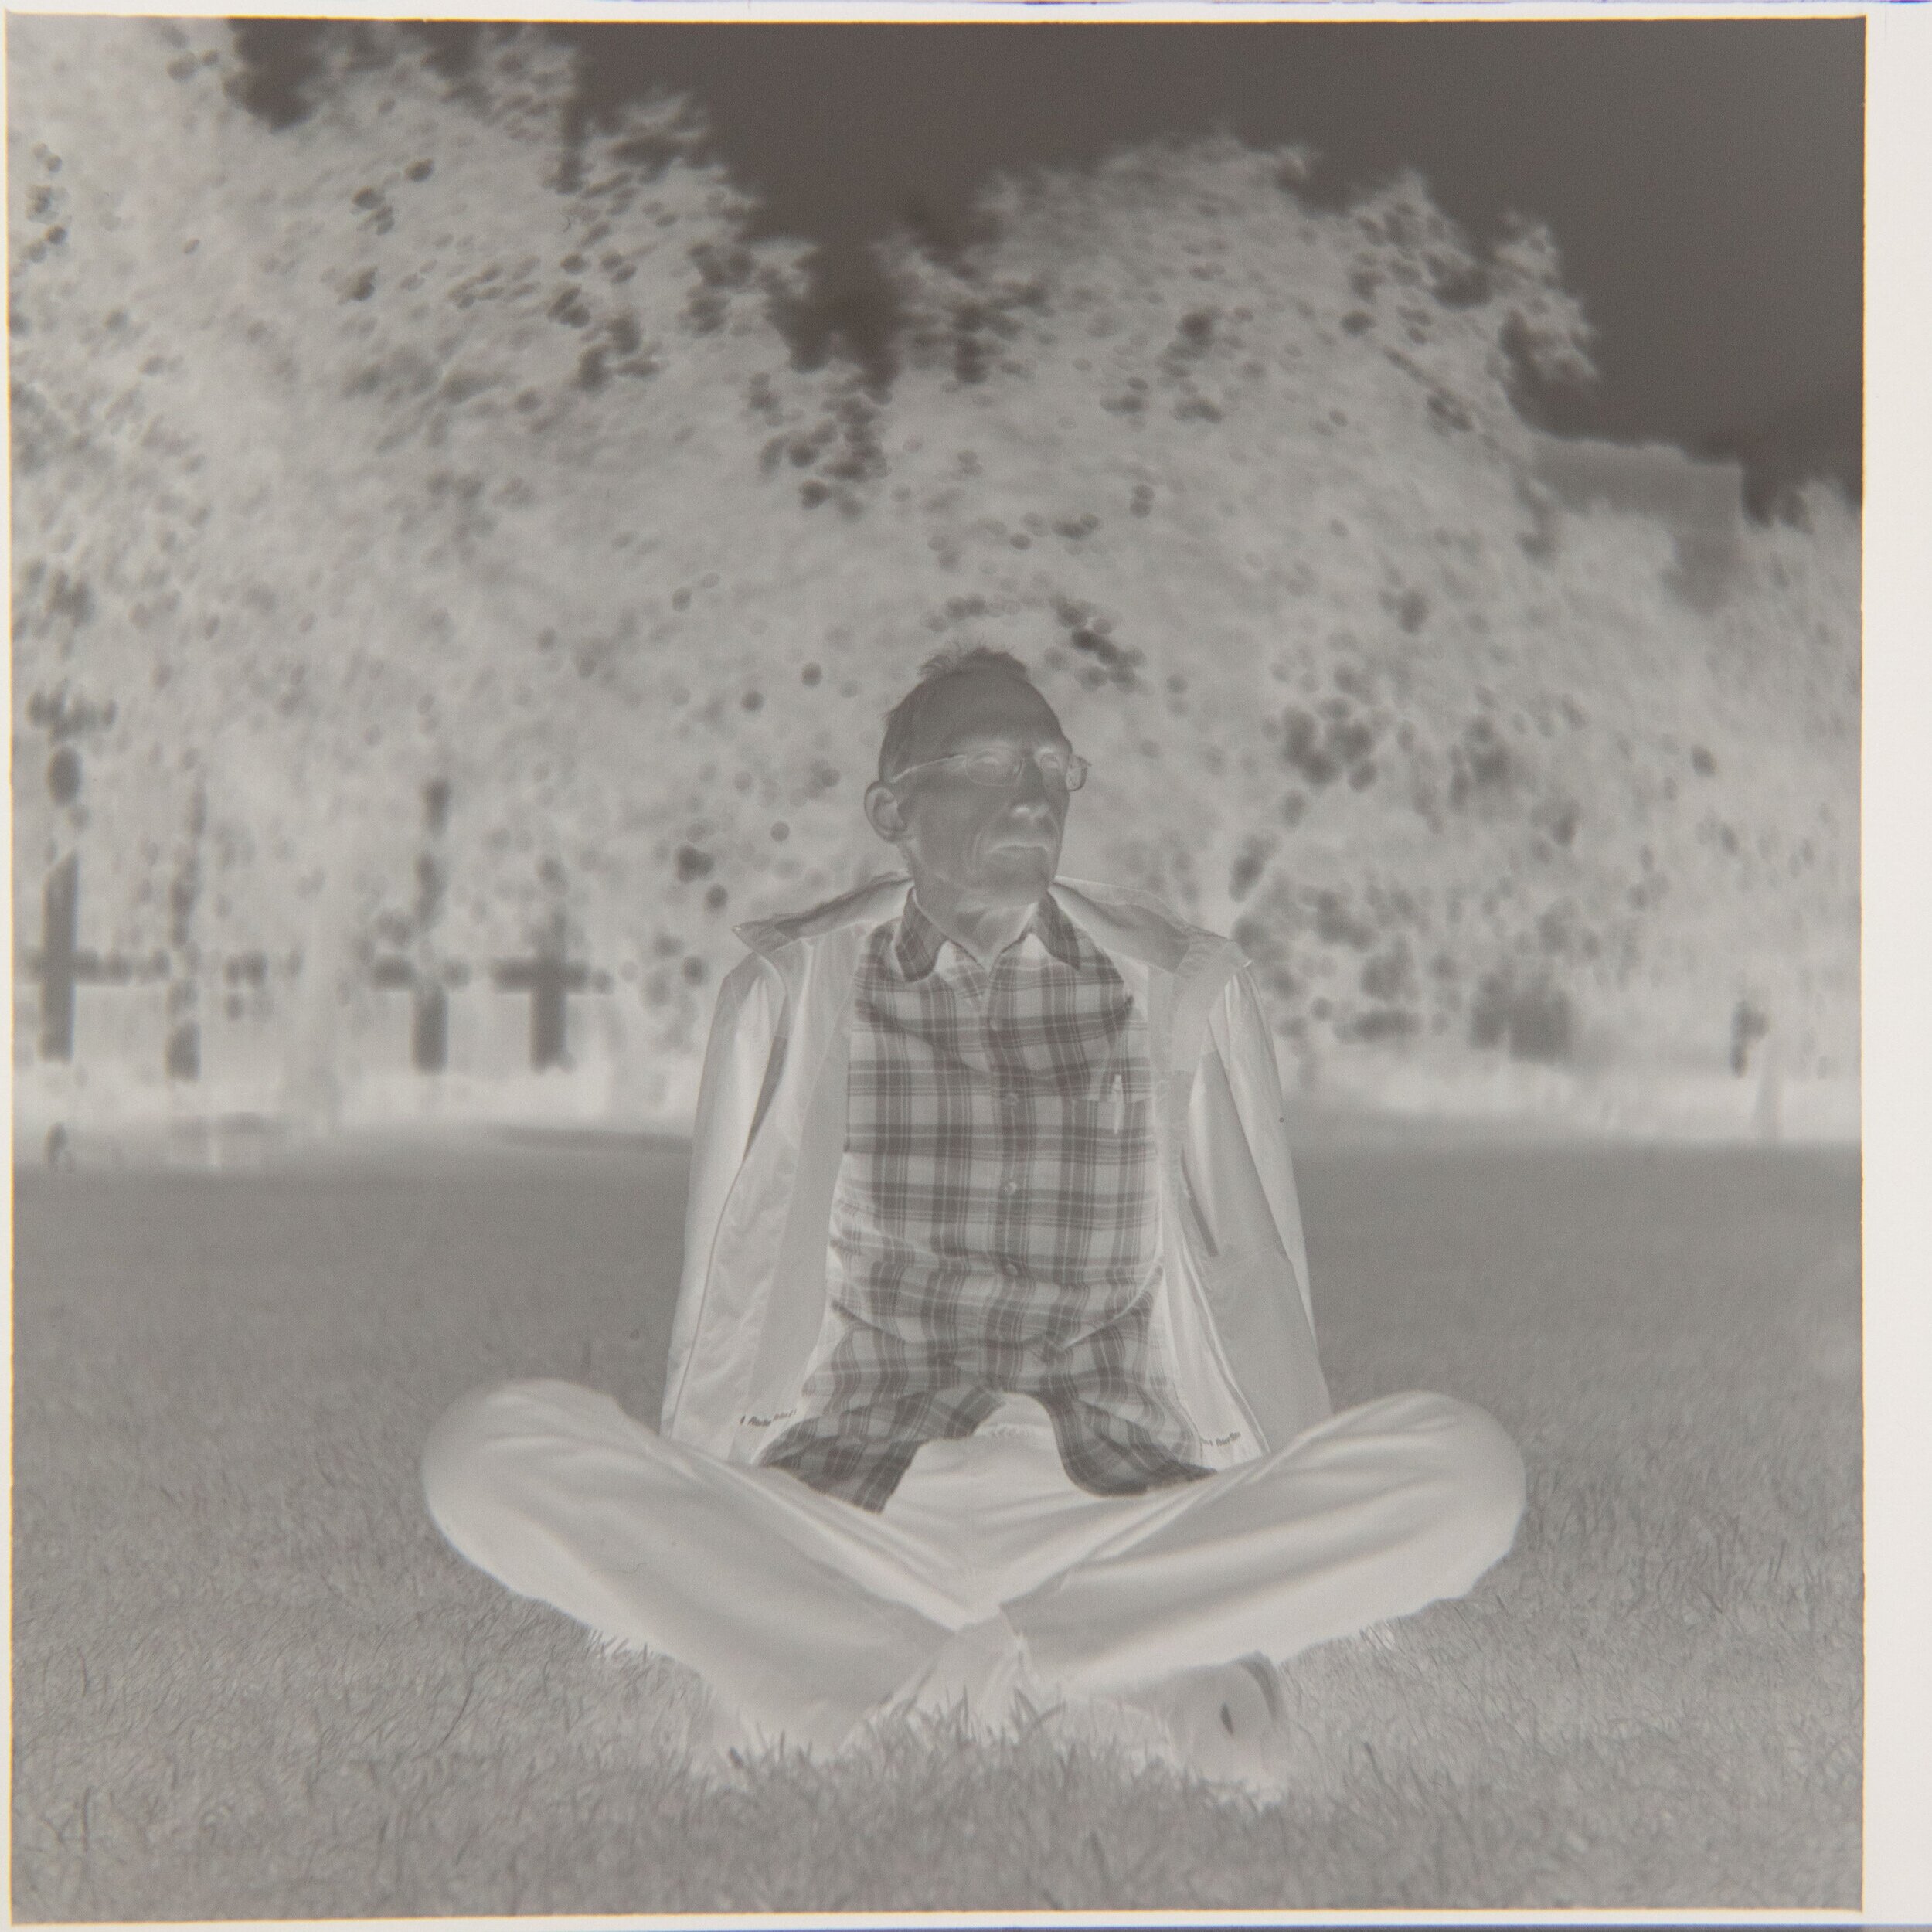
Here is an example of a very thick (or dense, they are the same) negative, placed alongside the resulting scan, which turned out to be washed out and grossly overexposed.

Dense negative

Raw scan of dense negative
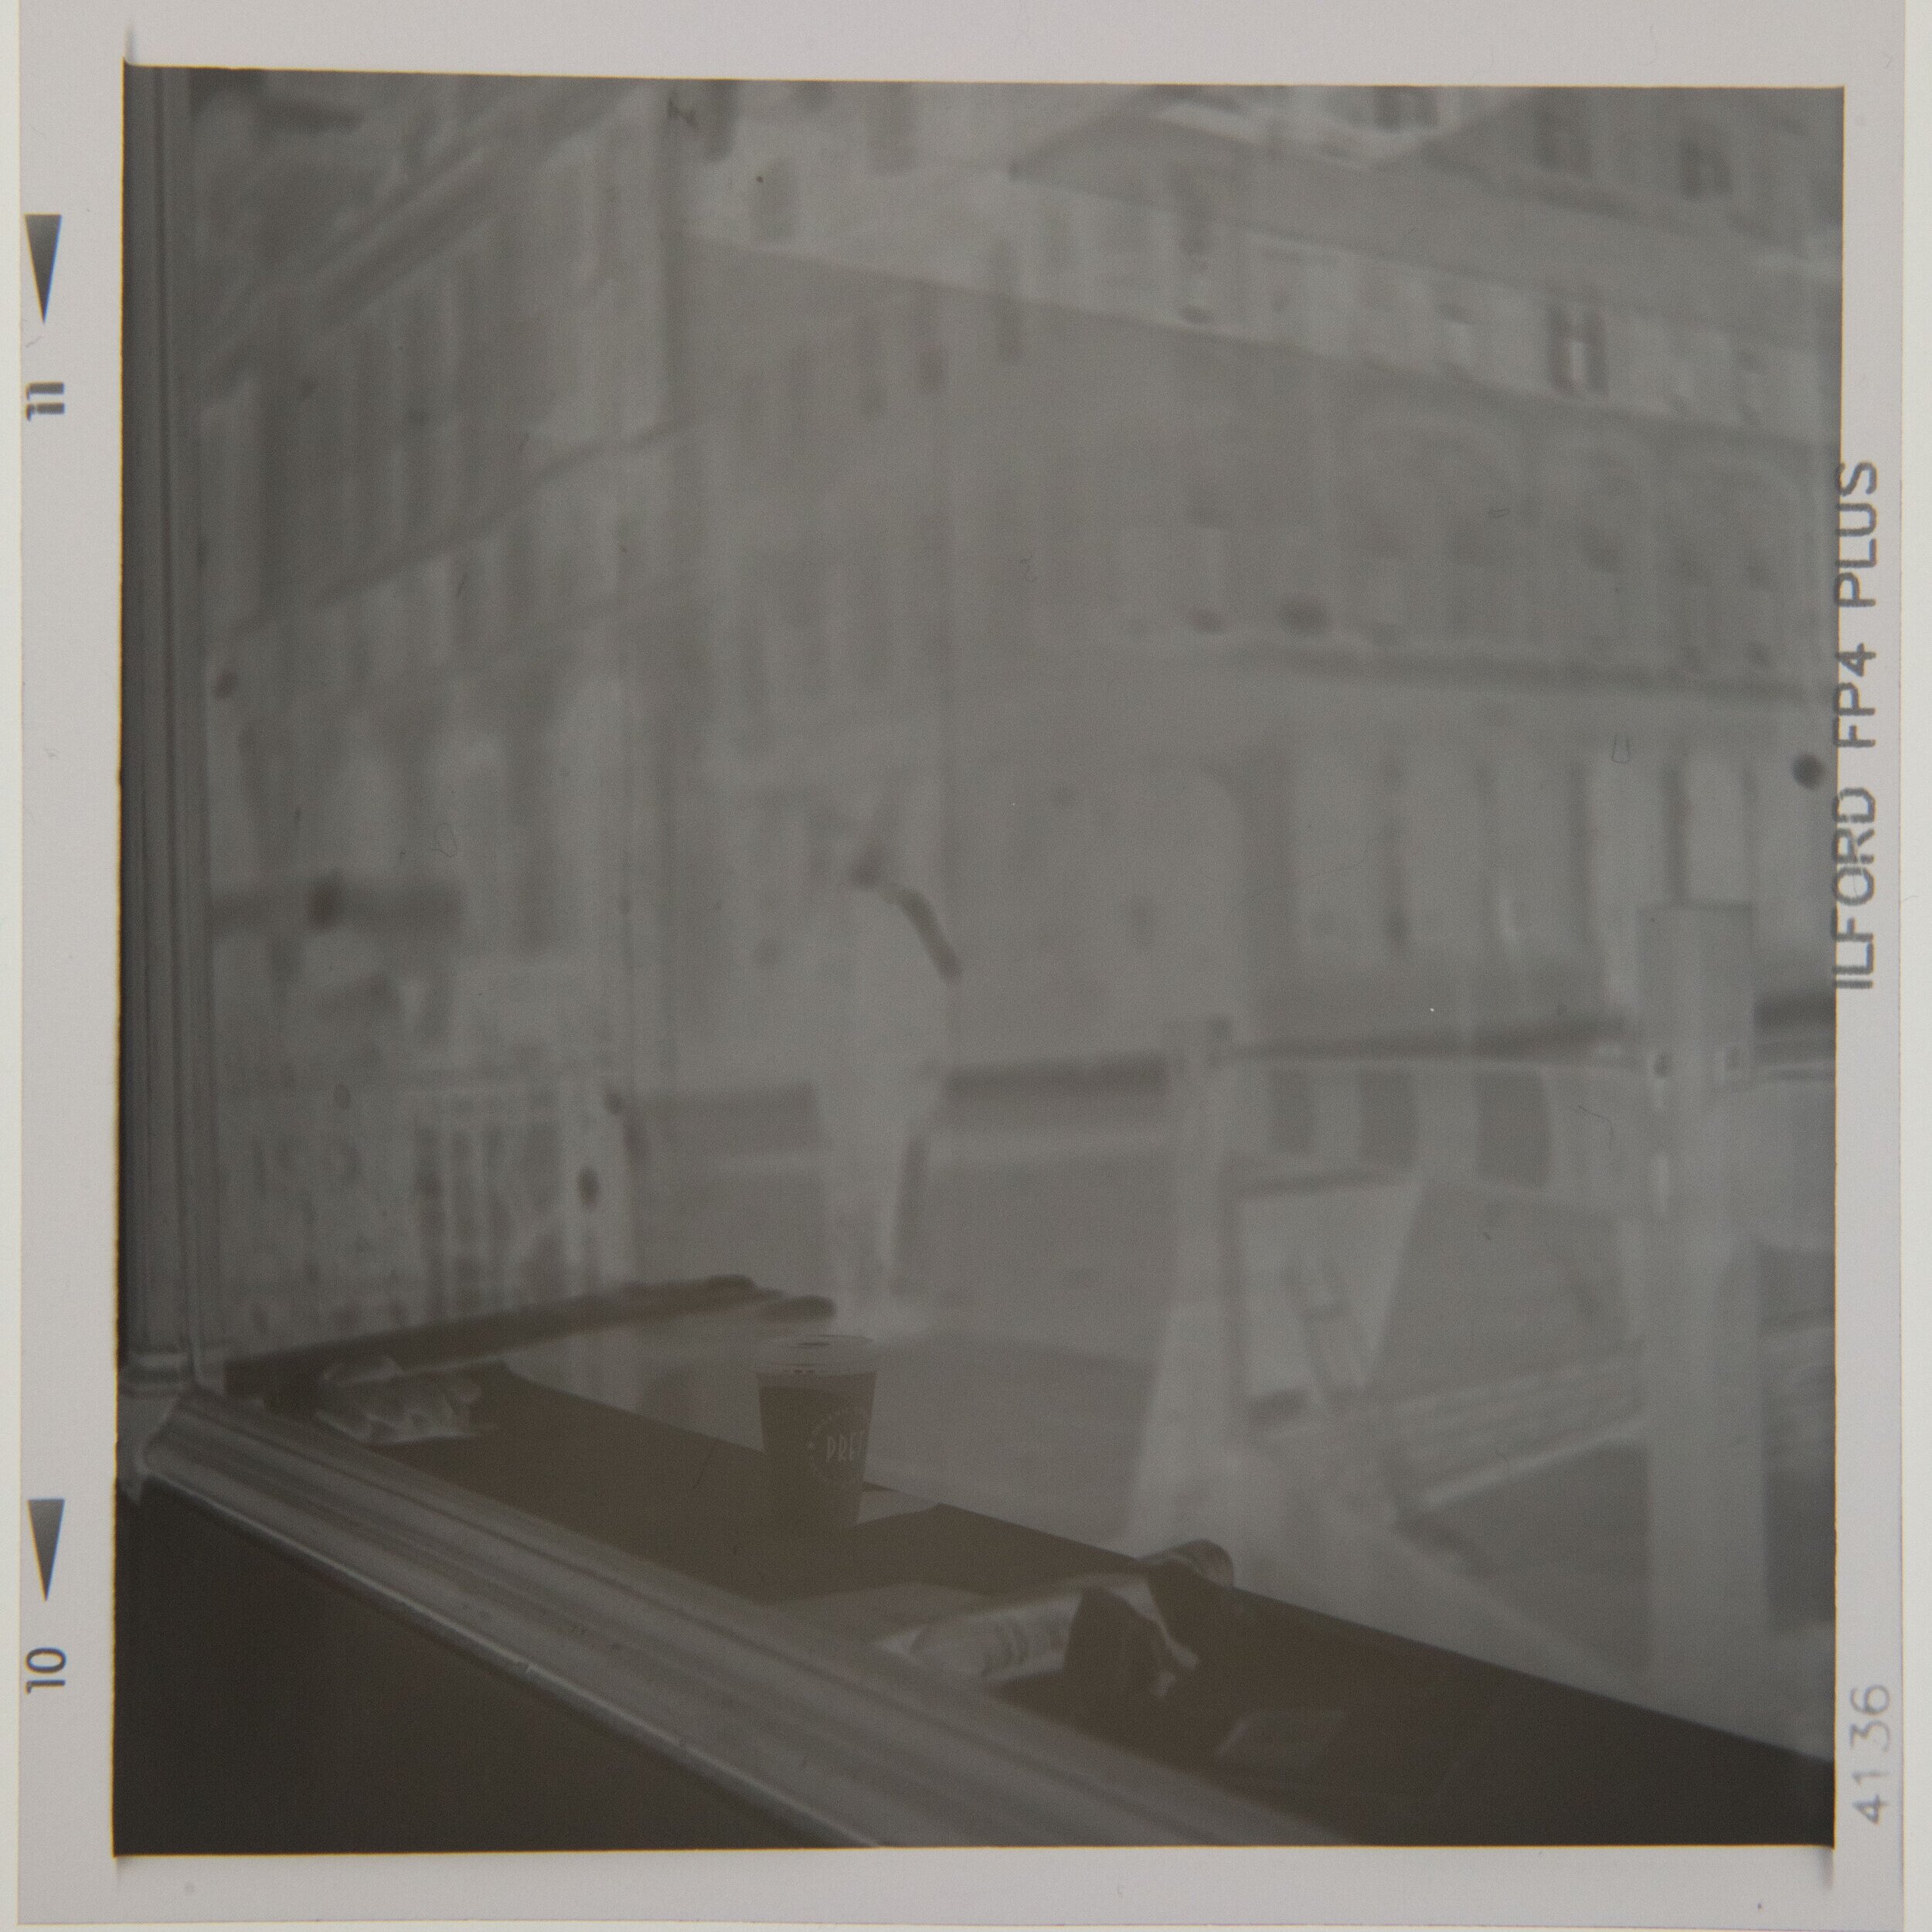
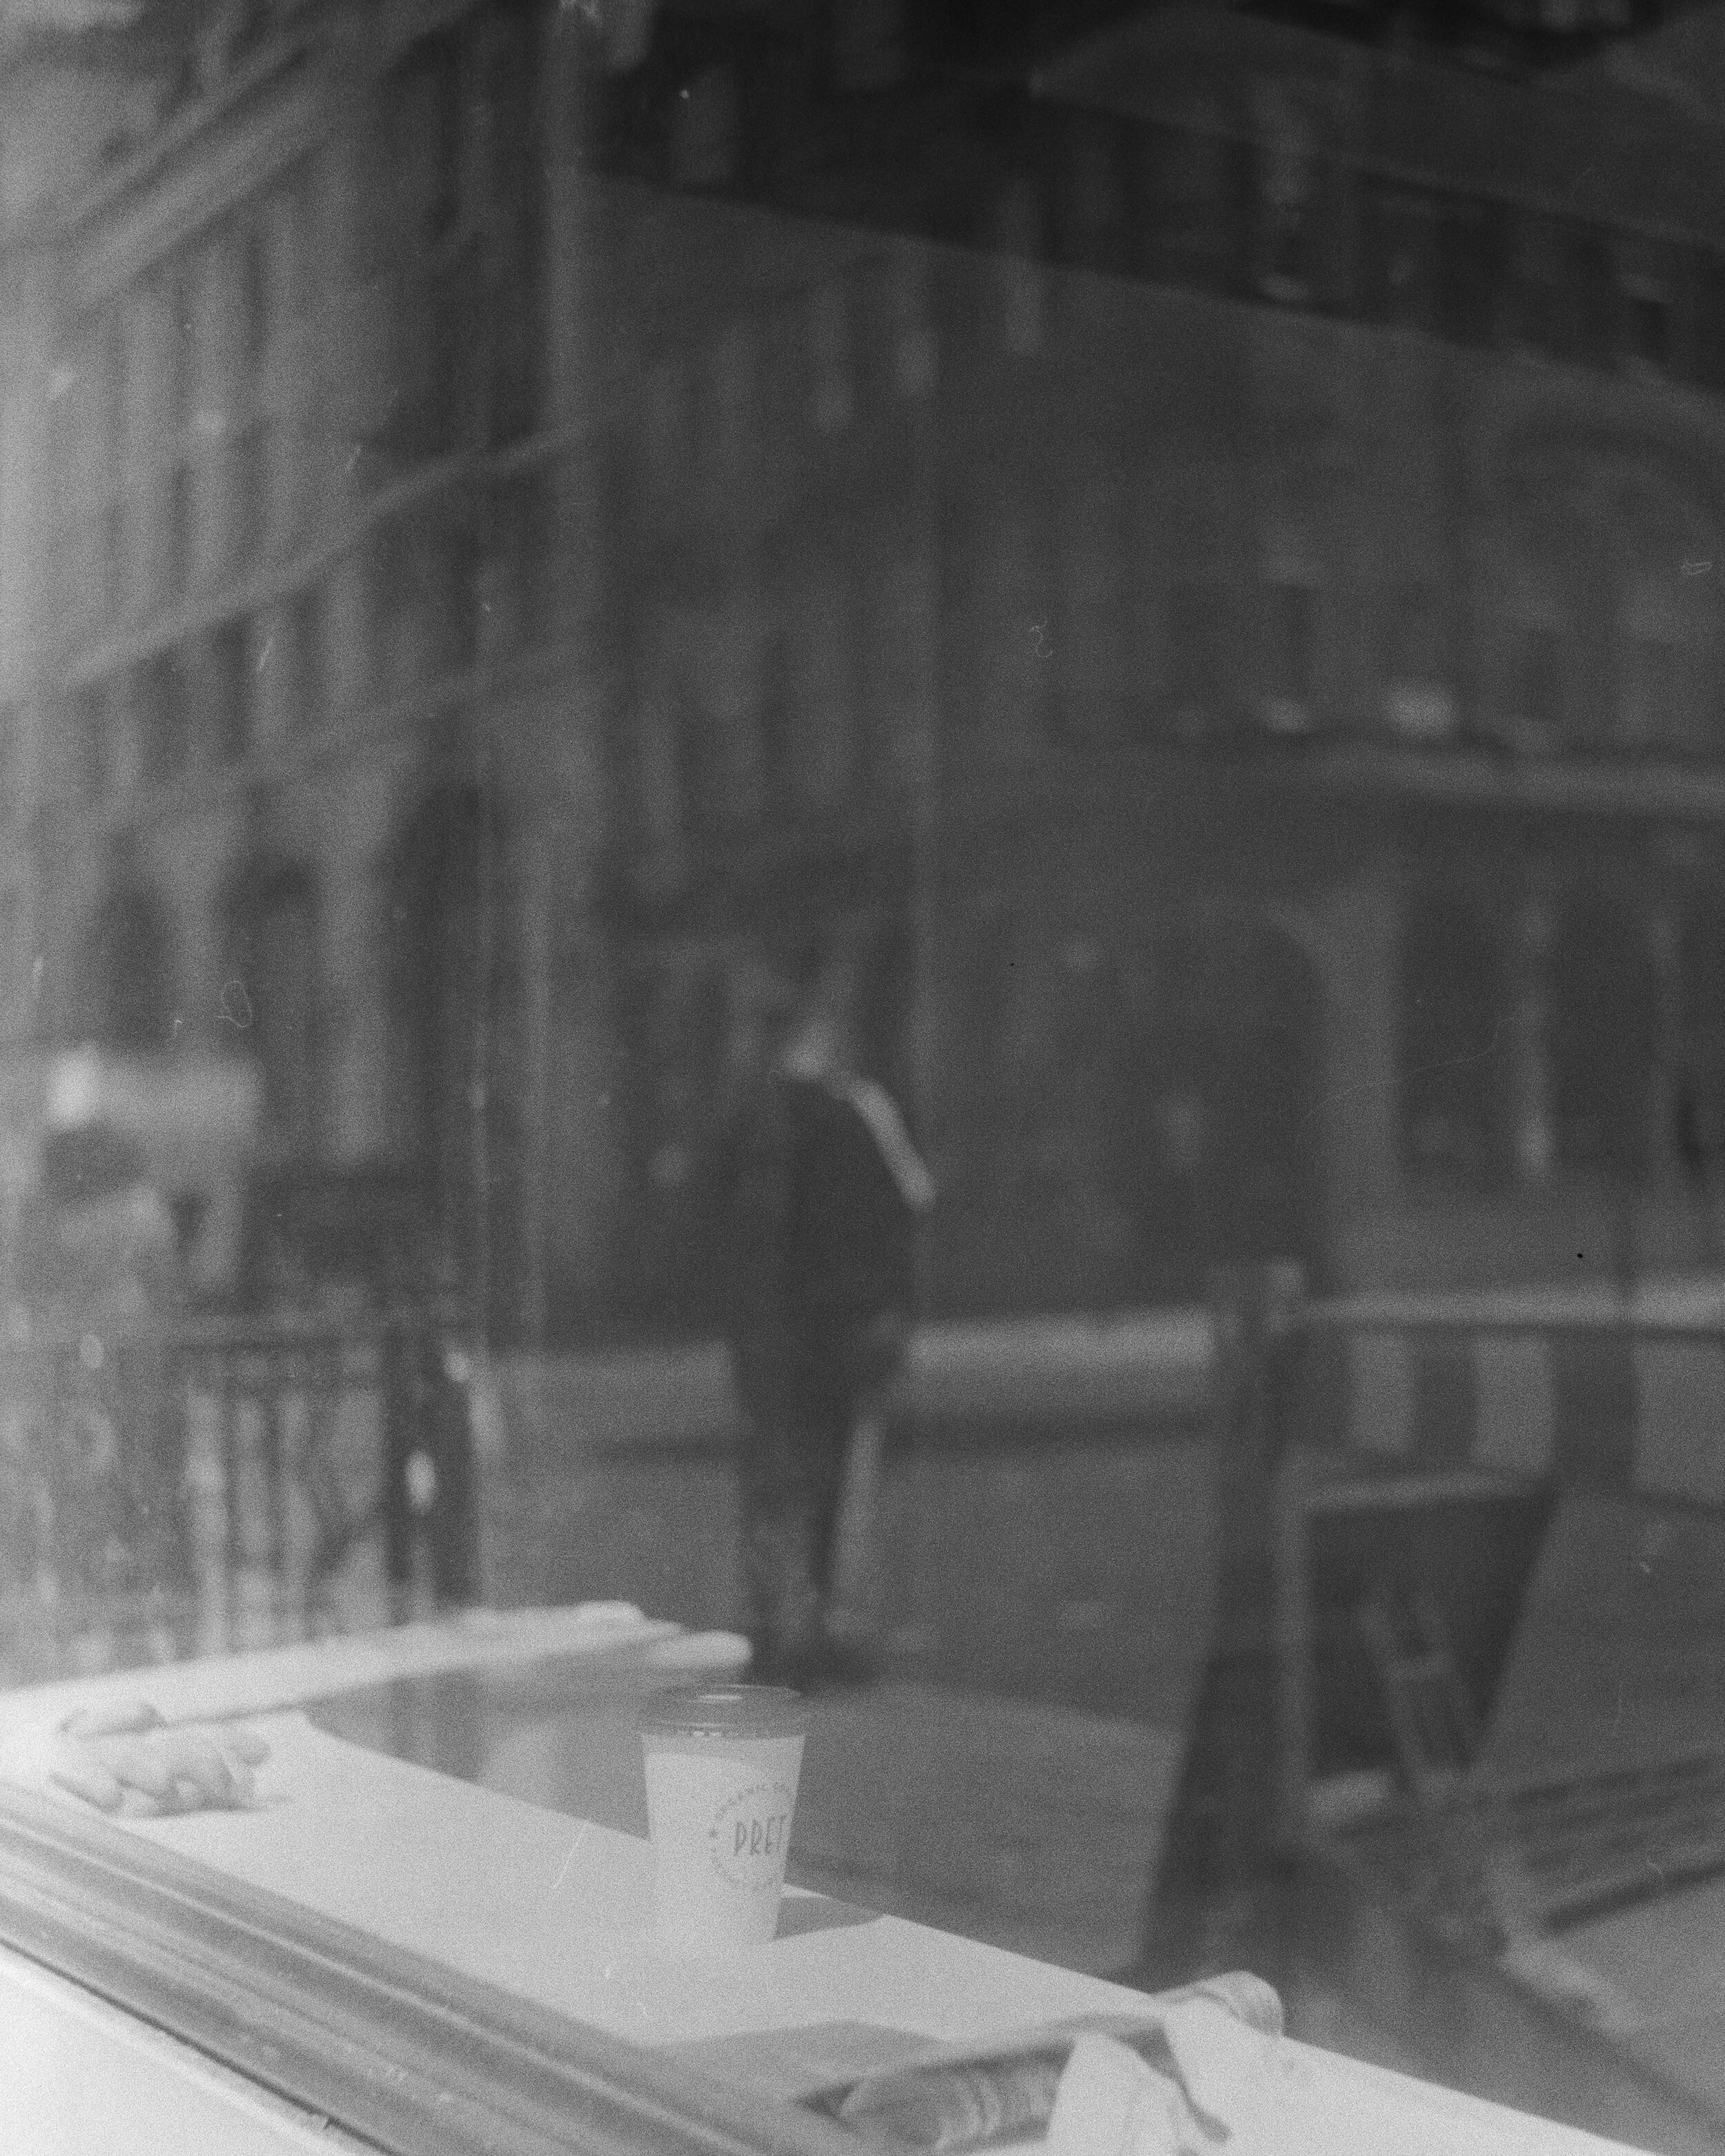
Here is an example of a very thin negative juxtaposed with its scan. You can see that the frame did not receive enough light for any detail to be uncovered.
What does an overexposed negative look like? Can you fix overexposed film?
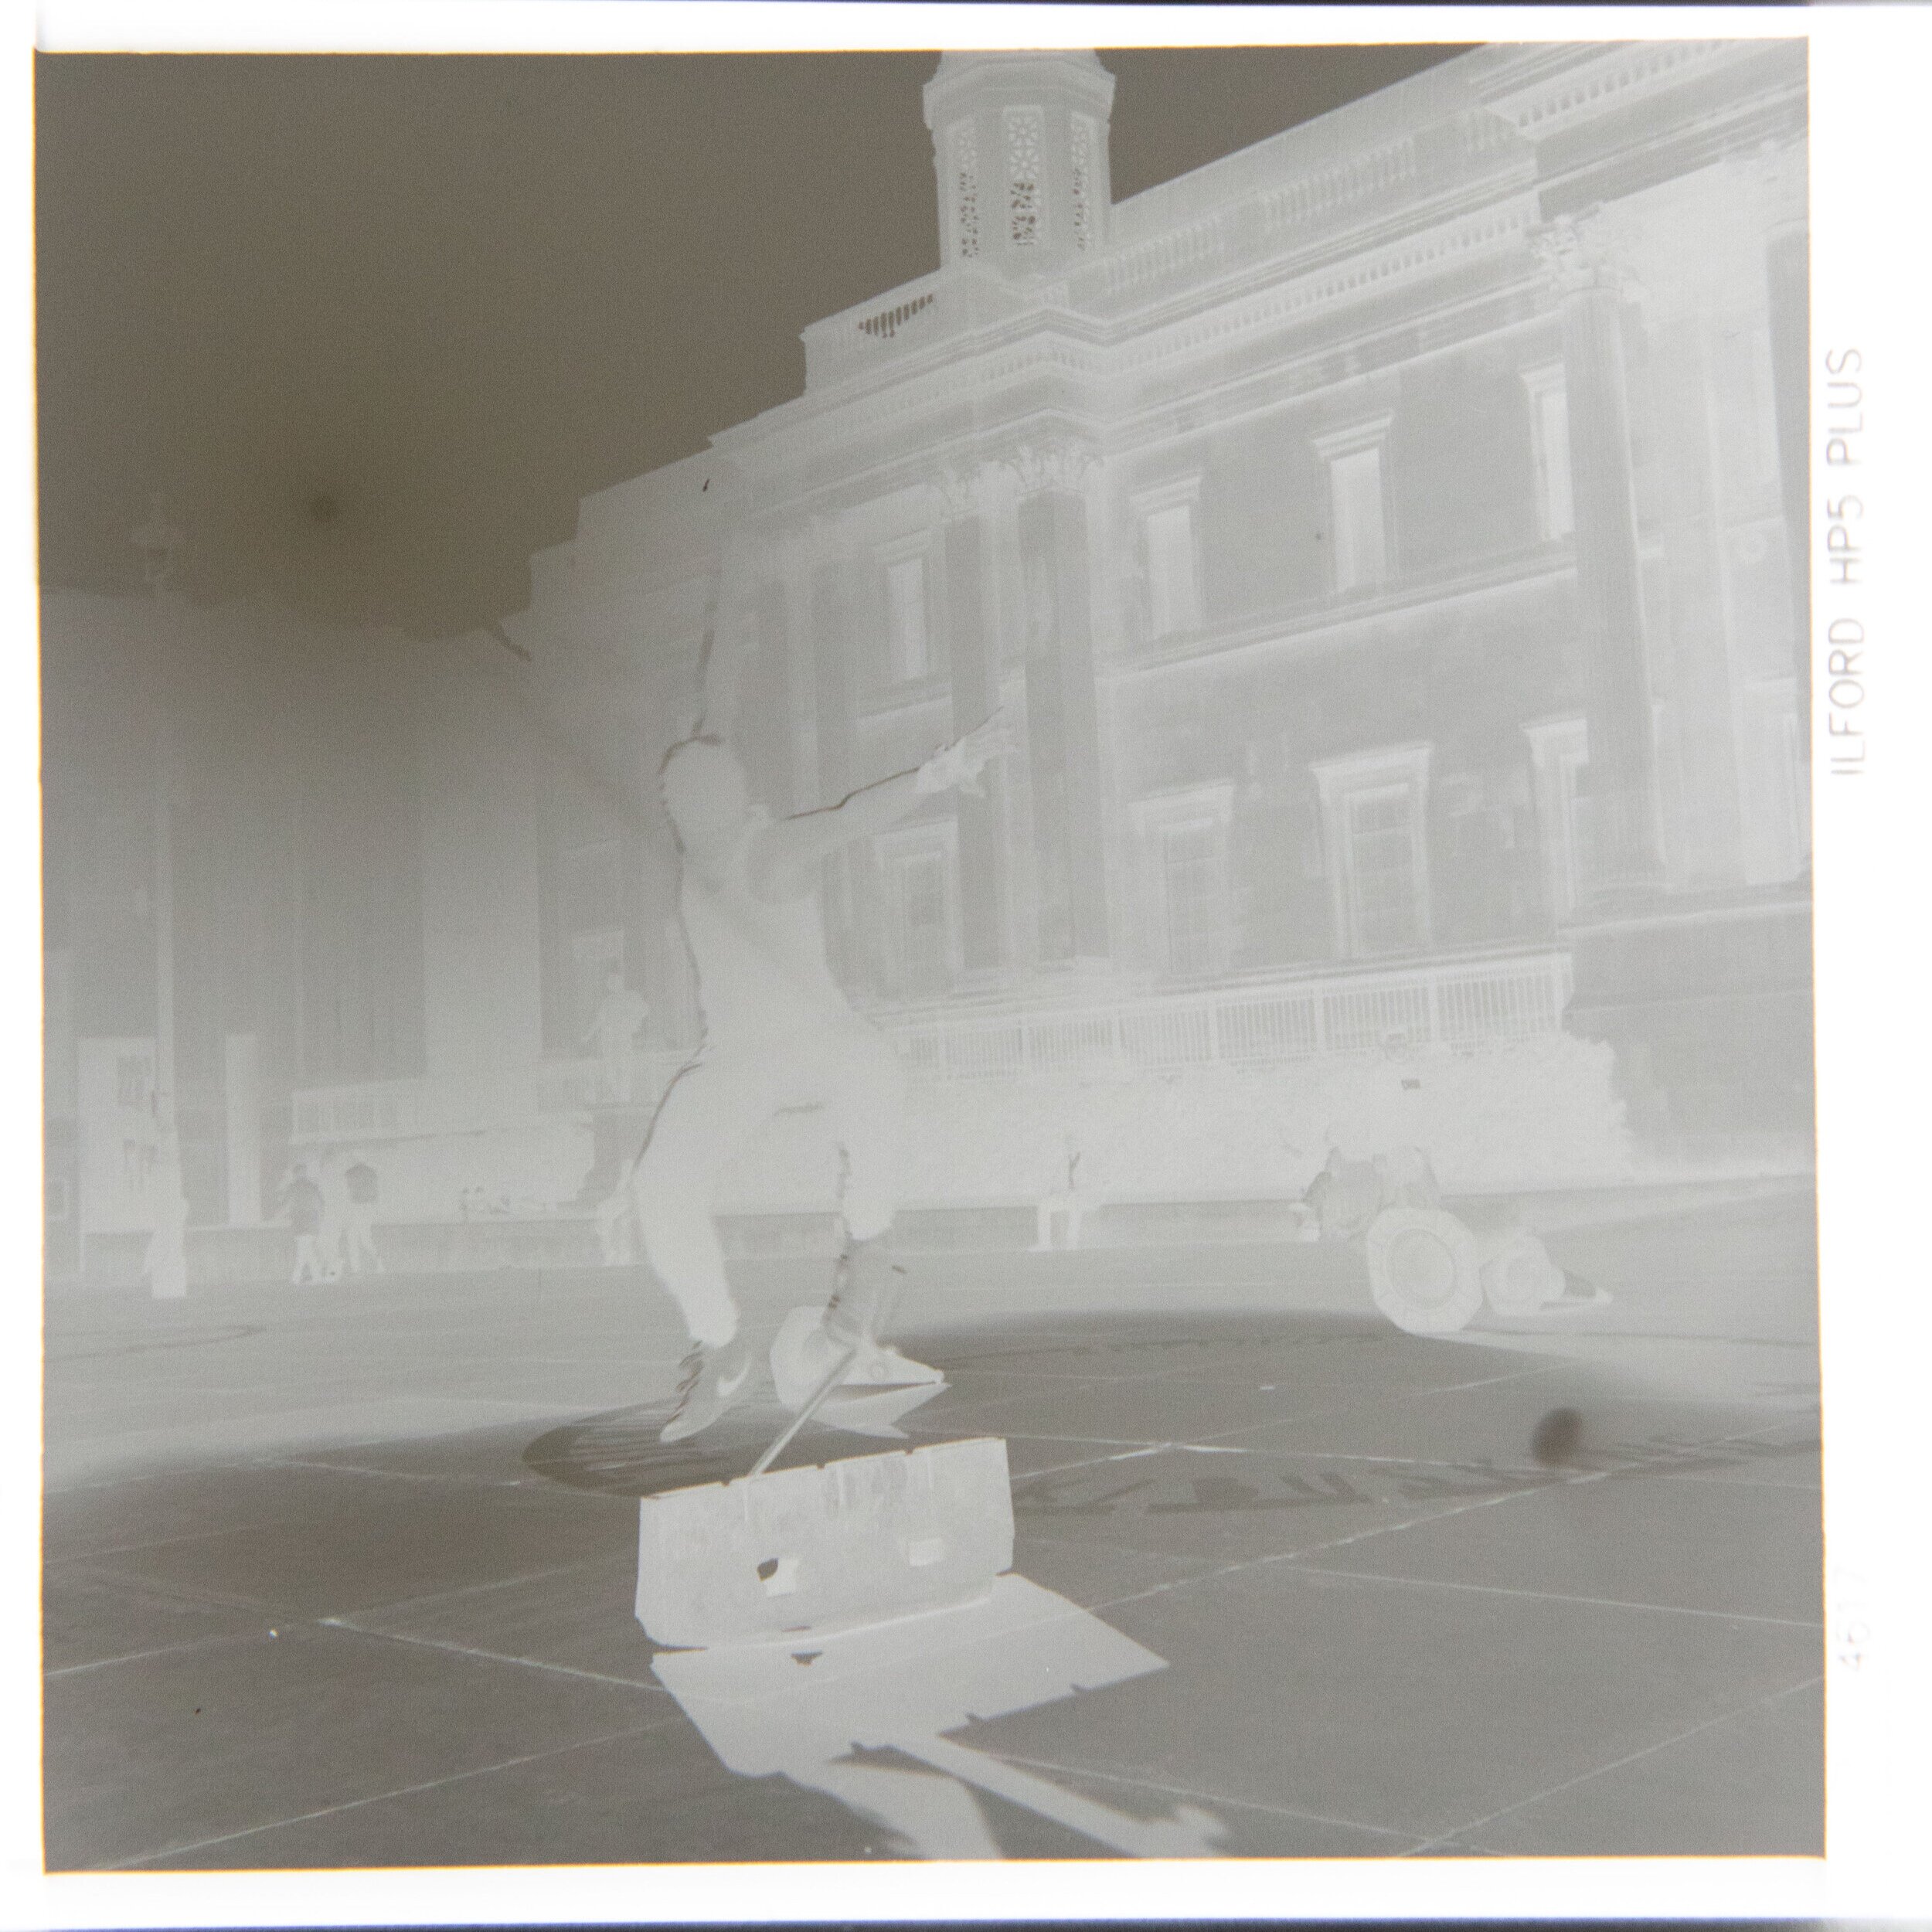
Gross overexposure on film results in very dark negatives with limited see-through areas. There might even be areas on the negative that are completely blocked out by black material. Overall, a majority of the frame appears dark. Overexposure, unless done to an extreme, can usually be mitigated in the scanning or printing process. While it takes a bit of work, it is usually possible to retain quite a bit of detail that is seemingly lost in the highlights.
I have already provided an example above of an overexposed negative, but here is another one alongside the resulting scan before any adjustments have been made.
You can refer to this video, in which the footage shows the actual lighting situation under which this shot was taken. From the clip you can definitely tell that there are supposed to be shadows and black in the scene.
But from the negatives, you almost see no transparent areas, which translates into a lack of true blacks in the final scan.
After some work in Lightroom, though, from the way the resulting image looks, you can’t really tell that it has been this terribly overexposed.
From this example, we can see that It is relatively possible to fix overexposed film. You will be able to retain the highlight detail by lowering the brightness at which you scan your photo, and by pulling down the highlight slider in your editing software. Pulling down the blacks helps too.
What does an underexposed negative look like? Can you fix underexposed film?
Underexposure on film results in largely transparent negatives, which sparse areas blotted by dark material. When observed against a light source, the negative is almost completely see-through, with vague shades of grey. In extreme cases, it can be difficult to make out the subject just by viewing the negative because so little information was recorded at time of exposure. It can be a tough job to fix underexposed film. The best bet would be to pull up the overall exposure during the print or scanning process.
I have already provide an example above of an underexposed negative, but here is another one alongside the resulting scan before any adjustments have been made.

Based on my records, these images were shot at 1/125s, f/5.6 and ISO 400 on a heavily overcast winter day in London, which was probably 3-4 stops underexposed.
Viewing the negatives alone, you would observe that a large part of the frame is transparent. In many areas, it is as transparent as the film borders, which means that there is no information or detail contained.

Once reversed, the image looks incredibly dark. There has been some success in pulling up the overall values in the final scan and specifically the shadows. But it was a struggle, and still the results are barely satisfactory.
What does an underdeveloped negative look like? Can you fix underdeveloped film?
Where a negative is underdeveloped but properly exposed, there is decent detail in the shadows but highlights look dull. Overall, the negative appears relatively thin, with little areas fully developed to give dark material that represents highlights. There is no way to fix the underdeveloped negative itself, but it can be mitigated by increasing contrast during scanning or printing.
This image shows an example of an underdeveloped negative, properly exposed.
You can distinguish underdevelopment from underexposure by reading the shadow values, which correspond to the transparent areas on the negative. Where there is sufficient separation in the shadow values, it is not an exposure problem.
As in the scan of the photo, the shadow areas exhibit a level of detail like what you would see in a properly exposed and developed photo. This is because shadow areas are the first to finish developing, only requiring half of the entire development duration.
What appears off is the highlight areas. The negative consists of mostly greyish colours, but lacking in deep, punchy blacks. When reversed during scanning, the lack of blacks translates into a lack of whites.
When read together, you get a frame that reflects the shadows as usual but with muted highlights. As a result, the image looks flat and ‘lifeless’.
What does an overdeveloped negative look like? Can you fix overdeveloped film?
When you develop film for too long, your negative becomes overdeveloped. Overdeveloped negatives typically look very dark overall and very contrasty. Assuming proper exposure, the negative contains a good variety in shadow values as indicated on the transparent regions on the negative, whilst appearing almost black in highlight areas. The way to fix overdeveloped film is to scale down the highlights during printing or scanning.
As explained above, the shadow areas complete development first because they require less time to develop. However, where left in the developer for a prolonged period of time, they can still be pushed to higher values, resulting in more blackness even in the shadow areas.
As for the highlight areas, overdeveloping leaves too much time for black material to build up, creating vast areas of darkness on the negative. Where the film latitude has been reached, details in the shadow may be lost.
When read together, you get a frame that is high in contrast, with highlights that are blowing out, and a shadow that is edging towards what would normally be mid tone territory.
Grain
Is grain on negatives a good thing?
Grain per se is a neutral, inherit characteristic. Generally, grain is a desirable trait in film photos as it is what distinguishes a film from digital, as it engenders a sense of nostalgia in photos. Normally, it is therefore acceptable for grain to be visible in a film photo, so long as it does not cause unwanted distraction from the image itself. Some photographers, however, have a particular love for rough grain in their photos which they develop into their distinct style.
As compared to digital noise, it is more positively received by most photographers as an aesthetic of film photos. To the very least, it is not something that needs to be mitigated. In most circumstances, you would be fine as long as the grain is not unnecessarily pronounced, which would most often be the case where standard exposure is paired with standard development recommended by the film manufacturer.
Even where your film photos turn out to be very grainy, much more than it needs to be, photographers have actually built careers out of deliberately accentuating the grain structure in their photos as their personal style. As will be addressed in the section below, some photographers actually take active steps to increase the level of graininess in their film photos.
What causes excessive grain on negatives?
Using a fast film
Films rated at a faster film speed generally produce grainier images. For a film to be rated at a higher ISO, it is more sensitive to light, thus enabling the photographer to achieve adequate exposure under dimmer light conditions.
The science behind this is the use of larger grain in the emulsion. The larger the grain size, the more light they are able to capture, and thus the more sensitive the film to light.
Because the grain structure is rougher in the emulsion, the resulting scan naturally appears grainier.
This is the case generally with classic films, though in recent years film manufacturers have been releasing film stocks that are designed to give finer grain at a given ISO, which would be more an exception than the norm.
Development
Various components at the development stage, including the choice and dilution of developer, temperature, development time and agitation frequency. Certain classic developers such as T-MAX and Rodinal give a more pronounced grain structure. Longer development times and frequent agitation tends to give grainier results.
It follows that pushing film, which describes the practice of underexposing film below the rated ISO, followed by increased development times to compensate for the underexposure, increases the appearance of grain.
Underexposure
The case with underexposure is more severe in relation to graininess. The grain that we see is in fact not the grain itself, quoting Ansel Adams, but the gaps between the grain through which light is passing through.
Film emulsions are composed of grains of varying sizes; the larger ones react more readily to light, and less so for the small grains. If available light is grossly insufficient, otherwise known as underexposure, only the largest grains were able to respond to the light and deposit as the black material you see on negatives. The rest are washed away during the development process.
As a result, only the coarse grain remains on the negative and produces an appearance of highly noticeable grain.
Shooting expired film
Shooting expired film often returns grainier results as compared to fresh film, unless where the film has been stored under perfect conditions throughout its history.
Over the years, the film loses its effective ISO and often experiences some shifts in the structure of the emulsion.
As a result, many times not enough light is let in to expose the film due to its subdued sensitivity. Also, clumps may form more readily within the emulsion causing a more apparent impression of grain.
Free from Blemishes and Damage
Can you touch negatives?
It is not suggested to touch your film negatives unnecessarily, both before and after development. Accidentally touching your negatives is not the end of the world, but it might create greasy fingerprints on your negatives, or even scratches and destruction of detail. Common accidents occur during spooling the exposed film onto the development wheel and transporting developed negatives for drying.
If you are looking to developing your negatives with a new film lab for the first time, watch out for the below defects when assessing whether you can trust this film lab for your future scans. For considerations apart from the quality of negatives, refer to my earlier article ‘Full Guide on Developing Film with a Lab’, where I delved into greater detail on scan quality, extra services etc.
Scratches
Scratches typically occur when loading the exposed film onto the developing spool, for those developing their own film at home as well. Though, it can also happen at film labs where machines are employed to crack open film canisters, without supervision from properly-trained staff.
Scratches are visible on your negatives and scan or prints, usually in form of thin threads and creases. Scratches results in blank areas as the emulsion has been scratched off before development, so the area receives inadequate development and contains no information. The crease can also
Here is an example of a scratch as reflected from a scan. Look on the right around the street sign.

Fingerprints
Depending on how they are created, fingerprints can look like, well, passport quality finger scans, but not necessarily. It can also come in form of greasy patches that does not show a defined texture of a fingerprint. This can be caused by touching the negative while handling it for drying or scanning.
Worse still, where it happens before development, the grease and oils can lead to uneven development as the chemicals may not reach parts where the emulsion has been blocked by the grease. This would lead to a loss of information around the area where the fingerprints are created.
Water marks/ limescale
In some locations, tap water contains a higher concentration of minerals or organic substance than others. A common issue is hard water, which is the case here in the UK, where I am based.
Hard water contains a high amount of calcium, which deposits as limescale after the water evaporates. As a result, a white chalky material sticks onto surfaces on which water was adhering to previously.
If not handled properly, this can happen to your negatives as well. Before taking the negatives out of the water for drying, a wetting agent needs to be applied to the mix, to prevent limescale from forming on the surface of the negatives.
If hard water on negatives is simply left to dry naturally, you might end up with faint white circles building up on the negatives in the shape of water droplets.
Summary
In this article, we talked about what makes a good negative, which has the following characteristics:
a well-balanced range of tonalities;
a desirable level and structure of grain; and
an absence of damage and blemishes.
SUBSCRIBE via the box on the left for more PRO tips, and follow me on Instagram (@_bjiao__) and let me know what you think in the comments!
Share this article on Pinterest too!
Keep shooting, keep creating!
The mission of this blog is to provide the best insider information in the photography industry, as openly as possible. You have direct access to my
first-person experience as an aspiring photographer who talks, but also works.
Honest opinion are rarely available as public resources because this is a competitive industry. Huge sums are made when such information is delivered in the form of mentorship and workshops.
This blog is a great way in which I cover my daily expenses, but also provide real value.
If you have learnt something that would be worth at least $10, please consider donating to the page. This enables me to keep creating content and helping more people sustainably.
Your continued support for the blog is appreciated!