One thing that stops many beginner photographers from taking the leap from shooting auto to manual, especially when doing street photography, is the techniques involved in finding the appropriate exposure.
However, professional photographers don’t shoot on manual just for the sake of looking cool - there are very good reasons why you should learn how to shoot on manual mode too.
The learning curve might look steep, but the results will be super worth the efforts.
Plus, having done street photography for 8+ years, I had to make the switch at some point and I can tell you it was way easier than I thought!
The techniques will come with practice. You only need the basics on the theory and today I am going to walk you through JUST THAT.
If you find this helpful, SUBSCRIBE to my channel via the box on the left to make the most out of my blog! Also, do share it with people who might be interested. Shoot me an email/ DM to share your thoughts too!
Also, Pin this article to your Street Photography Techniques board in Pinterest if you find it helpful!
So let’s get right into it!
Definition of Manual Exposure
Let’s look at a definition of manual exposure as provided by Canon:
Manual Exposure is when the photographer manually sets the aperture, ISO and shutter speed all independently of each other… in other words shooting under M.
Alright. In simple words, you make the deliberate decision on all THREE settings - A, S, ISO.
Why Ruining Exposure is NOT the End of the World
Ideally, photographers should train themselves to get the exposure right in camera and require as little post processing as possible.
But in the process of getting there, you will have hits and misses and realistically, you WILL need to edit the exposure of your shots.
Professional photographers mostly shoot on RAW, which provides a better dynamic range to work with in editing.
But even if you shoot on JPEG, you can still get away with shots that are over/underexposed by up to, I’d say 3 stops, without causing too much destruction to your photo.
This photo below was shot on JPEG. It is so embarrassing to look at shots from my JPEG era, but hey, this is what makes my photography journey very human and real!

Overexposed Hong Kong street photo edited in Adobe Photoshop Lightroom; screenshot of before and after.
Specs: 1/400 f/10 ISO 800 Gear: Sony NEX-5R E PZ 16-50mm F3.5-5.6 OSS
Location: Sham Shui Po, Hong Kong
In my opinion the ISO was higher than what was necessary - this shot was done in the afternoon.
The boxed areas were blown out in the original file, but making slight fixes in Lightroom basically restored it to a decent level.
Don’t get me wrong, I am by no means advocating for solely relying on editing to fix your shots.
But this gives you the assurance that editing is a safety net you can fall back on as you acquire new photography techniques.
So, screwing shots is not an excuse to not explore manual exposure!
Common Street Photography Scenarios & the Corresponding Camera Settings
Most street photographs that we shoot fall into one of the following scenarios, and these scenarios themselves already provide guidelines for your settings!
What that means, essentially, is that as long as you figured out what type of shot you want, you will be able to derive these settings - no need to remember/ calculate anything.
Isn’t that AWESOME????
Scenario 1: Moving Subjects at a Distance
In street photography, a common composition technique is to press the shutter the moment a subject moves into the part of the frame you want it to be in.
To achieve that you don’t want there to be motion blur.
Based on my experience, this means that your shutter speed should ideally be higher than 1/250, especially for moving vehicles.
Plus, because it is moving, and oftentimes moving towards/away from the camera, you want a greater depth of field to increase the likelihood of the subject being in focus. That would require an aperture of at most f/7.1.
An added reason to use a smaller aperture is to keep both the subject and the background in focus.
Let’s take this street shot as an example.

Specs: 1/250 f/10 ISO 400 Gear: Canon EOS 1200D EF-S 18-55mm f/3.5-5.6 III
Location: Yik Fat Building, Hong Kong
Before I took this shot, I observed this spot for a while and I learned that taxis are accelerating in a certain direction away from my camera.
I then recognised that this is a Scenario 1 situation. So I made the adjustments (see the specs), and left the ISO on Auto.
Luckily the camera did a fairly decent job, and I started to get a hang on what these settings mean.
You might miss a few taxis at first, but being patient is the key!
Scenario 2: Streets with a perspective
Another type of shots commonly seen in street photography are those with an architectural appeal.
The sheer point of the photograph is to capture the converging lines as seen by a photographer standing on either end of that street.
To get a feeling of what I am referring to, see the example below.
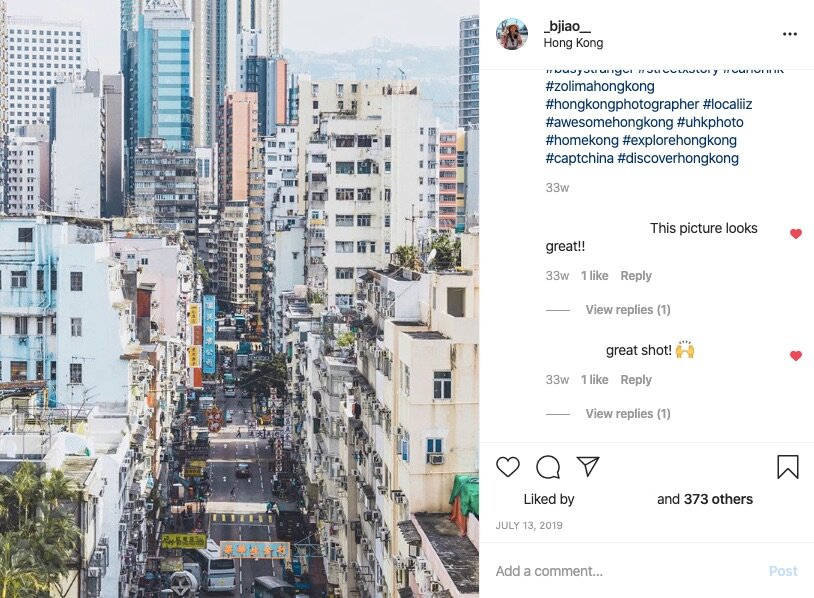
Specs: 1/200 f/9.0 ISO 200 Gear: Canon EOS 1200D EF-S 18-55mm f/3.5-5.6
Location: Jordan, Hong Kong
Lighting usually isn’t a problem in this scenario. Think about it - there must have been sufficient light in the first place so that you can see the pattern of the converging lines.
So, it follows that you could lower your ISO to the lowest level (usually 100) without much difficulty. This reduces the noise in your photos as much as possible.
Another consideration is the depth of field. You want to show perspective and therefore, you want the entire street to be in focus.
Usually, this would again require an aperture of at most f/7.1.
Now that you have both ISO and aperture sorted out, the only thing you need to work out is the shutter speed.
But in this case, since movement of objects are rather negligible, the shutter speed doesn’t really matter. I adjusted my shutter speed until the light meter reads -1 EV.
Scenario 3: Framing created by Depth of Field
Framing is a concept that is central to street photography.
Photographers make use of the framing technique to create direct the reader’s attention towards the intended subject.
To get this effect, you need a shallower depth of field, aka a larger aperture. As a matter of personal preference, I consider anything under f/3.5 as large.

Specs: 1/160 f/1.8 ISO 100 Gear: Canon EOS 80D EF 50mm f/1.8 ii
Location: Mong Kok, Hong Kong
Taking this image above as an example, I decided that the person pushing his bicycle is my subject that needs to be in focus.
With this image, I wanted to tell the story of a man with his bicycle in the midst of the chaos in Mong Kok.
I need the rest of the people to be as blurred as possible, so I opened my aperture to the widest level at f/1.8.
Since it was in the afternoon, there was sufficient daylight and so I set my ISO at 100.
I wasn’t entirely sure what the shutter speed should be, and the people on the streets were moving so I didn’t have that much time to think about my settings.
I then decided to use Aperture priority (Av Mode) instead. Since the subject was not moving very quickly, the camera’s default shutter did a pretty decent job.
How to familiarise yourself with manual exposure?
Think about the shot you want to get
Most likely, what you want to do falls into one of the above categories.
As a result, everything is just a matter of logical reasoning.
In other words, the first thing you think about should not be ‘What settings to use?’
Rather, you should first ask yourself, ‘What do I want to achieve in this shot?’
Once you made up your mind on that, the techniques will just fall into place.
Transition gradually with Av, Tv, or ISO Auto Modes
Your photography is not defined by what mode you shoot on. Therefore, there is no need to feel obliged to shoot on manual.
Sometimes, it is totally normal to have no idea regarding a particular setting, even if you have identified your shot as one of the above scenarios.
As you see in my examples, I did not always shoot on manual either; when I needed assistance, I put my aperture and ISO on auto.
Therefore, in your journey to mastering manual exposure, using Av, Tv and Auto ISO are very workable intermediate steps.
Sharpen your techniques through frequent shooting
Let’s be real. What is the worst thing that could happen if you screwed up a shot?
Nothing, absolutely nothing - it is all in your head.
Especially when you are trying to move away from the absolute beginner photographer stage, experimenting with your personal projects is the safest place to develop your photography techniques.
No client will hold you accountable for the quality of work; no follower will pick on the imperfections in your shots.
Therefore, you want to make sure you can nail every single shot before photography becomes more than just a casual hobby.
Summary
In this article, we talked about:
The definition of manual exposure as provided by Canon
Why exposure mistakes are not (that) fatal
Three common street photography scenarios (or ideas):
Moving subjects at a distance,
Streets with a perspective, and
Framing created by depth of field.
Simple methods to train up your manual exposure techniques:
Be deliberate about what you want your shot to achieve,
Make use of Av, Tv and Auto ISO shooting modes, and
Shoot frequently.
More sharing coming soon!
SUBSCRIBE via the box on the left for more PRO tips, and follow me on Instagram (@_bjiao__) and let me know what you think in the comments!
Share this article on Pinterest too!
Keep shooting, keep creating!


The mission of this blog is to provide the best insider information in the photography industry, as openly as possible. You have direct access to my
first-person experience as an aspiring photographer who talks, but also works.
Honest opinion are rarely available as public resources because this is a competitive industry. Huge sums are made when such information is delivered in the form of mentorship and workshops.
This blog is a great way in which I cover my daily expenses, but also provide real value.
If you have learnt something that would be worth at least $10, please consider donating to the page. This enables me to keep creating content and helping more people sustainably.
Your continued support for the blog is appreciated!