This article will cover the following things:
Ways to photograph books without glare;
Tips to keep a book open while photographing;
Instagram style/ bookstagram photo composition ideas; and
Product style/ e-commerce book shot ideas.
To avoid glare in photographing books, change up the angles and planes in your setup, or use polarising filters and diffusers to modify the light entering the lens. To keep a book open while photographing, fold the book harder, tuck one side beneath the other, or incorporate styling materials and the hand into the frame.
If you find this helpful, SUBSCRIBE to my channel via the box on the left to make the most out of my blog! Also, do share it with people who might be interested. Shoot me an email/ DM to share your thoughts too.
Also, Pin this article to your Photography Techniques boards in Pinterest if you find it helpful!
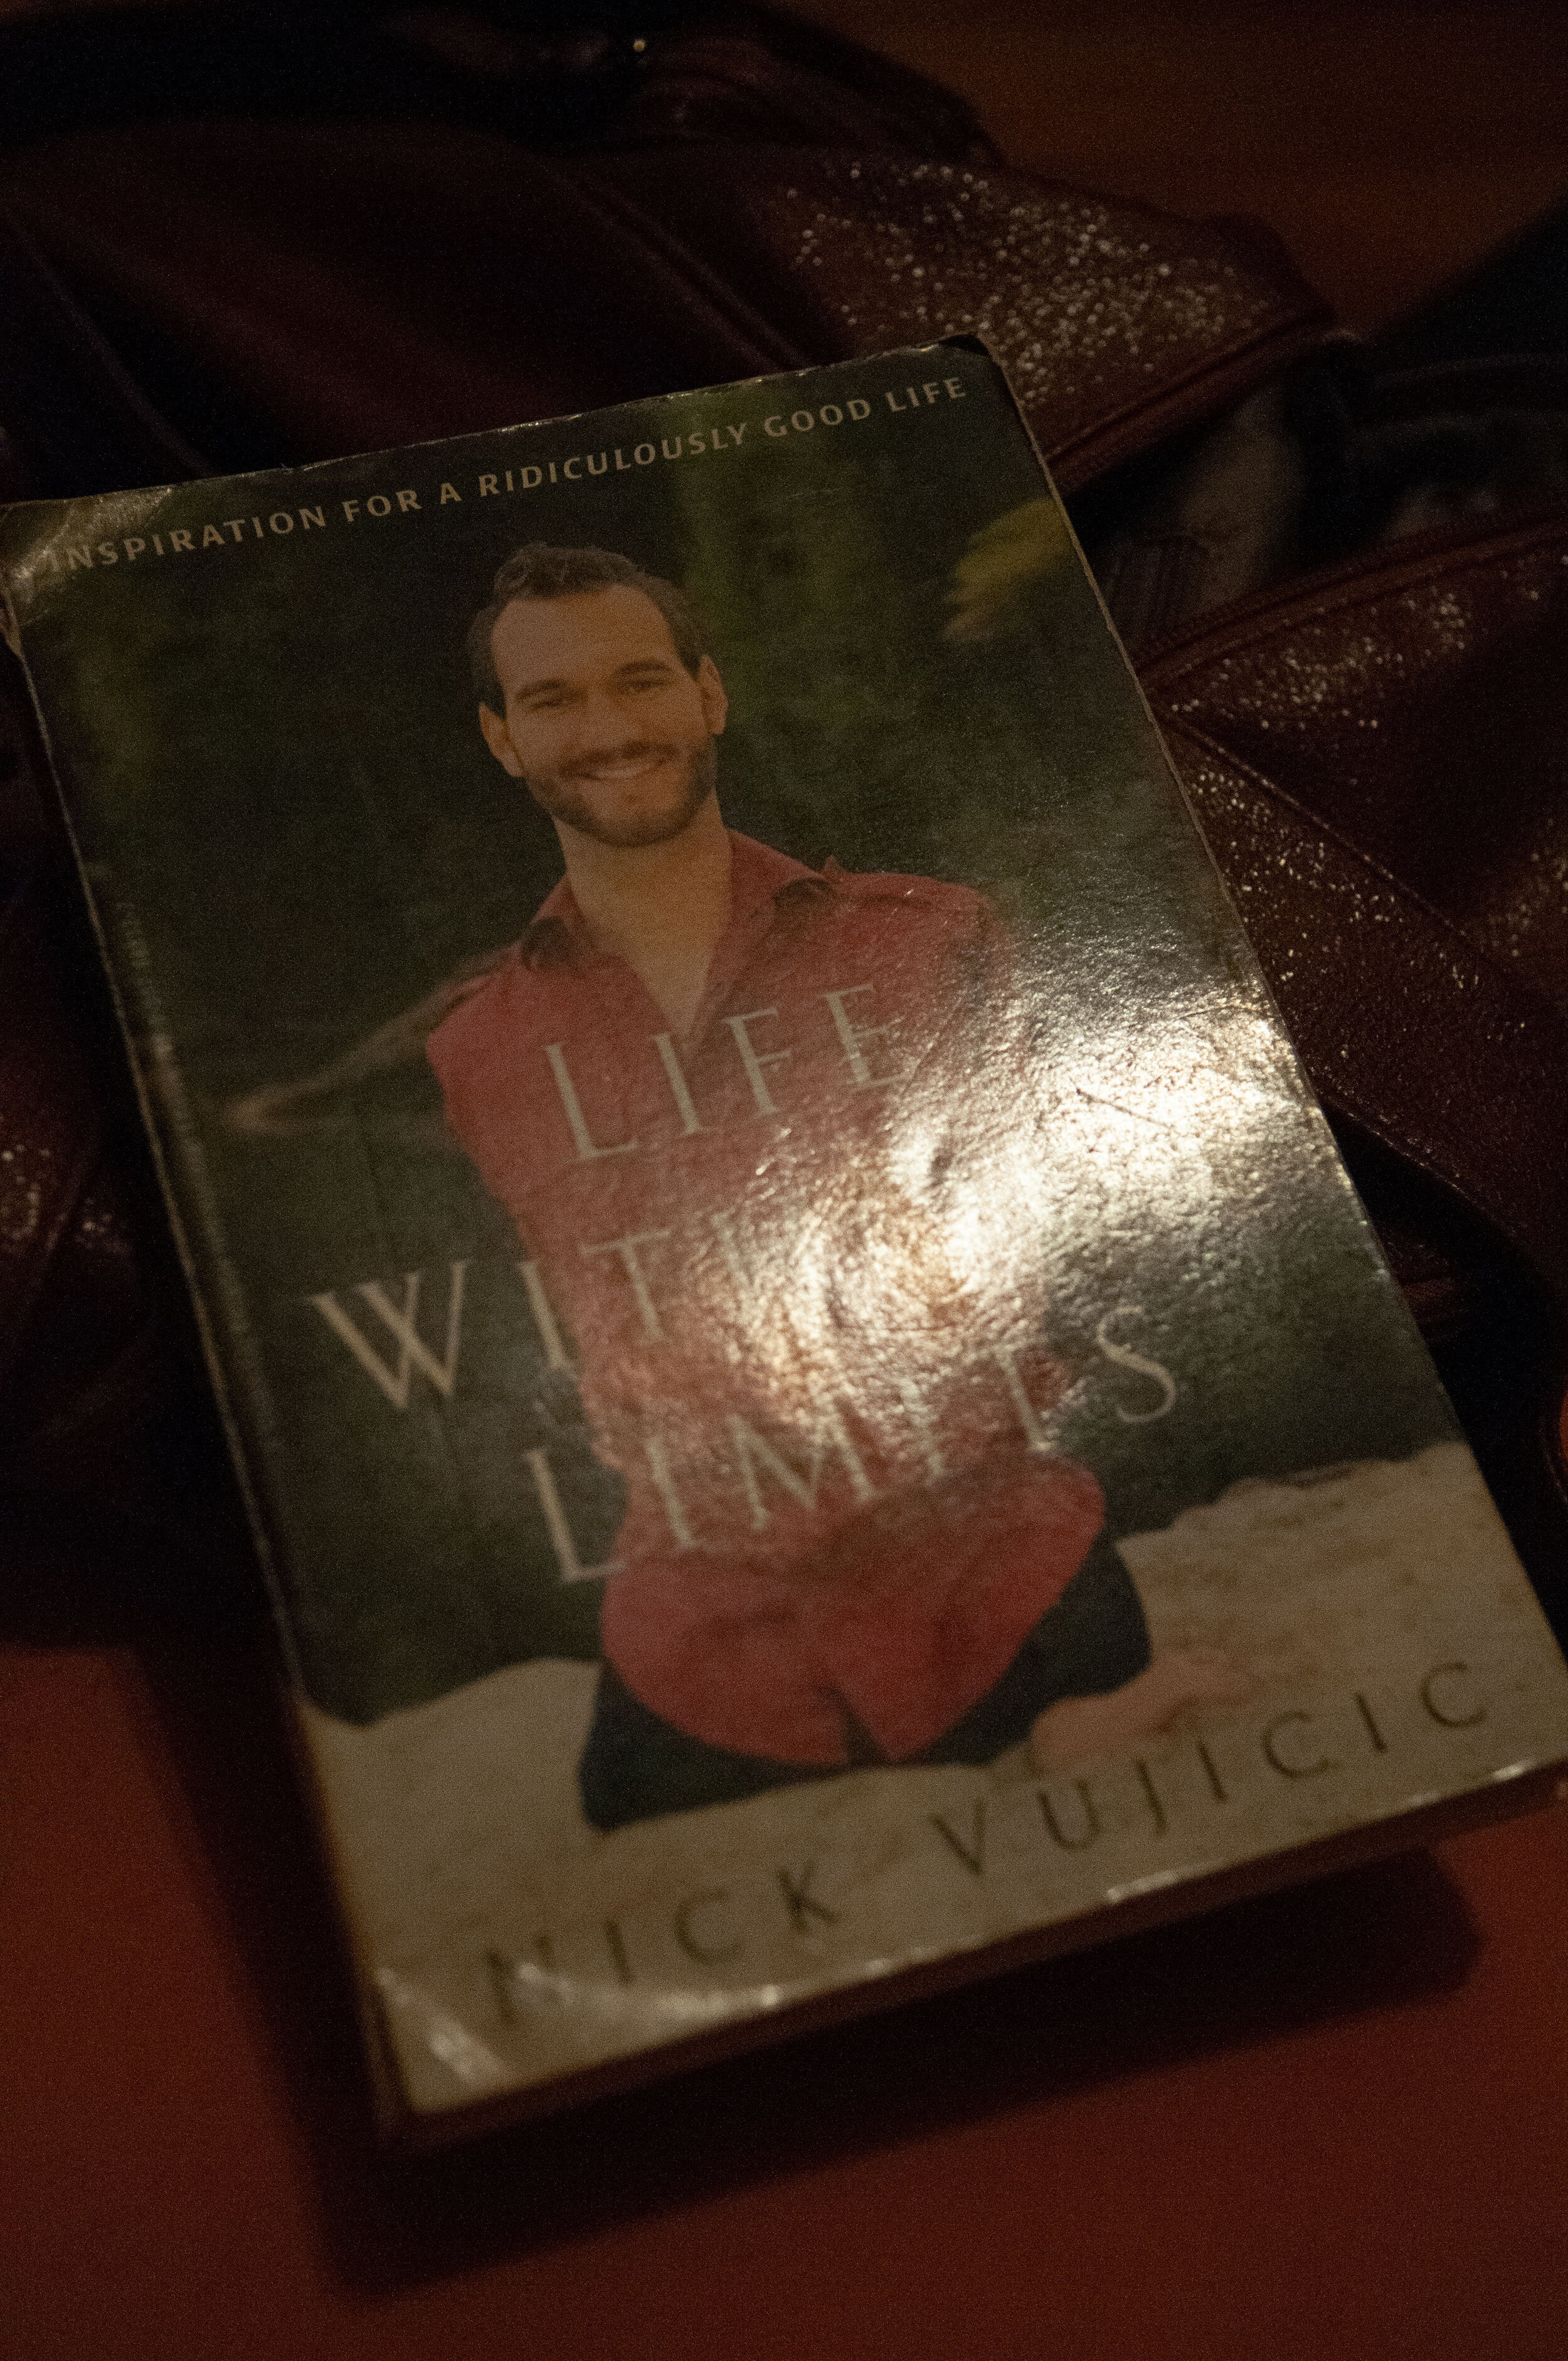
How to Photograph Books without Glare?
Glare is an issue when photographing books with shiny pages. It results in this overexposed patch on part of the page, which 1) takes away potentially important details the photo is supposed to relay, and 2) looks amateurish overall.
So here are three most straightforward ways to solve the issue, with varying requirements on additional gear.
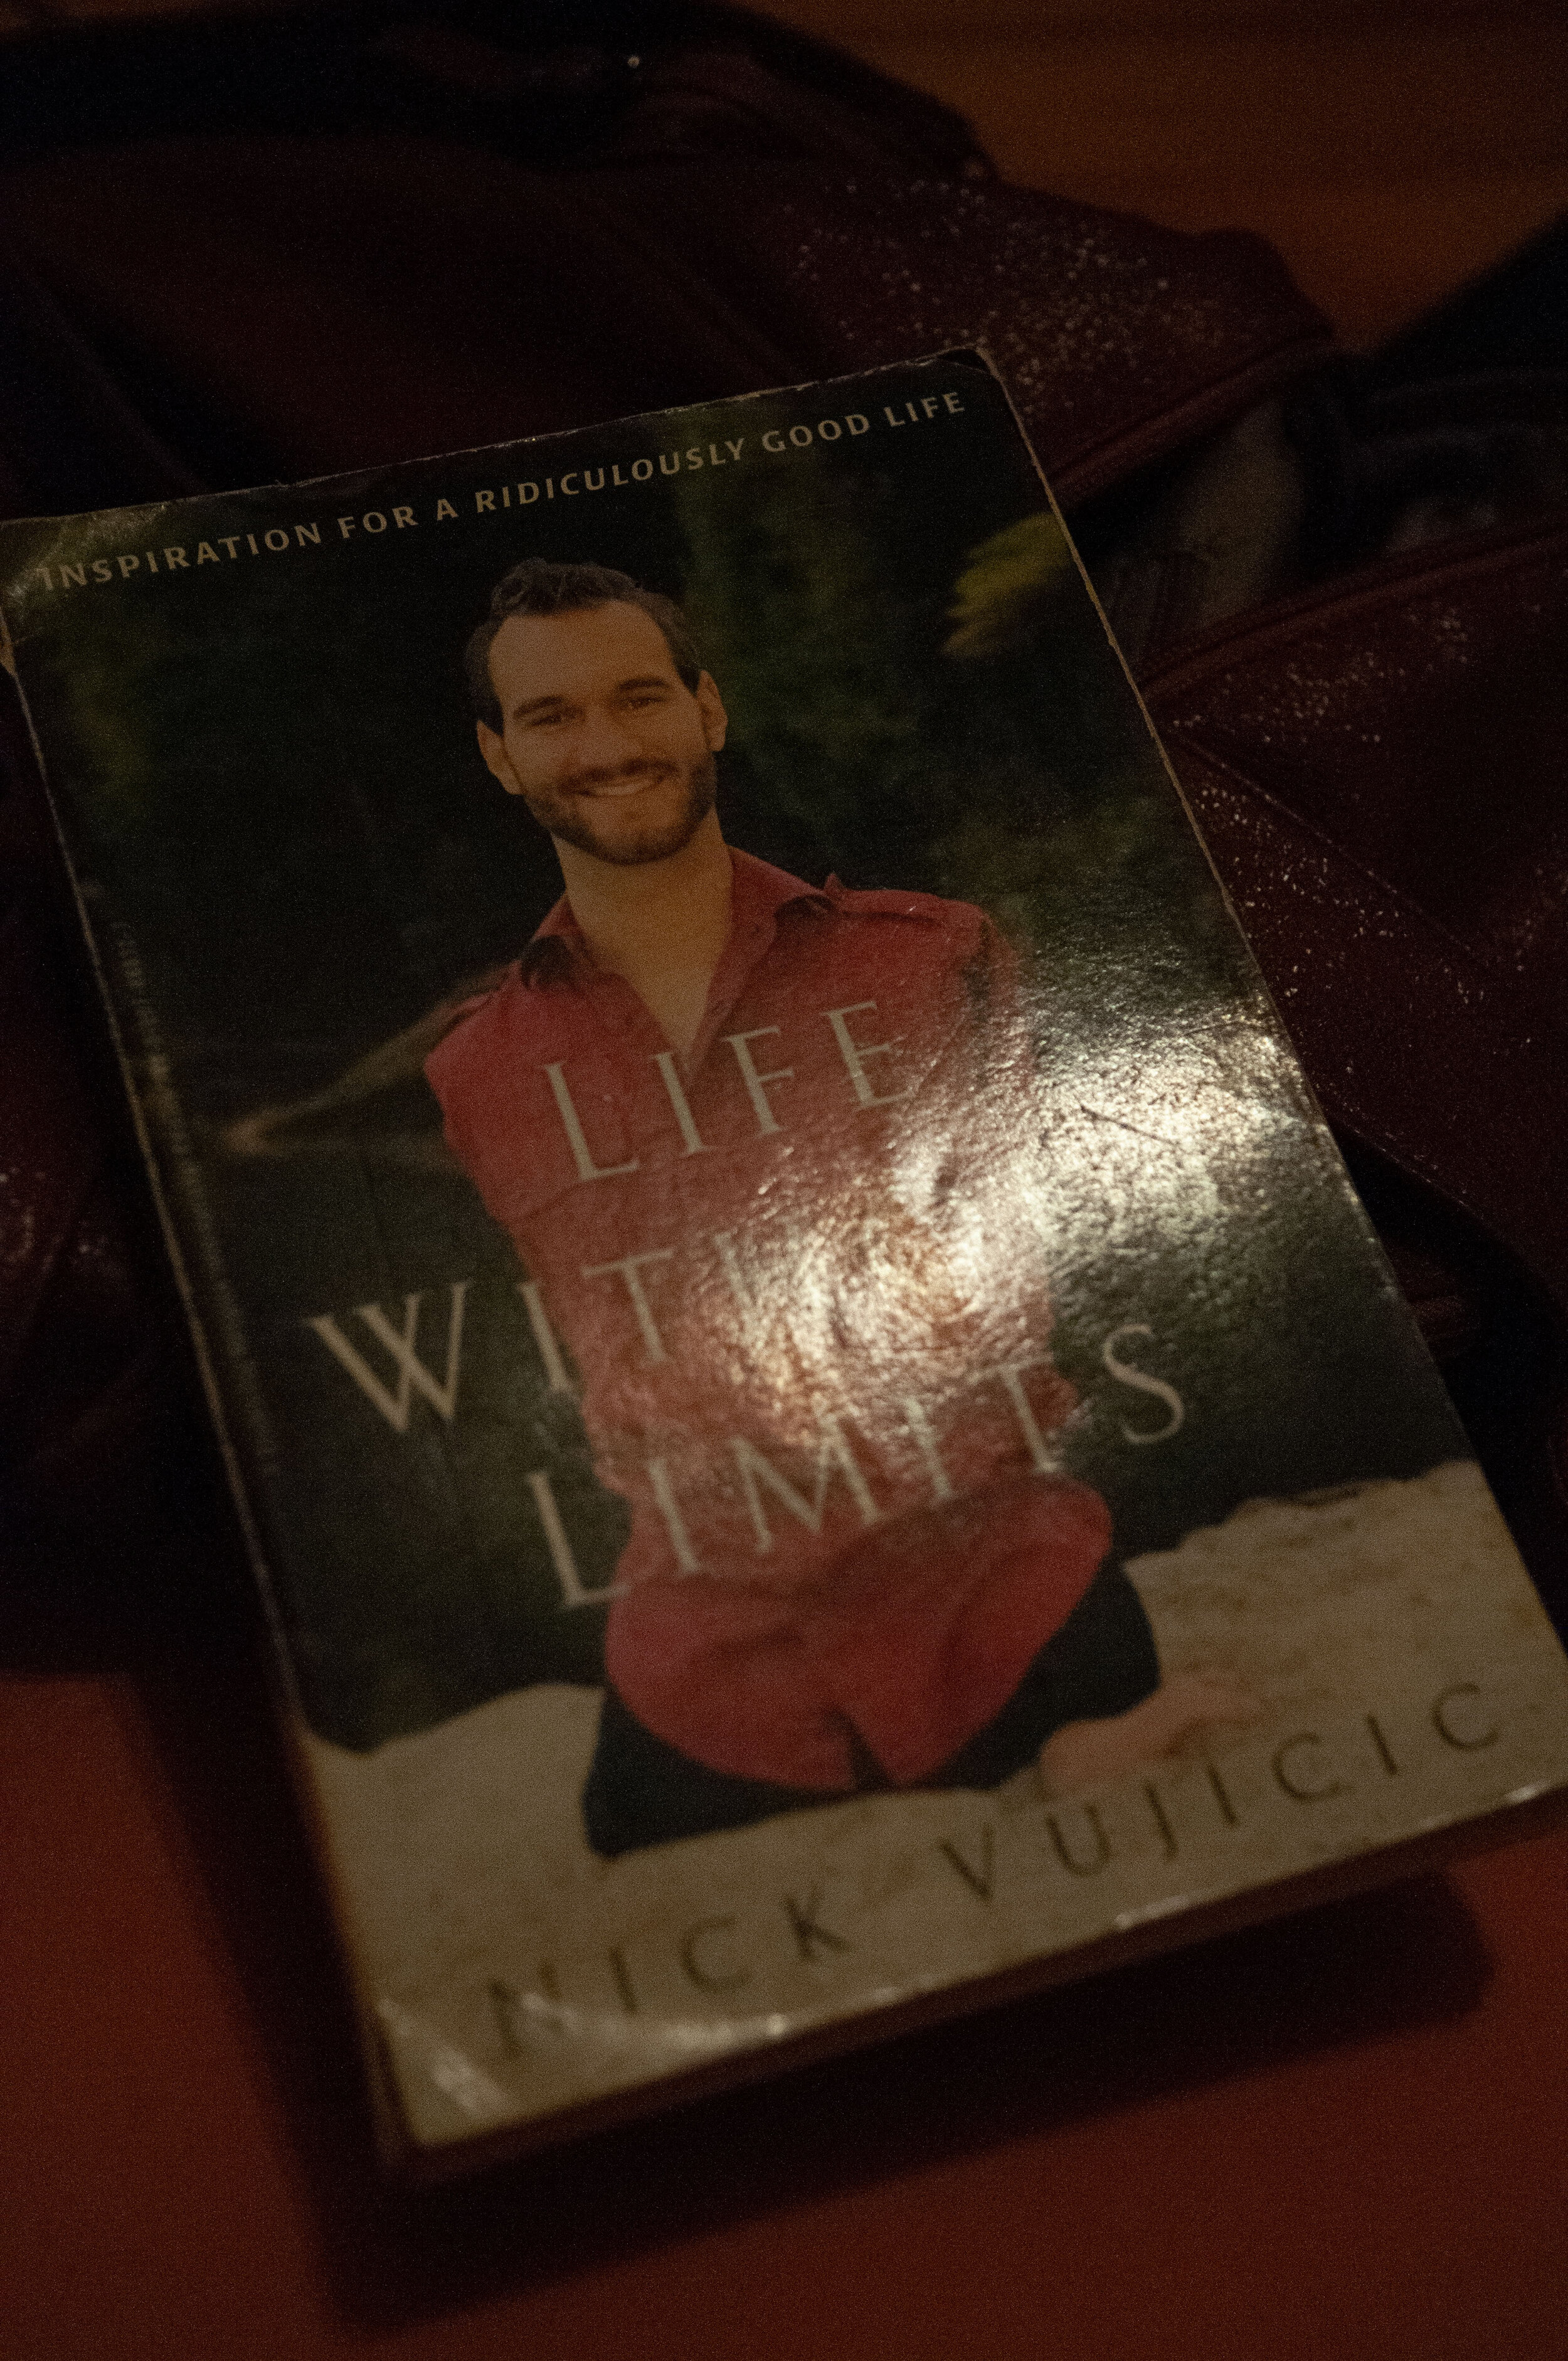
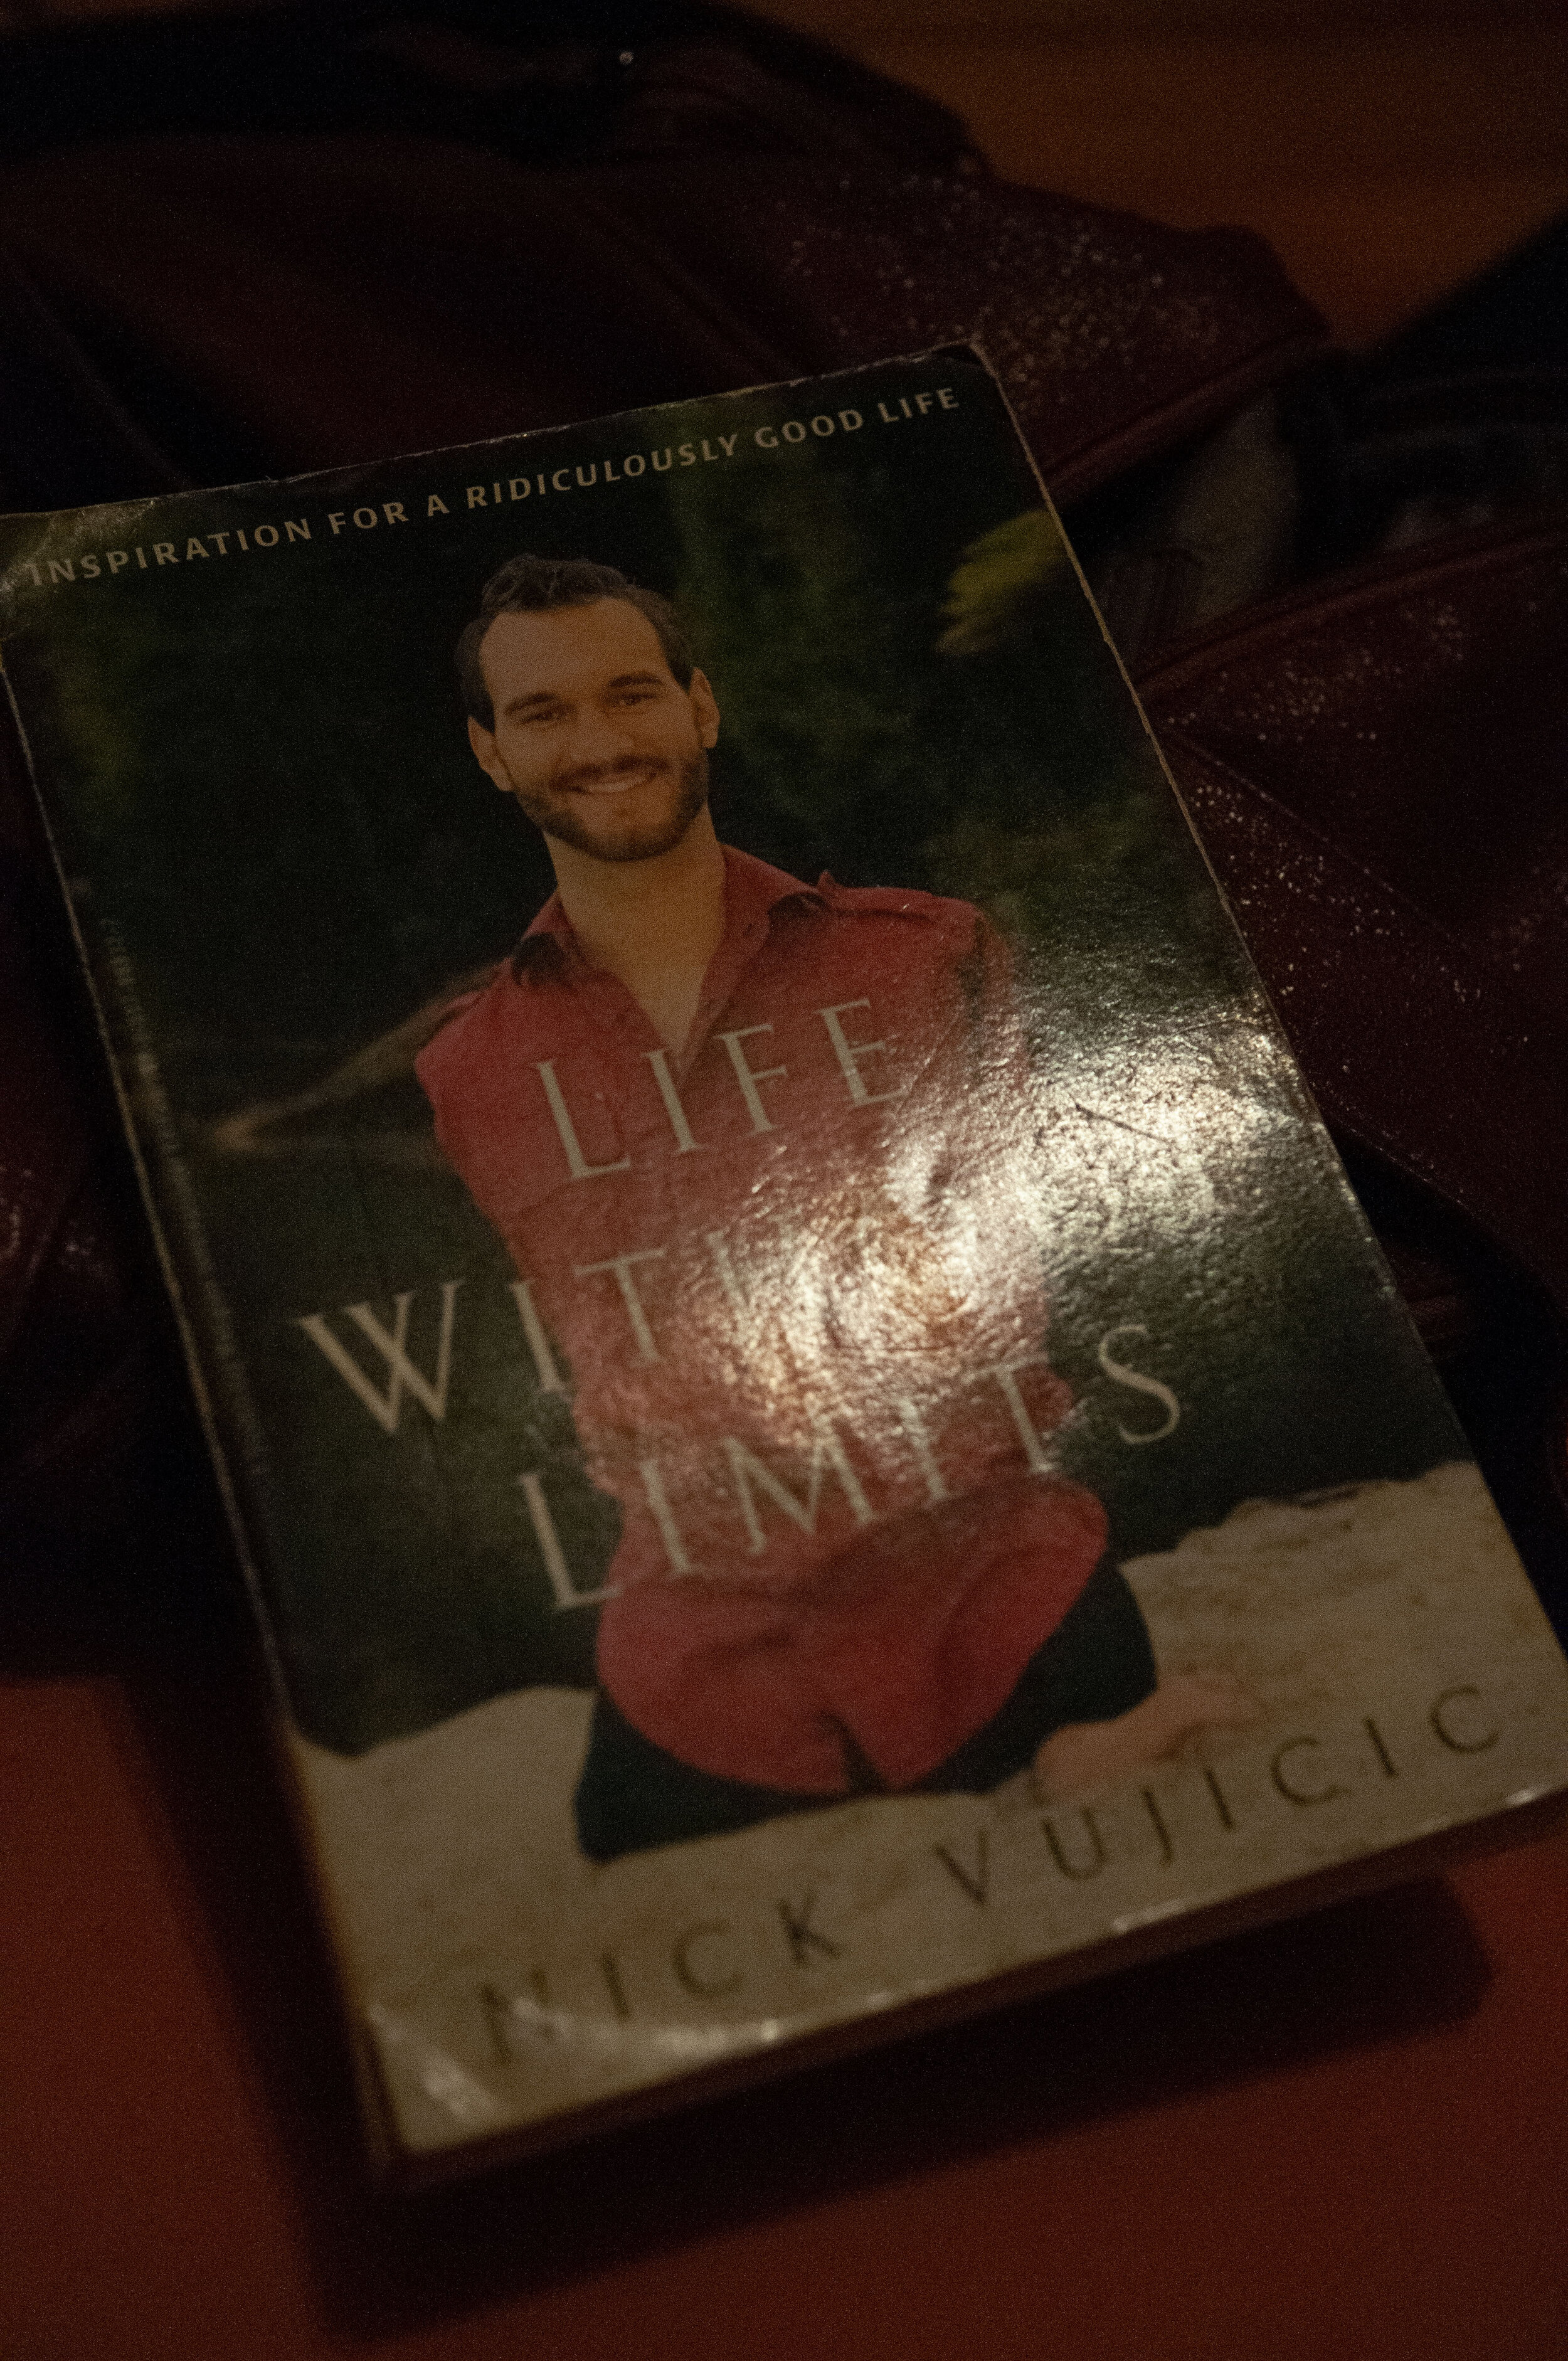
Angle
The easiest way, without involving extra gear and accessories, is to change the angles. This is a common technique in professional product photography - by no means is it an inferior technique as compared to the following two, which would require additional equipment.
Patches of blown-out highlights appear on pages because of a combination of angles. Light travels from your light source, hits the book page at an angle, reflects away from the book page at the identical, opposing angle, and finally hits onto your camera’s sensor. Overexposure is essentially the result of too much light entering onto your camera sensor from that specific part of the book page.
Simply change any one of the angles mentioned above, and the bright patch will be mitigated. You can opt for any of the following, whichever the most convenient:
Change the position/ direction of the lighting (applicable if the book is lit using mainly artificial lighting);
Adjust the position/ slant angle of the book;
Move your position/ angle of your camera
While this is the most cost-effective way to avoid glare, this method creates some limitations of composition - perhaps you can try changing the angles up and compare this new composition with the original one.
Indeed, with some shots does not allow you to change the angle, such as the flatlay because a flatlay has to be flat; or the upfront hero shot because the lines have to be straight. In these cases, you will have to resort to the following methods by introducing extra accessories.
Based on my experience though, with the majority of the shots, a little stretch on your creativity in composition (and some abs and legs in case you have to squat or do some weird pose) will do the job.
Polarising Filter
The polarising filter is a piece of glass that you can mount in the front of your lens, which cuts out reflections.
Depending on the design of individual filters, you might be able to rotate the filter to adjust the amount of reflection you still want to retain in the image, because a moderate level of shine is not only acceptable, but it can actually make your book product look for 3D and realistic.
With a polarising filter, you will able to keep your composition and styling as is and shoot as usual.
Note that they might not be able to cut out the glare completely in some cases, though they can significantly reduce the glare.
Here is an example I made to demonstrate the effect of a polarizing filter - on the left most is a shot without the filter. The middle shot was with the filter adjusted to moderate level of glare, whereas the right most photo was shot with the filter adjusted to cut out the most glare.
All shots were shot under the same camera settings.
For your reference, the polarising filter I used was a H&Y SPRO 1 CPL 77mm filter.

Diffuser
This is an alternative for those who want to lessen the hot glare to retain more detail, while wanting the highlights to remain in a more subtler form.
A diffuser is a piece of white material that diffuses the light, as its name suggests.
We mentioned that glare is the result of too much light concentrated at one spot and thus causes too much of it to hit the camera sensor at where the patch recorded.
What the diffuser does is that it spreads that light out to give a gradual, smooth transition to the brightest to darkest parts of the book page. Another way of understanding this is that the diffuser changes the initial angle from which the light hits the book page into many more different angles, thus diluting the harsh patching effect.
As a result, the book page is still bright where the highlights are supposed to be, but it spans over a larger area and transitions nicely across a larger area on the page.
How to Keep a Book Open while Shooting?
Another practical difficulty in shooting books is when you want to capture its inside pages. Certain paperback books are produced in a way that makes it hard to stay open - they stubbornly collapse and close.
The tips below are ways I often use to circumvent this problem.
If the book couldn’t rest open on its own, you will have to rely on styling to keep it open.
Handling the Book
Choose a Page in the Middle
Depending on the exact book you are photographing, some books are not entirely not foldable, you just haven’t folded hard enough.
Though to save you from totally ruining the backbone of the book, which I have done, picking a page in the middle page range would help alleviate that problem - you probably don’t have to fold that hard to get it to stay put.
The weight of the pages on both sides are relatively equal when you pick a page closer to the middle - this adds to the stability of the opened book.
Tucking One Side Behind the Other
Another way of handling the book so that it stays open, is to wrap one side of the open book backwards and tuck it beneath the backbone.
Sounds complicated? Here is an example.
For better stability, especially if the book you are photographing is thick, open the book at a page in the first half of the book.
The apparent limitation of this is that it doesn’t quite work on books with a hard cover; it also imposes some limitations on your composition.
Partial Inclusion of Book
No one ever said you must include the entire book in the frame - unless you are doing e-commerce style product photos (but then you mostly will photograph the book closed).
If you prefer to keep your shot clean and minimise the amount of styling required, a tactful way is to crop out parts of the book where you are fixing it.
There you get your book to remain open, while minimising the items that can potentially distract in the frame.
This also leaves more negative space for you to create any composition as you see fit.
Styling Materials
Some hard paperback books actually do not have this level of flexibility for folding, and therefore you will need the help of other items that go with the shoot in photographing inside pages of a book.
As we will see in the section below, in many circumstances, especially if you are going for the ‘Instagram look’ (aka #bookstagram), you will be incorporating a bunch of other items into the frame together with your book. It is then only a matter of positioning the items, and tactfully keeping the pages open by placing sufficiently heavy items in the right places.
Examples of common materials used to assist with styling book shots include:
Stationary
Bookmarks/ Cards
Plants Stalks/ Flowers
Another book, whether identical or not
Here is how I styled the book shot by incorporating Shiseido products to tell a story of going on vacation and adventures.

These are but some of the most typical things people incorporate into their book photography, but by no means by limited but these and do exercise your creativity in matching items with your book!
Hand Gestures
Even simply holding the book is a great way to keep the book open while achieving lovely aesthetics - back to basics!
For instance, you can hold the book book in your hand.
Or, you can lay the book down and incorporate the hand while fixing the pages - see here an example.
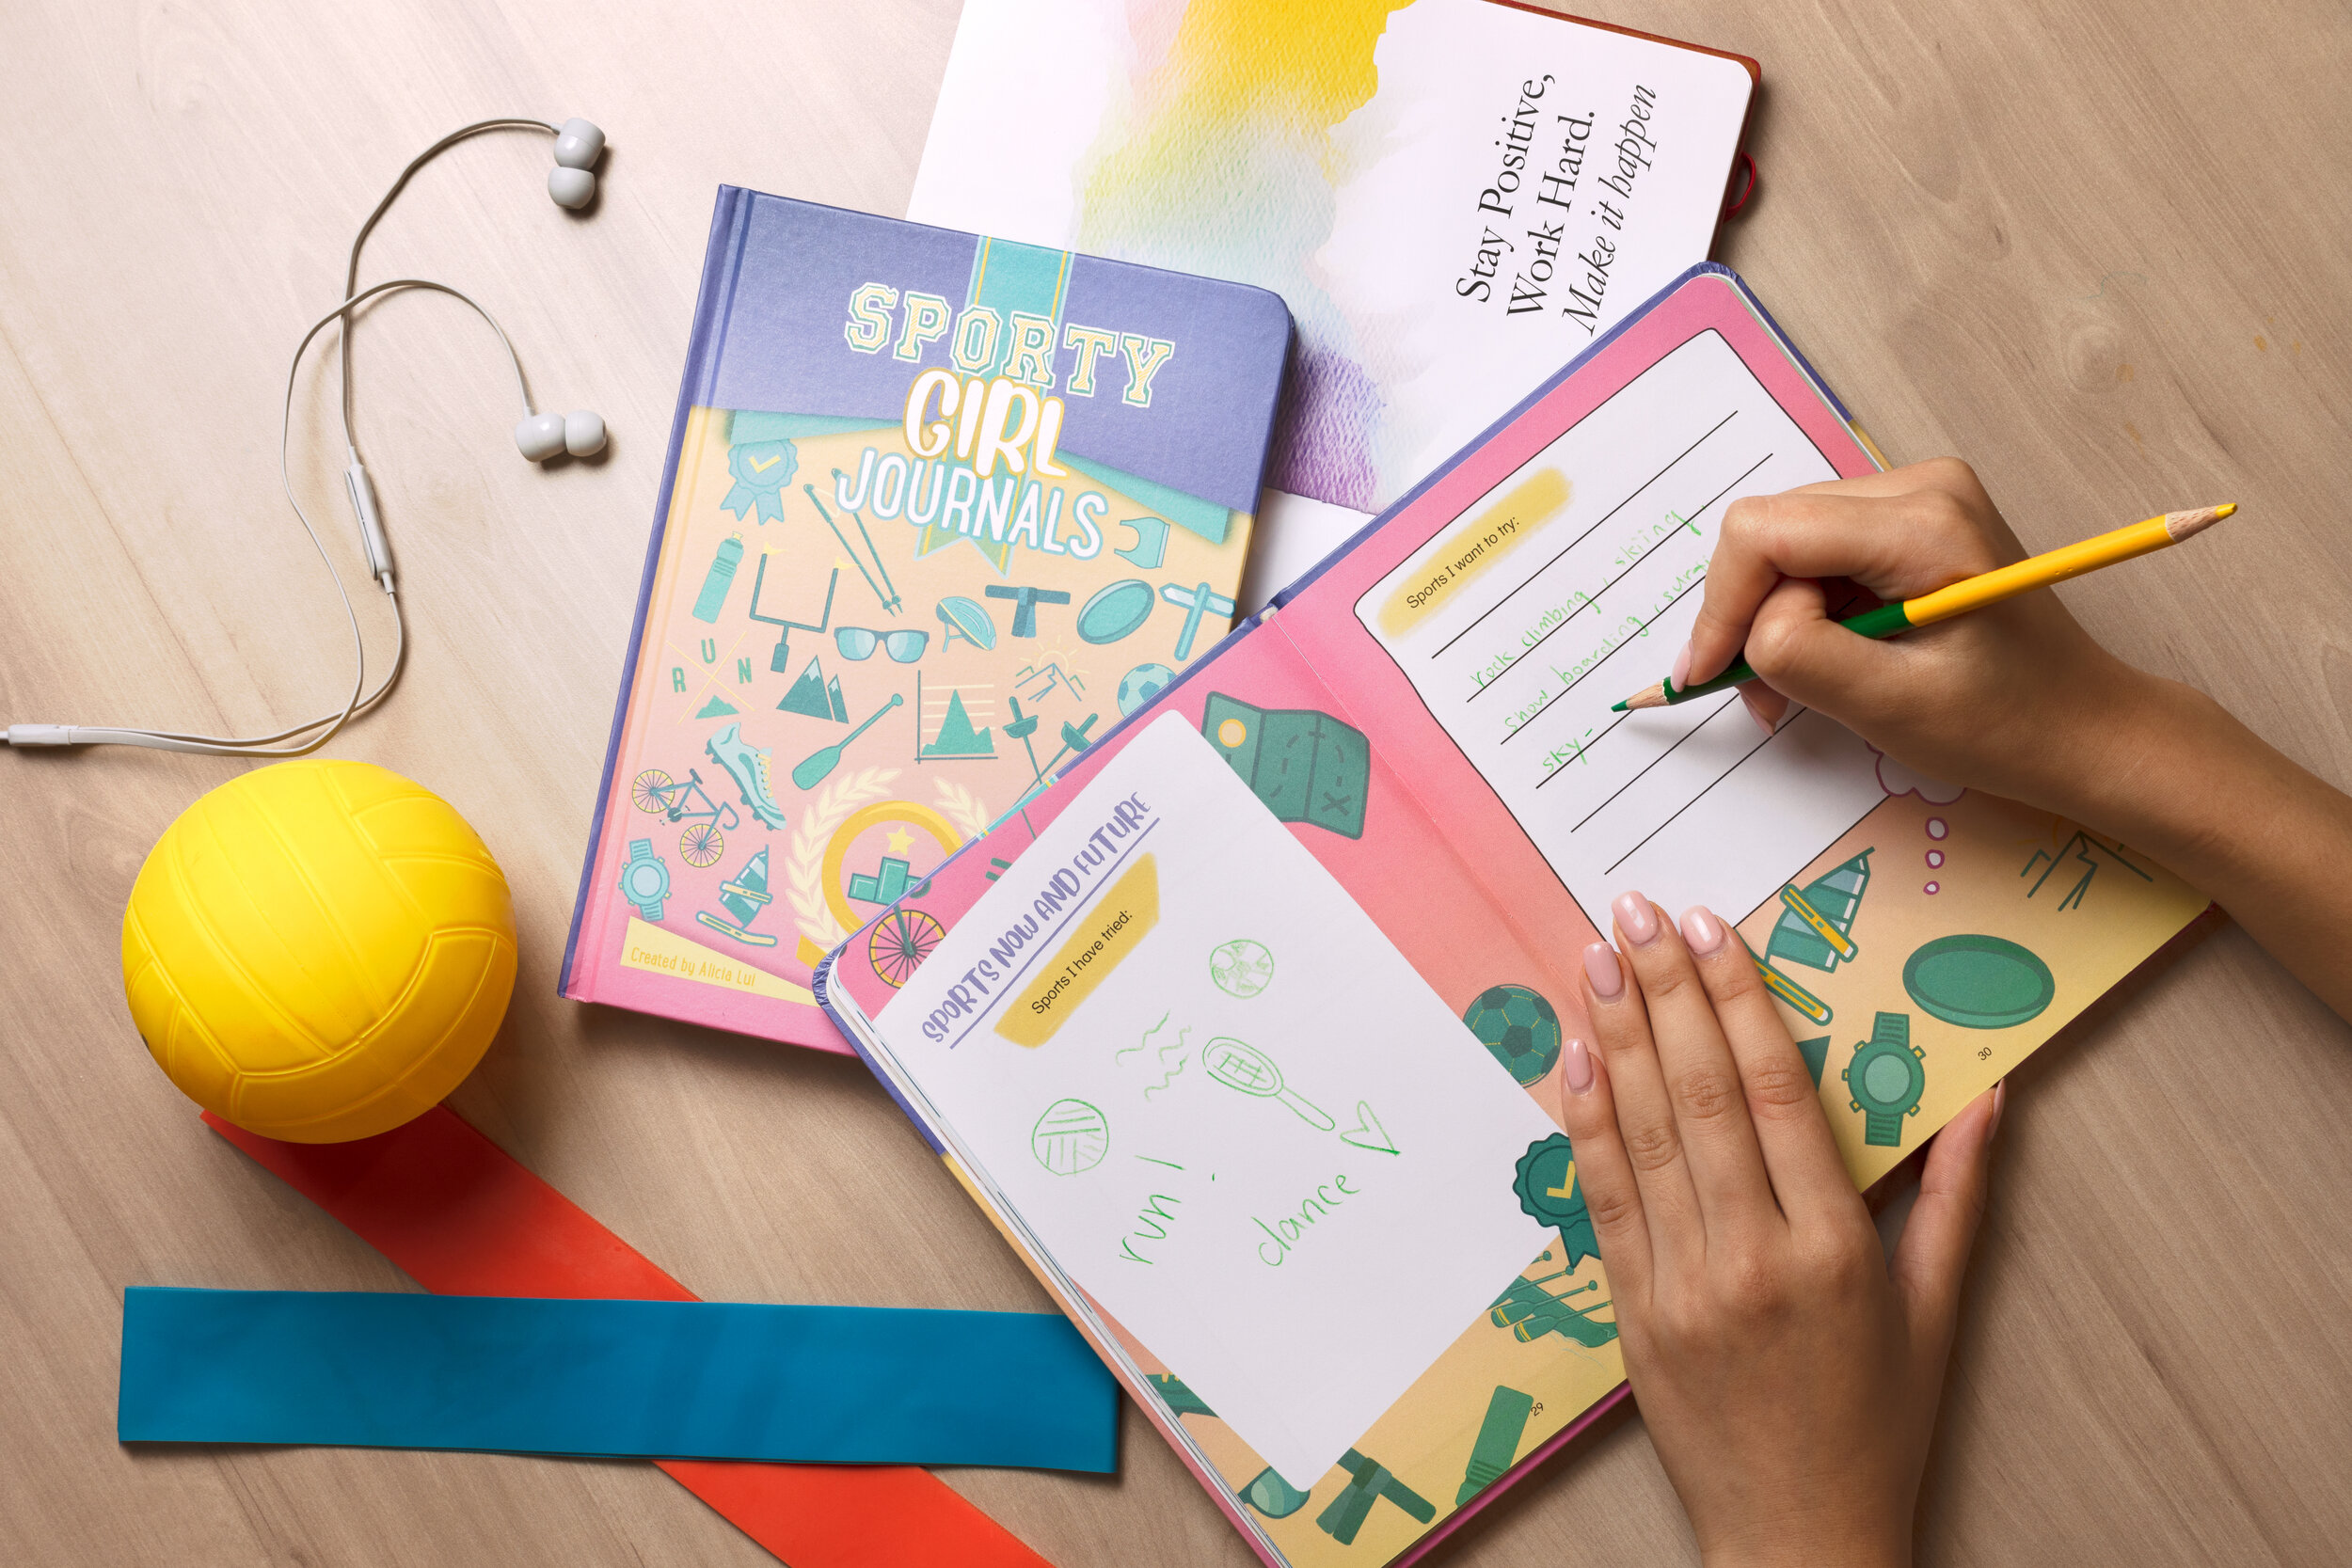
This is a great way to add a personal touch which makes the shot feels less staged and generic. Feel free to find your own way of positioning the hand!
Instagram Style Book Photography Ideas
In this section, let’s look at some general photo ideas for bookstagram shots - absolutely bomb for Instagram!
Flatlay
The flatlay is commonly employed in Instagram photos not without good reason.
It allows many items to be incorporated into the shot alongside the book, which adds substance to the shot. Instagram is about conveying and fostering lifestyles. This ability to use other related items to help create a sentiment works very well on Instagram.
This was a flatlay I did for Shiseido’s lifestyle blog.

Specifically for books and especially when they are photographed closed, they can look flat and don’t fill the frame sufficiently. By photographing from the top, the thickness factor is eliminated because everything is expected to look flat. Flatlays are a commonly used techniques across various genres of photography, such as food, to make flat items look more flattering.
In creating a flatly, pay attention to the concept of visual weight. In simple words, visual weight means creating a balance between the items in a flatlay shot. To achieve a balanced, natural-looking composition, you will have to make a few attempts, tweaking things one at a time.
Based on my experience, things to pay attention to include:
Positioning of each item (relative to each other),
Amount of particular items,
Orientation of particular items,
Colour of particular items (if you had to choose)
We can go on and on about the theory of visual weight, but words can just go as far in explaining visuals - it ultimately builds down to your sense of what looks nice - photography is way more flexible than you imagined!
It can take up to 3-4 hours just to develop a flatly setup that you are happy with, depending on how complex your design is. But the journey is a hell lot of fun, and your eye for flattering compositions will just get better with more practice!
At an angle
Unless you plan your feed to be strictly a flatlay feed, or else you will likely need shots done from a variety of angles.
Images shot at an angle has the advantage of creating a sense of depth. Unlike the flatlay, in which every item is at the same distance from the camera, photographing your book enables you to play with the concept of visual depth to make your book stand out more.
When shot at an angle, it essentially means that some things will be in front of your book, others behind. These ancillary items also bring out the context in which you placed your book, but in a slightly different way from the flatlay.
Firstly, depending on the positions of the items relative to the book, your camera will likely focus on the book, resulting in a blurry foreground and background. For those shooting on a camera - to accentuate this effect (aka bokeh), turn down your aperture stop. This draws attention to the book because the focus on it is the sharpest compared with other items in the frame.
Secondly, shots at an angle require that you have an intention, because most likely your book is now going to take up a larger part of the frame. For flatlays, you don’t necessarily need to identify one main protagonist in your shot - in extreme cases the messier the items the more aesthetically pleasing - but for shots fired at an angle, an unorganised setup seldom works well. This routes back to the same concept of visual weight.
It requires that you tidy up your setup and minimise the items that can potentially be distracting around your book. When you have one large item in your frame, it requires a more delicate balance between negative space and ancillary items for the image to look ‘normal’.
Lifestyle
Another convenient way to add variety to #bookstagram shots in your feed is to show up in person - take a photo of yourself reading the book!
Here is an example I did of such type of shots.

Depending on how the book cover is formatted, the viewer can still read it even where you incorporate your whole/ upper body into the shot. This is a great way to inject more personality into your feed. Nothing stands for your character better than yourself!
This will require you to hold the book not necessary at the angle you normally would - we are doing it for the gram - but to hold it tilt it slightly so that the cover is closer to an upright angle relative to the camera lens.
For usual sizes of books, it is better to photograph your upper body because you will need the camera to be sufficiently close to the book for your audience to make out what it is about. This also means that it can be a challenge to include your entire body.
For larger books, you can consider doing full body sitting shots, because if the cover is large enough, it makes sense to stay further away from the camera while holding it so as to create a better balanced image.
Product Style Book Photography Ideas
Here we are going to look at how you can shoot plain product-style book photos, including a shot list of common shots, and what to pay attention to when choosing the backdrop.
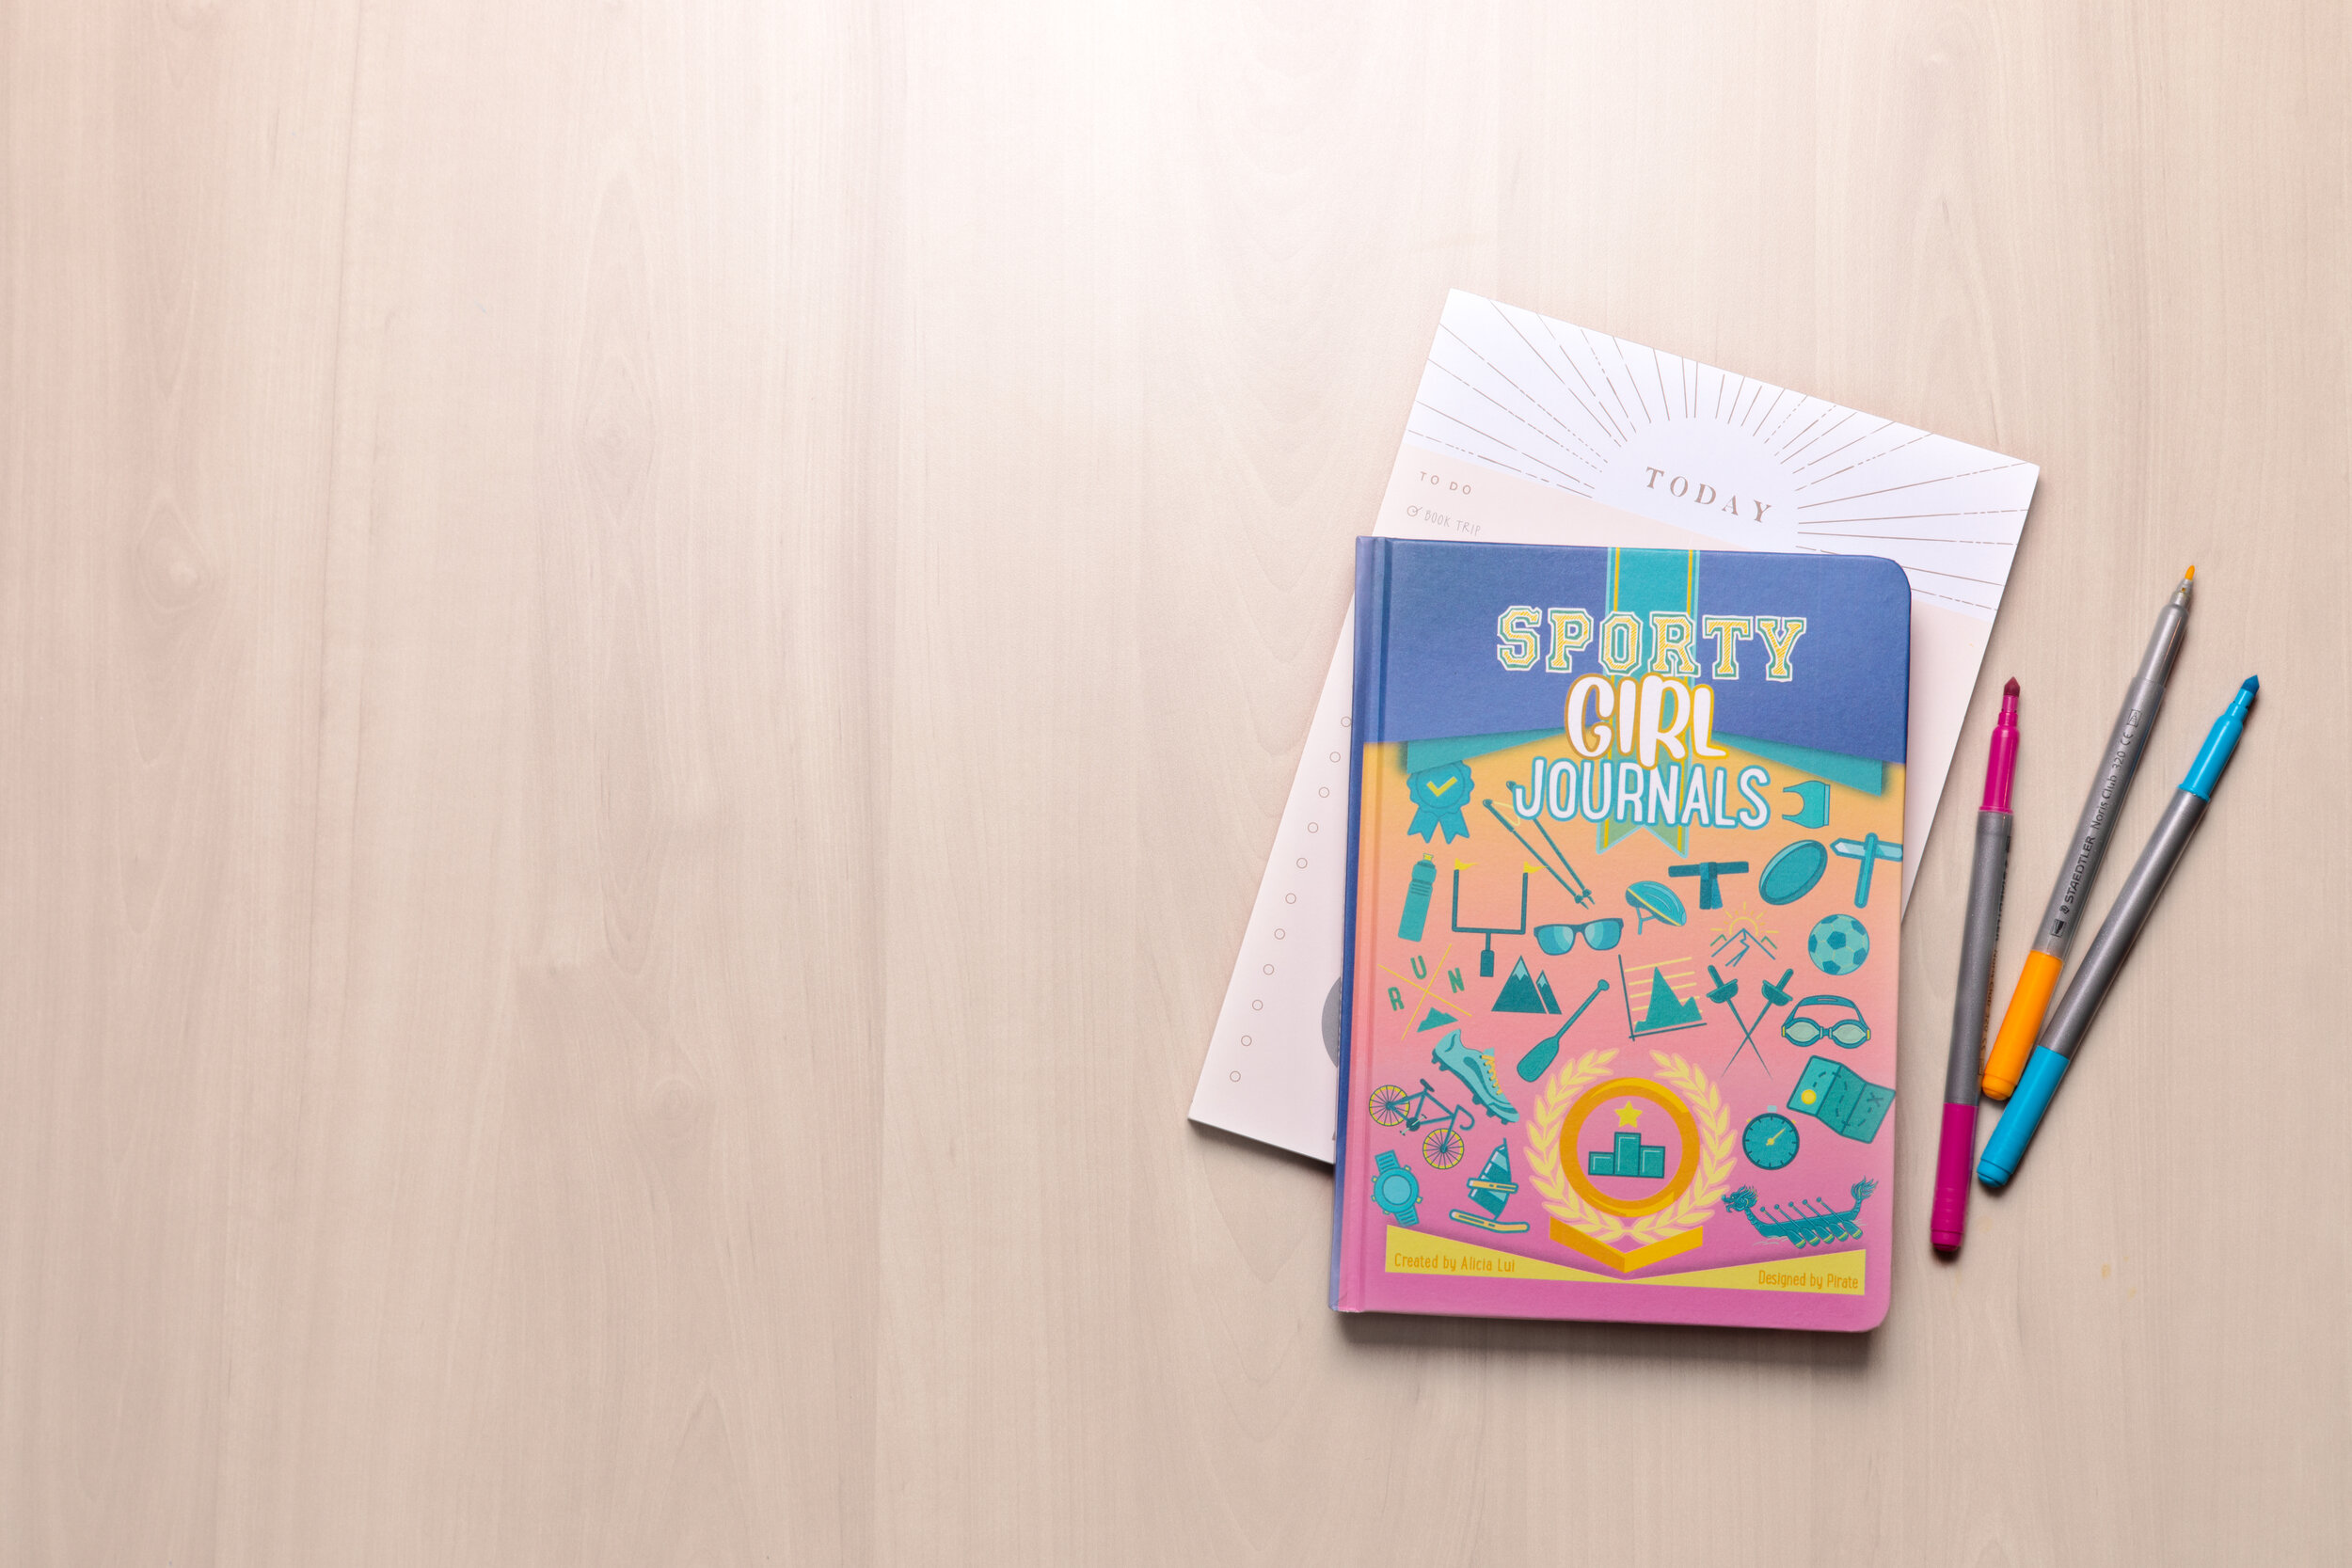
Front Cover
Totally essential is the hero shot of the book, featuring the front cover. People do judge a book based on its cover, so you will need an impressive shot of the cover to successfully sell your book online.
This was what I did for a book client.

Before we talk about aesthetics though, the first thing the hero shot must do is to clearly show the book cover for what it is. This avoids disappointment due to misrepresentation of the book in the photos.
To do this, I recommend photographing on eye-level relative to the book to avoid any distortion in the lines and shapes. Make sure the plane of the book is parallel to the camera as far as possible.
Light the scene sufficiently with neutral white light so as to reflect the colours on the book as is.
Interior Page
On top of the standard hero shot of the cover, you might want to let the potential buyer see a glimpse of the layouts inside, how it is formatted so as to help them decide to or not to buy.
When I worked with a book client, we chose this page deliberately because it embodies the spirit of the book the best.
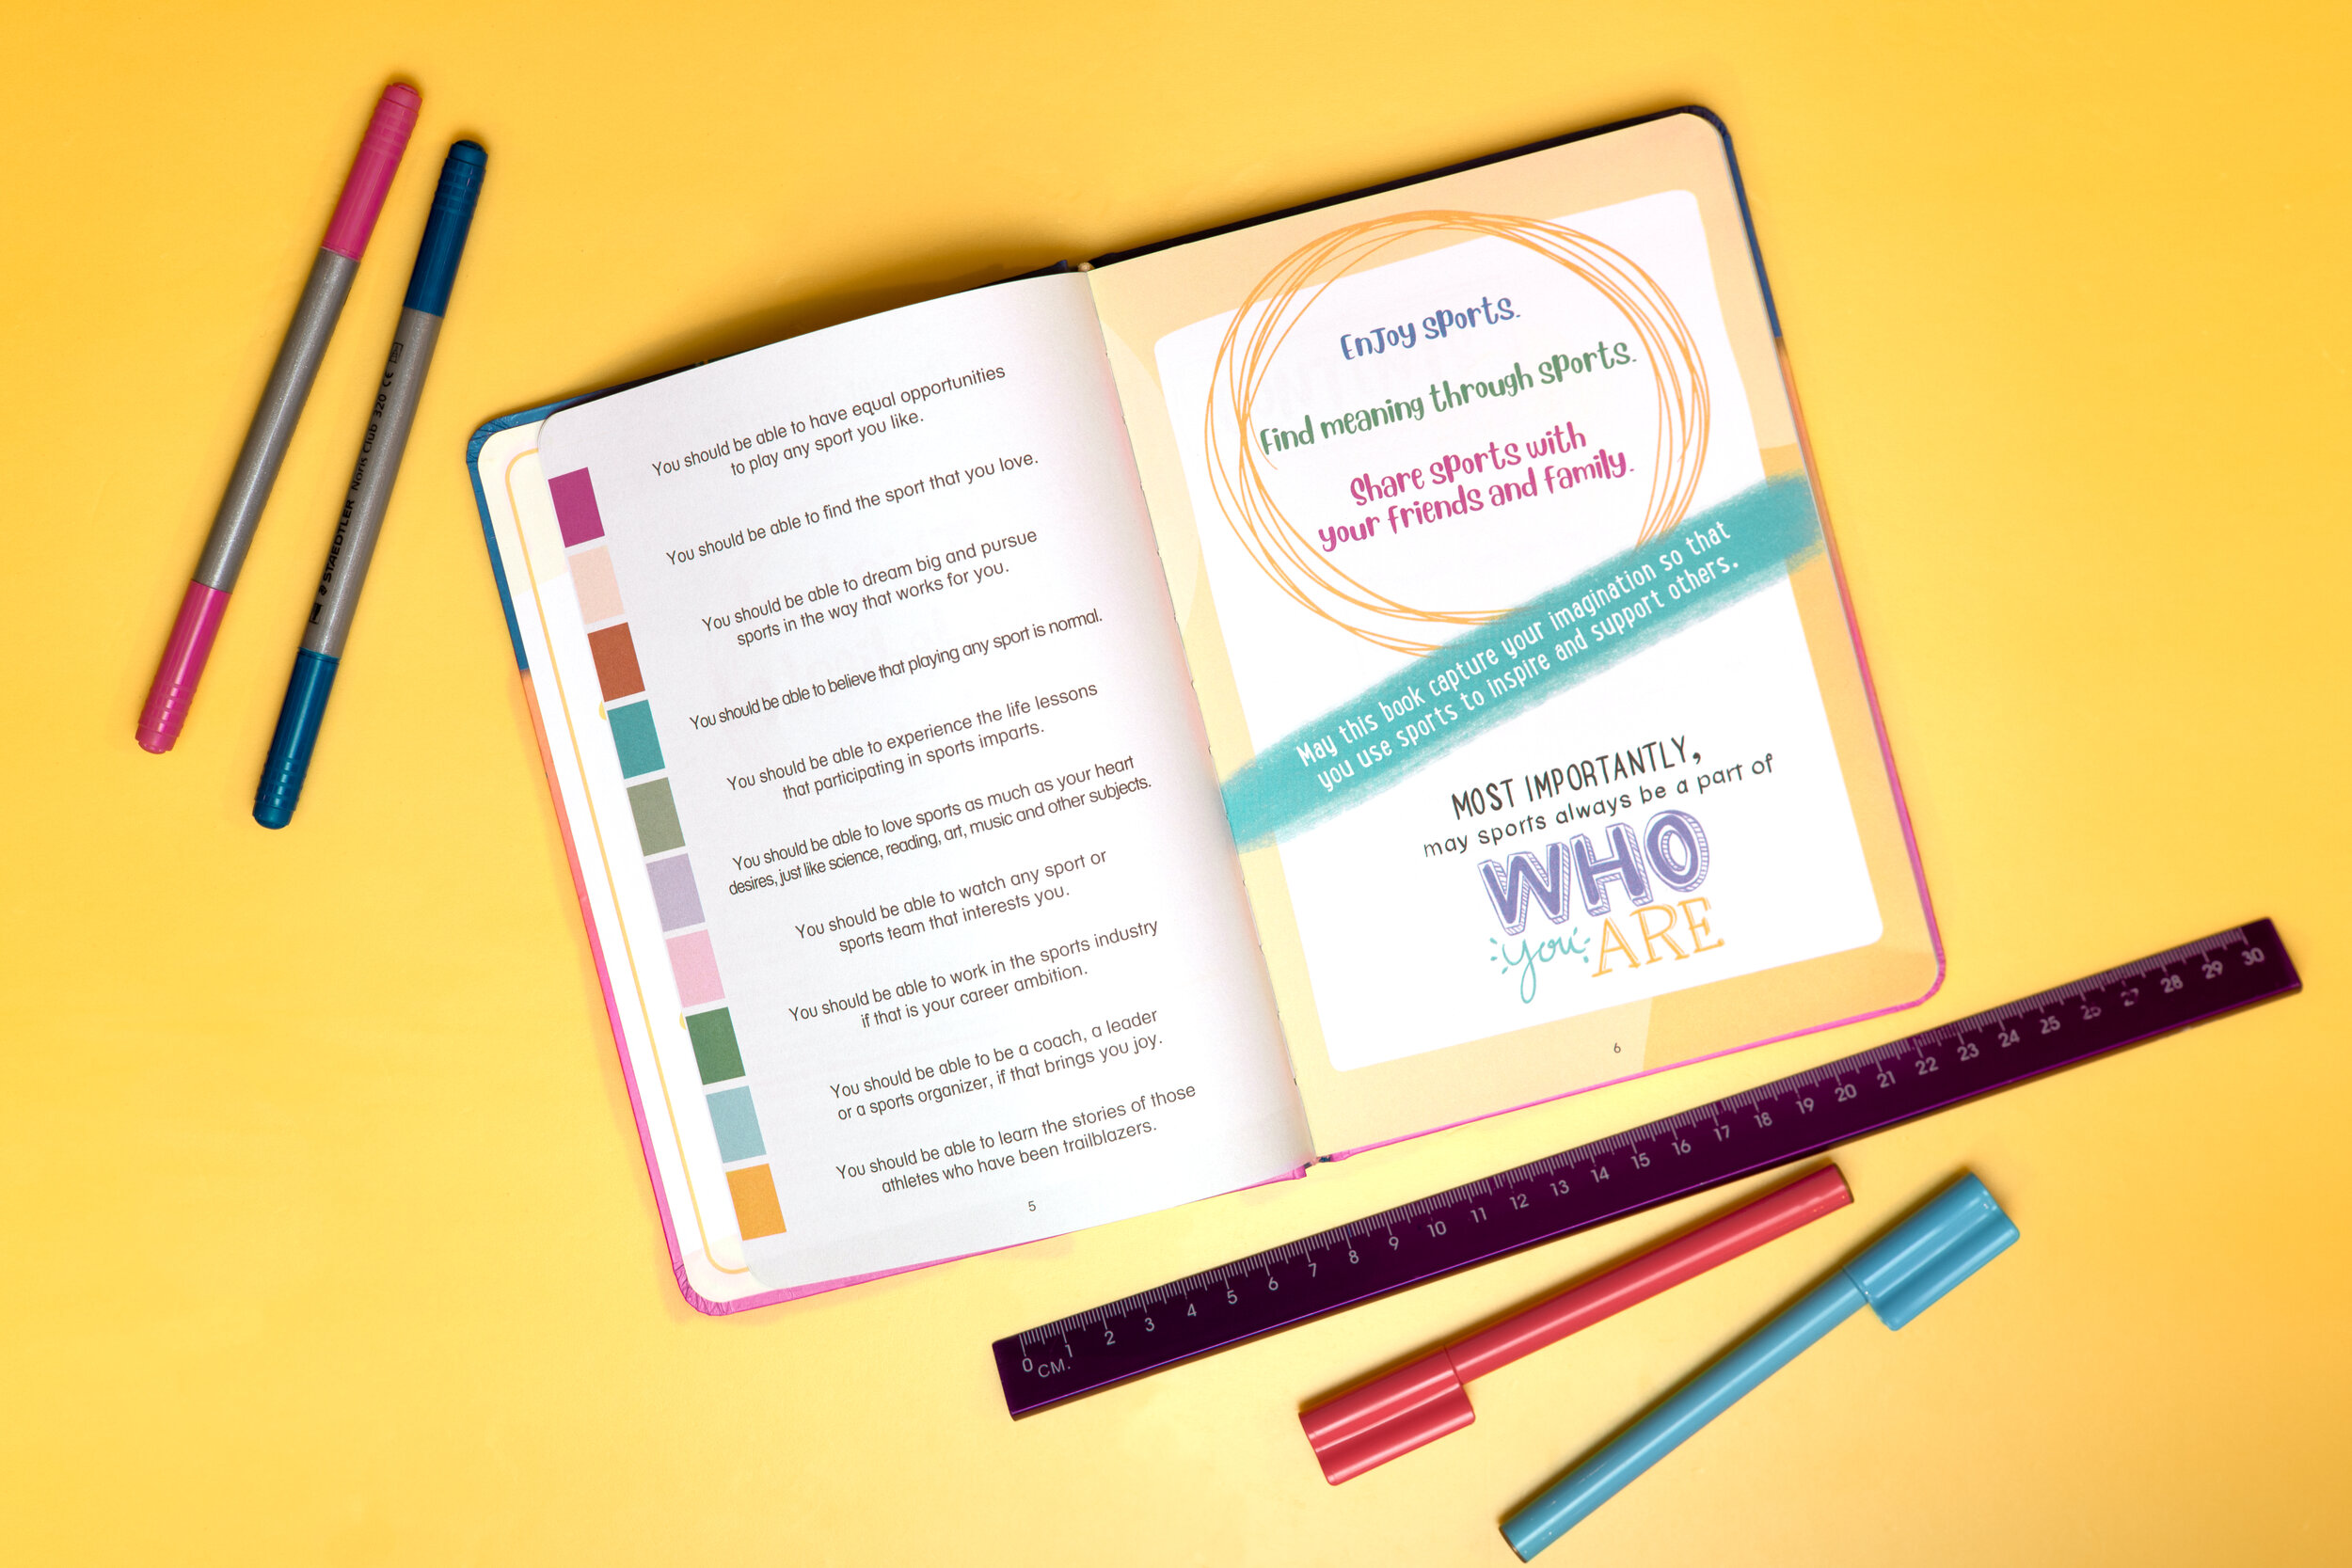
To achieve this aim, pick out inner pages that are thoughtfully designed, that effectively gives an impression on what the book is about.
If you come into challenges in relation to keeping the book open, refer to the tips listed above.
Stacked
If you are selling a series of books, or simply want to add more variety to your product shots, stacking up a few books in the same shot is a good option to consider.
Some buyers are also interested in inspecting the backbone too, before making a purchase because it does matter to some book collectors.
In stacking up your books, I suggest that you display the stack of backbones towards the camera so as to show off the design there as well. In fact, many book publishers design their backbones so that when stacked next to each other in the correct order, it pieces together a special design. Otherwise, the consistency in design is also a powerful way to establish branding across your book series.
This also gives the buyer a better idea of how thick the book is, how well it is designed and made, providing a more profound perspective to the potential buyer.
Backdrop Ideas
In relation to product shots, the backdrop is a crucial factor to consider.
The main focus on doing product shots is to get your book to stand out as clearly as possible, and the below are some points to achieve this primary goal while enhancing your shots.
Colour - Books are brands. It can be the personal brand of the author, or the commercial branding of the publisher. Whoever the case, there are dominant colour in the brand and design that should be flashed out. Incorporating one of these colours into the backdrop increases the brand recognition - people are more likely to identify with your brand because of its consistency.
Pattern - Use subtle patterns, if any at all. This is to eliminate all sources of distraction from the book you are trying to sell. While patterns can help provide some texture, this is of a much lower priority than making sure the book stands out, in the context of product photography.
For your reference, here is an example of a subtly patterned background of wood. The pattern is relatively mild so that it could provide some interest to the eye but not detract away from the intention of the photo, which is to sell the book.
Summary
In this article, we talked about:
How to avoid glare in photographing books,
How to keep books open when photographing them,
Instagram style book photography ideas, and
Product style book photography ideas
More sharing coming soon!
SUBSCRIBE via the box on the left for more PRO tips, and follow me on Instagram (@_bjiao__) and let me know what you think in the comments!
Share this article on Pinterest too!
Keep shooting, keep creating!
The mission of this blog is to provide the best insider information in the photography industry, as openly as possible. You have direct access to my
first-person experience as an aspiring photographer who talks, but also works.
Honest opinion are rarely available as public resources because this is a competitive industry. Huge sums are made when such information is delivered in the form of mentorship and workshops.
This blog is a great way in which I cover my daily expenses, but also provide real value.
If you have learnt something that would be worth at least $10, please consider donating to the page. This enables me to keep creating content and helping more people sustainably.
Your continued support for the blog is appreciated!