This article is going to save you hours from scrolling between endless random Pinterest boards and Google Image search results - yes you need to find inspiration, but first you need to know how!
In this blog post I will walk you through how exactly I came up with my Editorial Fashion concept, which was awarded 3rd (Bronze Star Award) in ND Awards Photo Contest: People: Fashion Category, non-professional 2020. Inspiration comes from everywhere, but having a method helps you capture ideas more effectively!
If you find this helpful, SUBSCRIBE to my channel via the box on the left to make the most out of my blog! Also, do share it with people who might be interested. Shoot me an email/ DM to share your thoughts too.
Also, Pin this article to your Fashion Photography/ Photography Inspiration boards in Pinterest if you find it helpful!
Coming up with the concept is usually the collective work of a team, though the photographer and stylist typically play a larger role. The entire team communicates concepts using a moodboard, which consists of any images relevant to the discussion, including previous magazine covers, brand assets, or past work with a photographer with a similar style. The moodboard can be targeted at a certain fashion magazine, or at a brand’s message behind the collection to be shot. The moodboard also contains images singling out specific parts of the hairdo, makeup and props (if any).


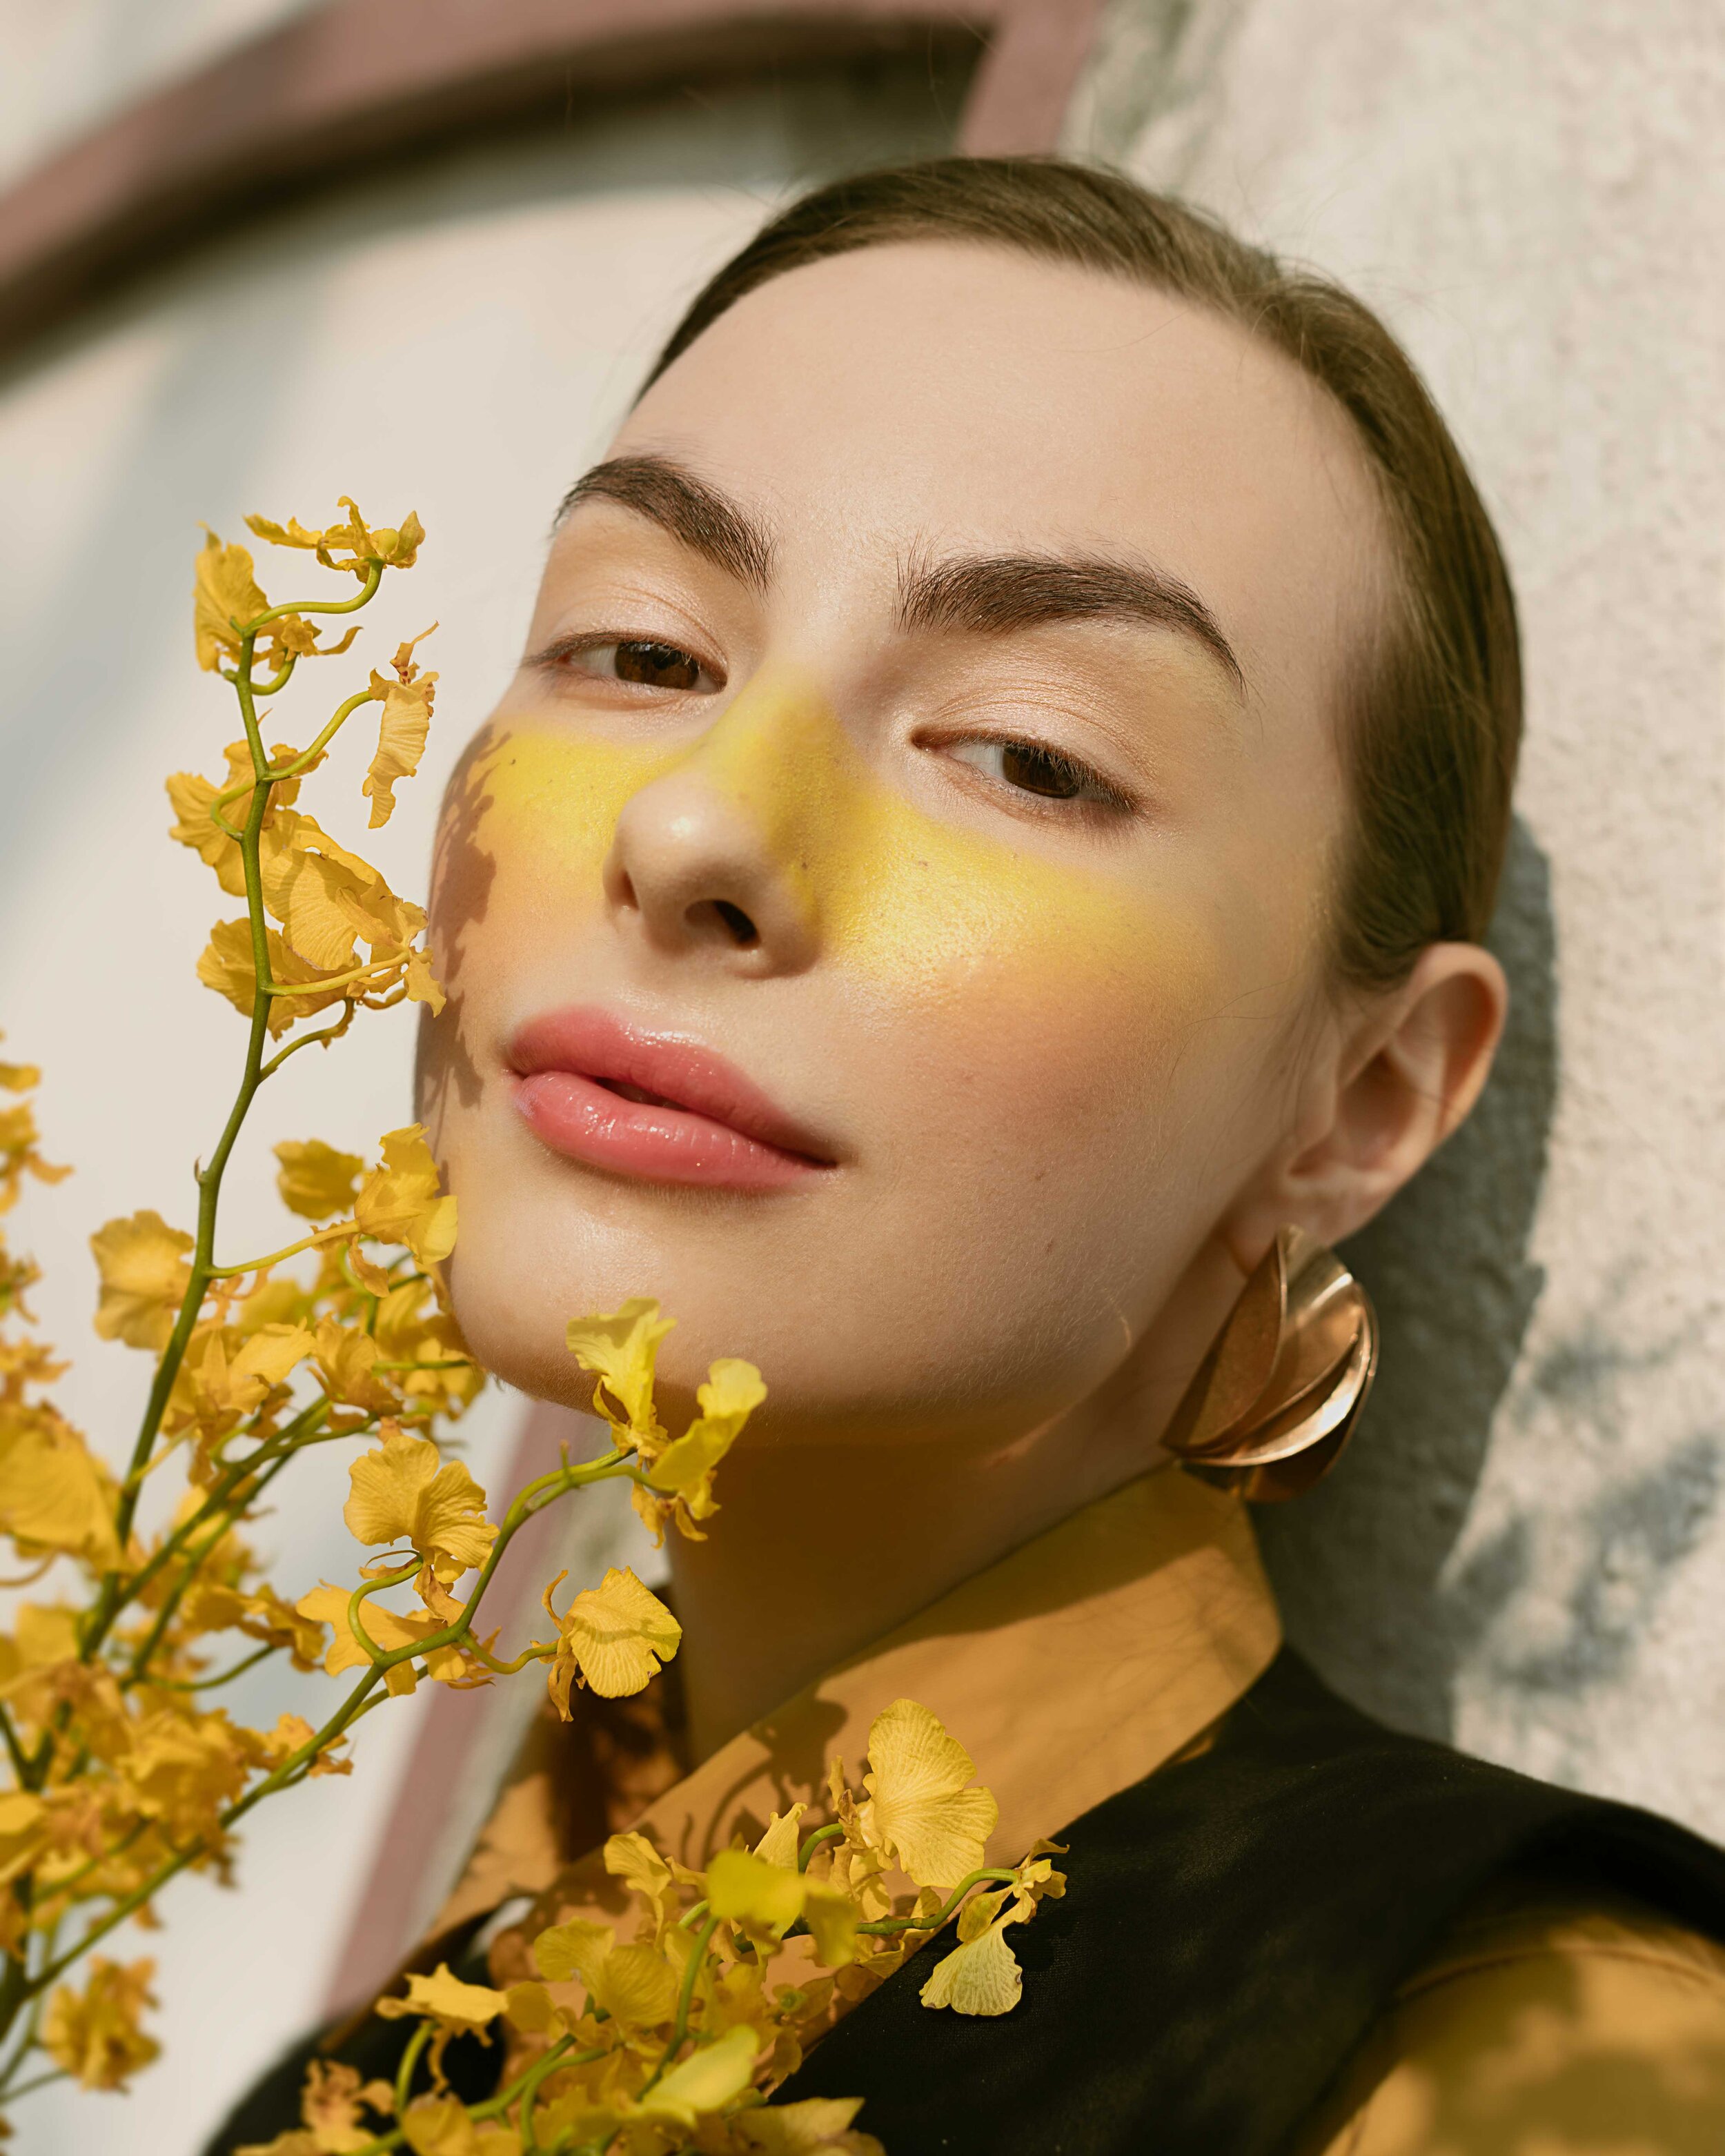
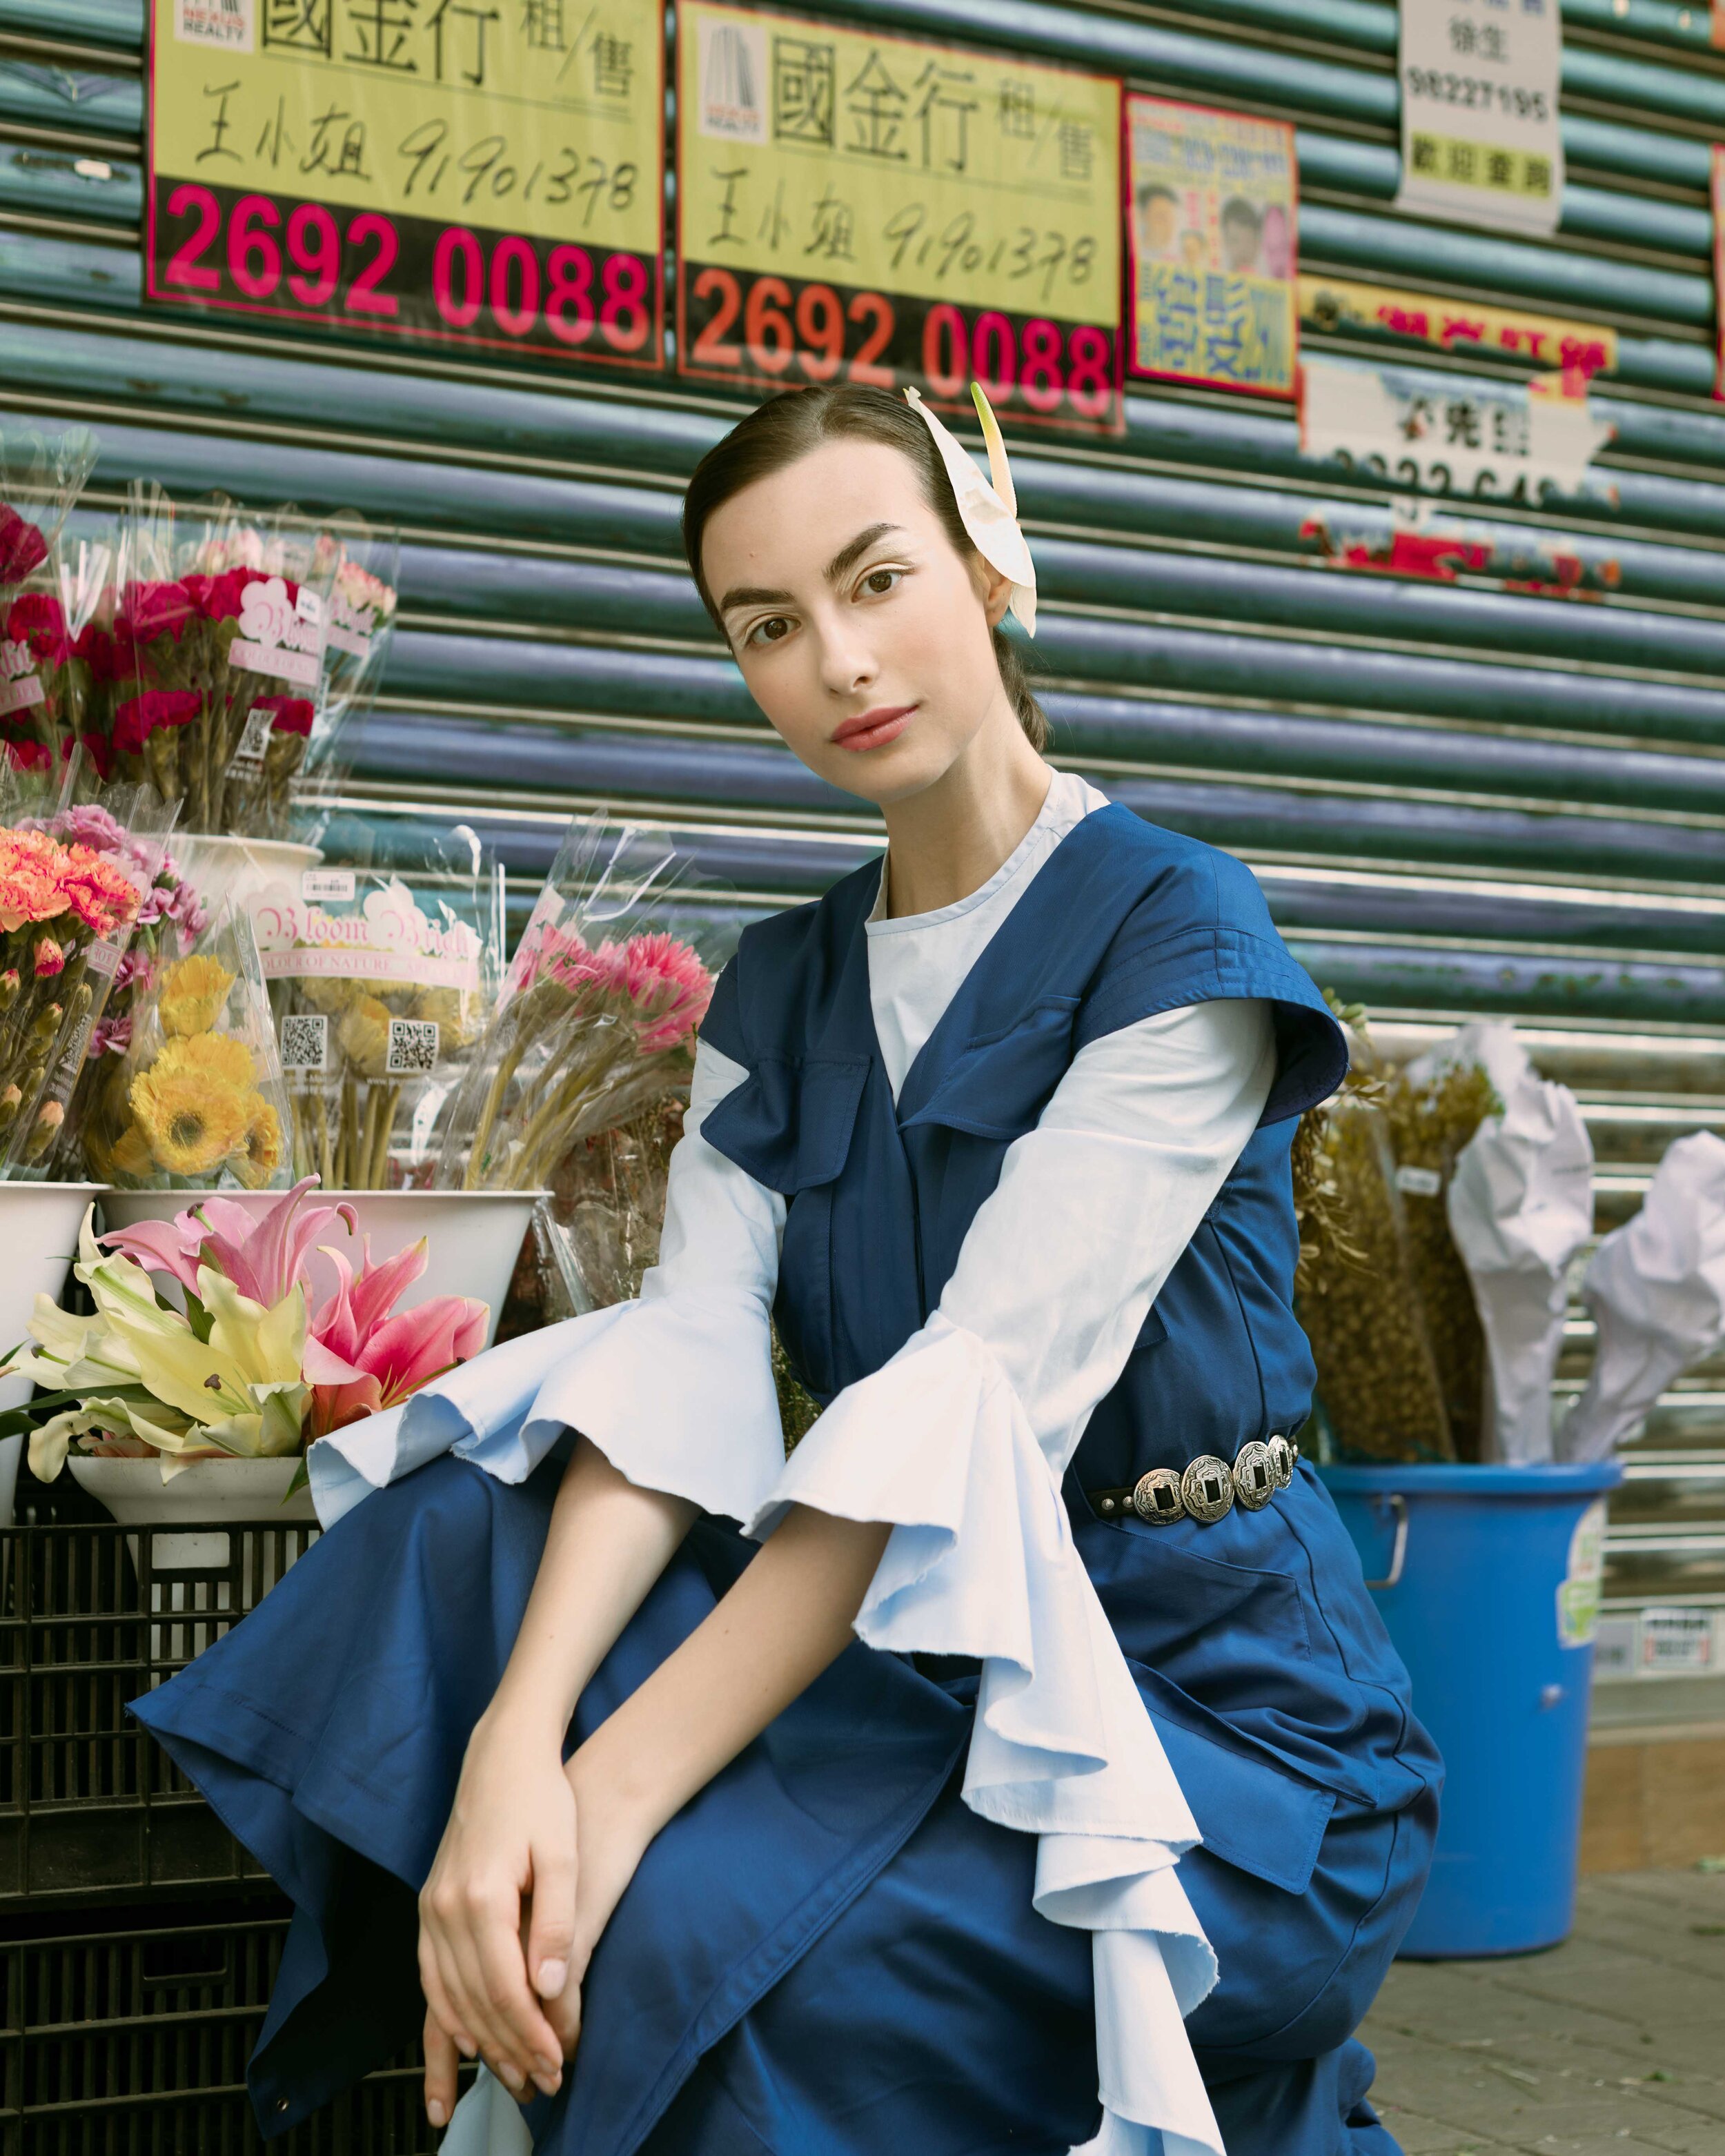
Here is my entry, ‘Floral Pursuits’, which has also been previously published on Mordant Magazine May 2020 Volume 7. As its title suggests, (one of) the theme(s) underlying this set of images is flowers.

Now that you have seen the final editorial concept, we can proceed to break it down, from start to finish, how this concept was born and eventually materialised.
Find a Stylist/ Brand
Before you can start your brainstorming in a meaningful way, you need to make sure that the ideas get along well with the garments that you are finally shooting. So this is why I recommend that photographers start their brainstorming process with the clothes. Fashion photography is about the fashion, after all!
There are two main ways of ascertaining the set of clothes for the shoot. You either find a stylist, who would put together a complete outfit using his own resources, or a brand, which typically has collections that are already designed to be full outfits that you can borrow from. If you chose the former route, the stylist will cherry pick pieces to form the final outfit, which would consist of a few brands. For the latter, the entire shoot will be from the same brand.
That is not to say that photographers cannot be their own stylists; many photographers do that. I have done it also, because when I started out, I didn’t always have the contacts, and it can be difficult to work around schedules. To get yourself started, you might have to take on the role of a stylist too, to contact brands and borrow clothing for the shoot. But I will have to admit that having a stylist makes my photos much better - stylists exist for a good reason!
Once you figured out the source of the garments, or the person who has access to the garments, you have already narrowed down the scope of your fashion shoot concept. At this point, you already have an idea of the clothes that you can potentially work with, and most likely just choosing between a few combinations that your stylist or the brand are happy to supply.
Plus, every stylist and brand have their own styles. As the photographer, you can take their underlying styles and do your own spin of that. This makes it much easier for you to come up with a creative fashion shoot concept, because it gives you just the right amount of substance to start with. Not too little, not too much.
My Example: E-Meeting Charlotte Ng Studio
I was scrolling on my Instagram feed for local designers in Hong Kong when I was still based there and came across Charlotte Ng Studio. Charlotte is one of the up and coming indie designers and has released a couple of her first collections when I found her profile.
Her work is marked by a gender-neutral approach to women’s garments, and I found that quite fascinating. The pieces are surprisingly feminine, while having elements that historically belong to menswear incorporated. The baggy cuttings, very different from traditionally figure-fitting was a great liberation in how women’s clothes are made.
So I reached out via Instagram DMs, asking if she is interested in doing a collab shoot. She was up for it, and so we went on and discussed the options on the collection we could shoot.
Build the Outfit
Having got in touch with a brand or a stylist, you have ascertained the overall direction of the concept. Now you will have to pick out the exact pieces that you want to use, because it determines the many important details of a fashion shoot, including the choice of model, the location and background, makeup etc, and even camera gear.
The outfit needs to be ‘built’ because it encompasses a few compartments. There will be the clothing, and the shoes (for 99% of the time). The other elements include headwear, jewelleries/ accessories, and bags. For more complex outfits, there might be more ornaments than what you would ordinarily encounter.
Usually for my own projects, I build three sets of outfits, because that is the minimum number of looks required by most magazine submissions, and also the maximum amount I can manage to shoot in one day, around 6 hours of shooting.
My Example: Working out the Three Looks with Charlotte
When it comes to the outfit part of the editorial concept, I usually let the stylist/ brand owner give more input, because I know this is not my strong suit. So I asked Charlotte to suggest some pieces that she is considering, and then we finalised how to fit the pieces into three combinations.
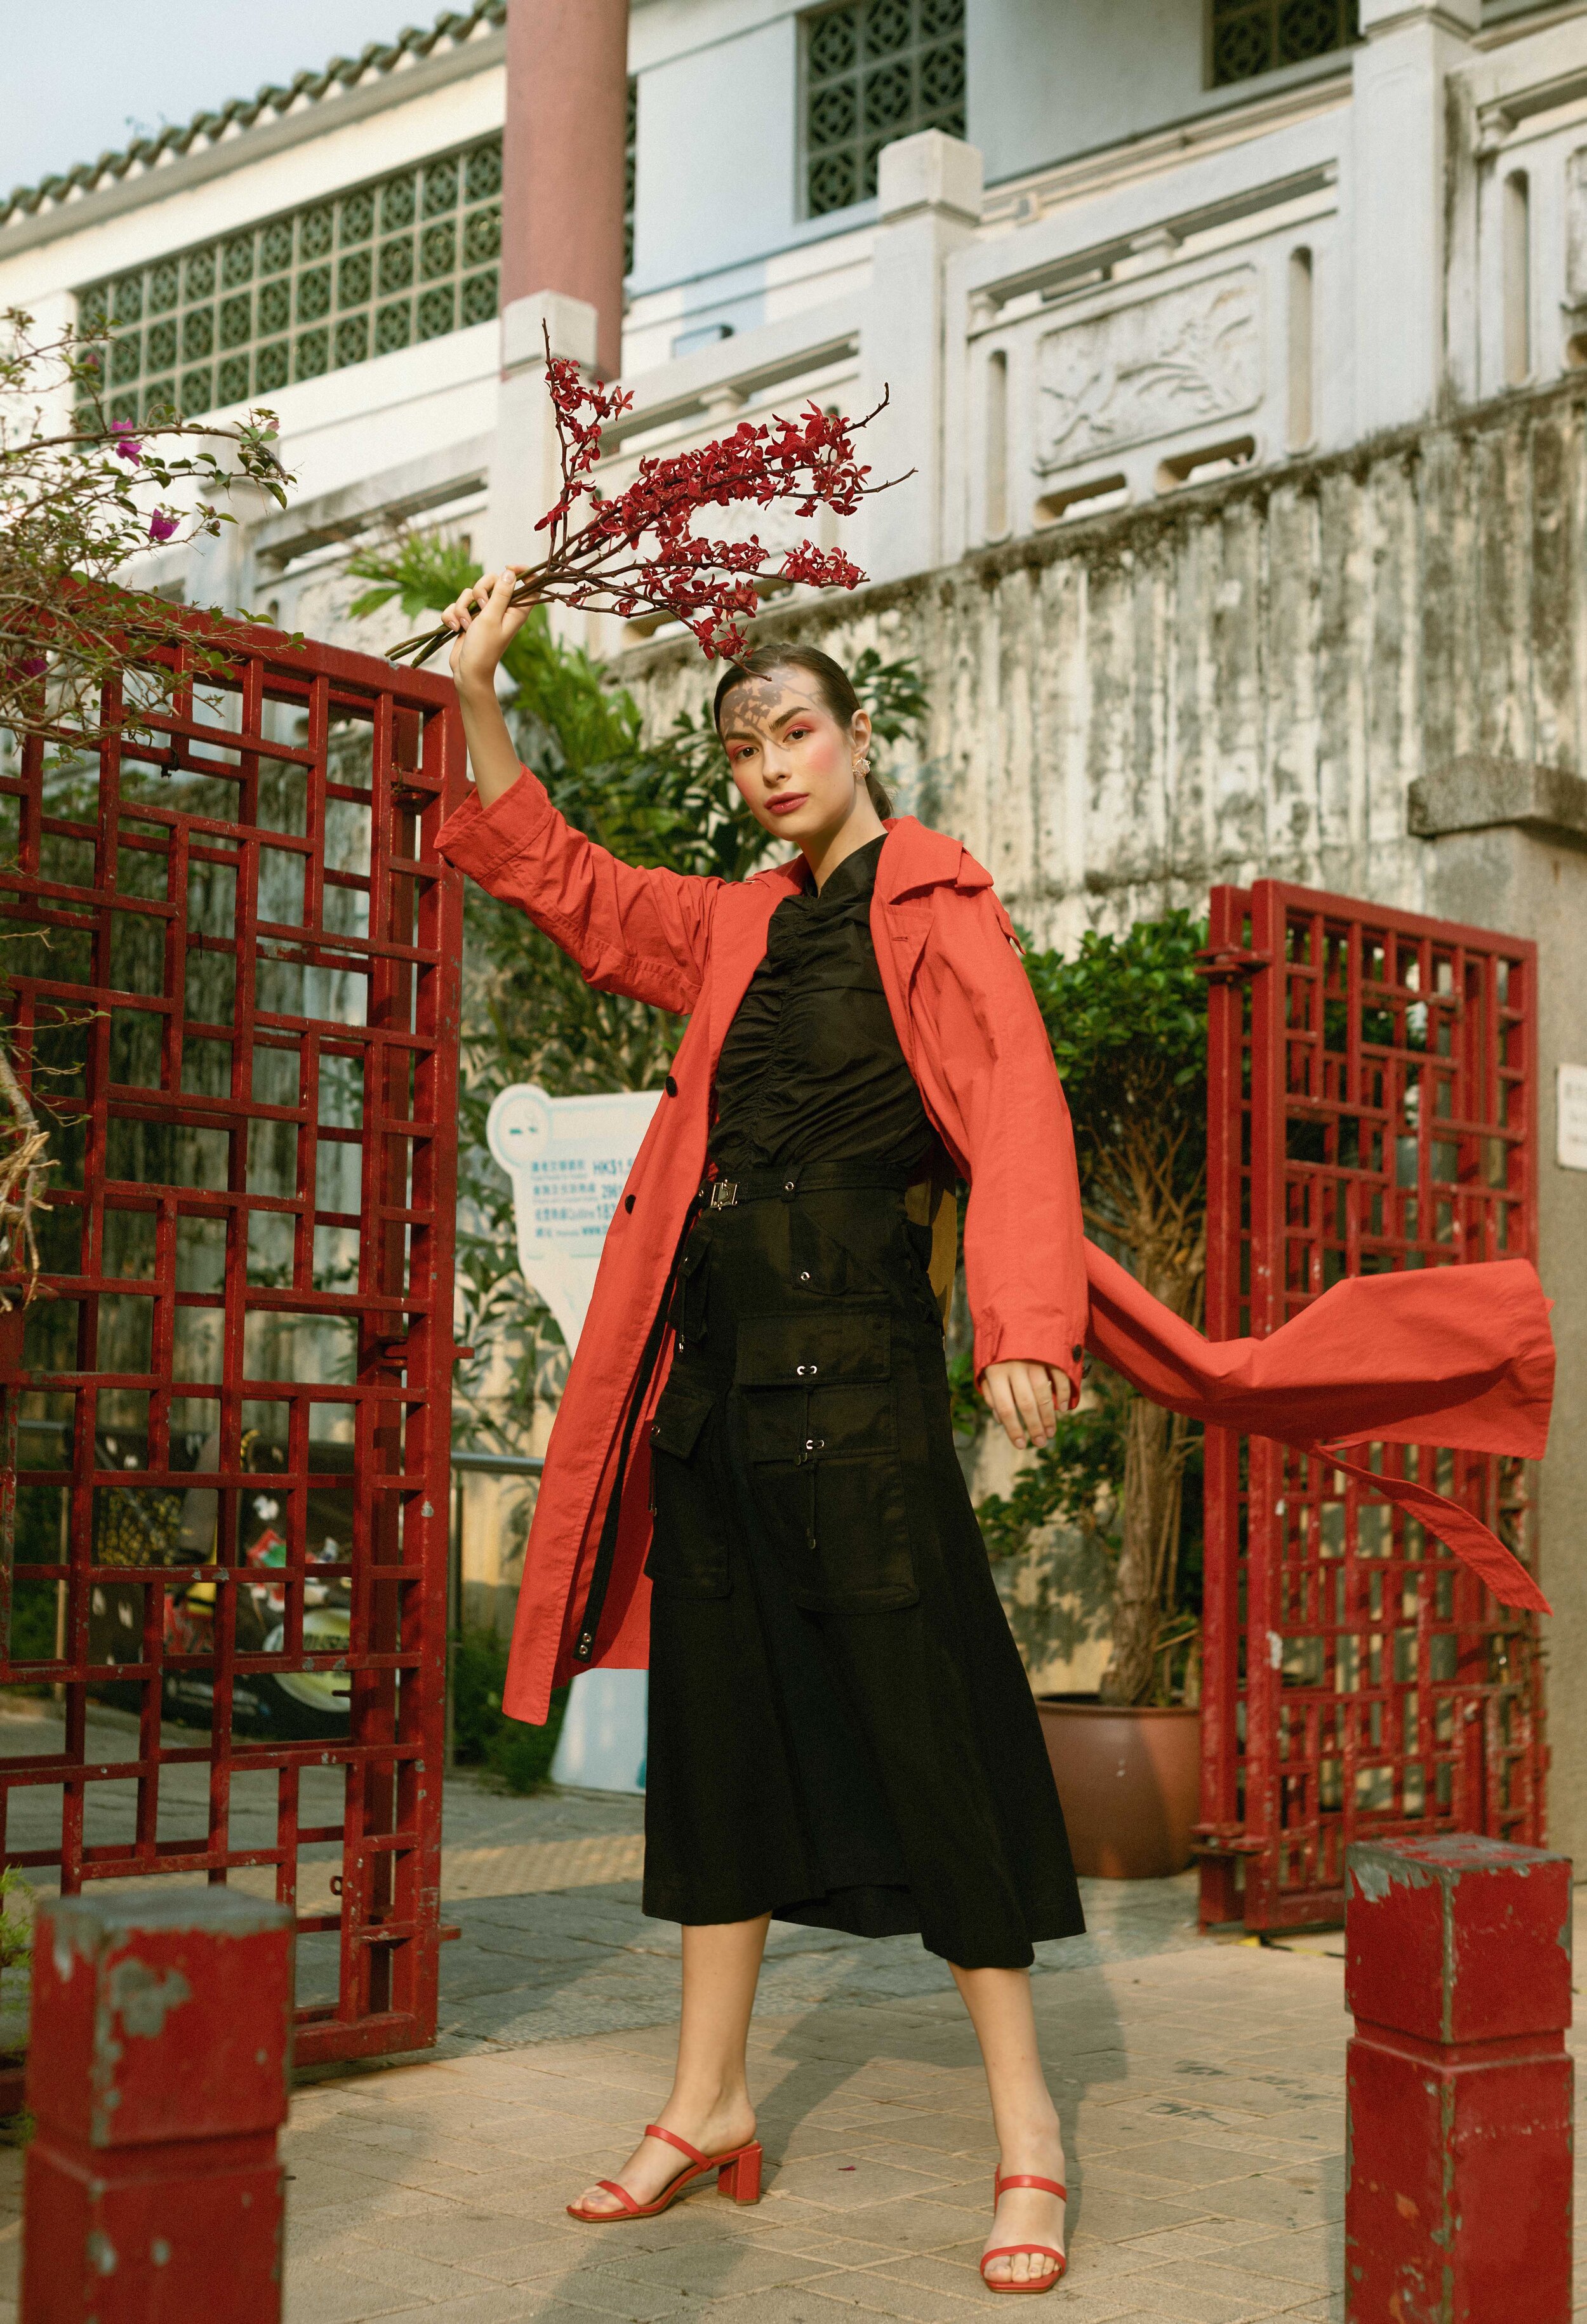
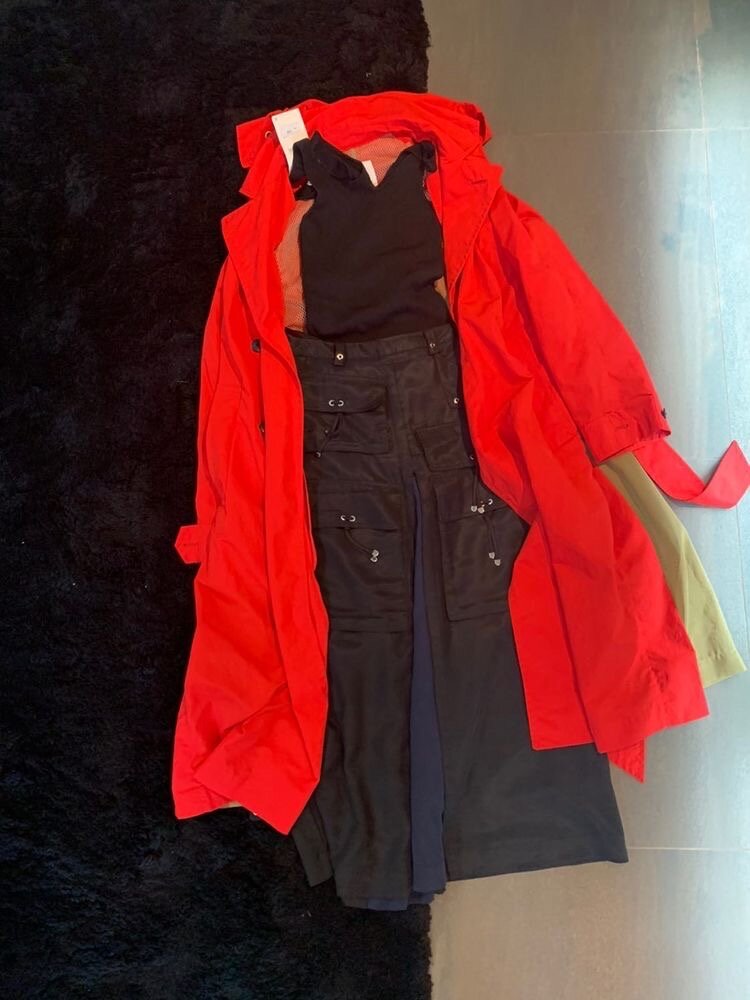
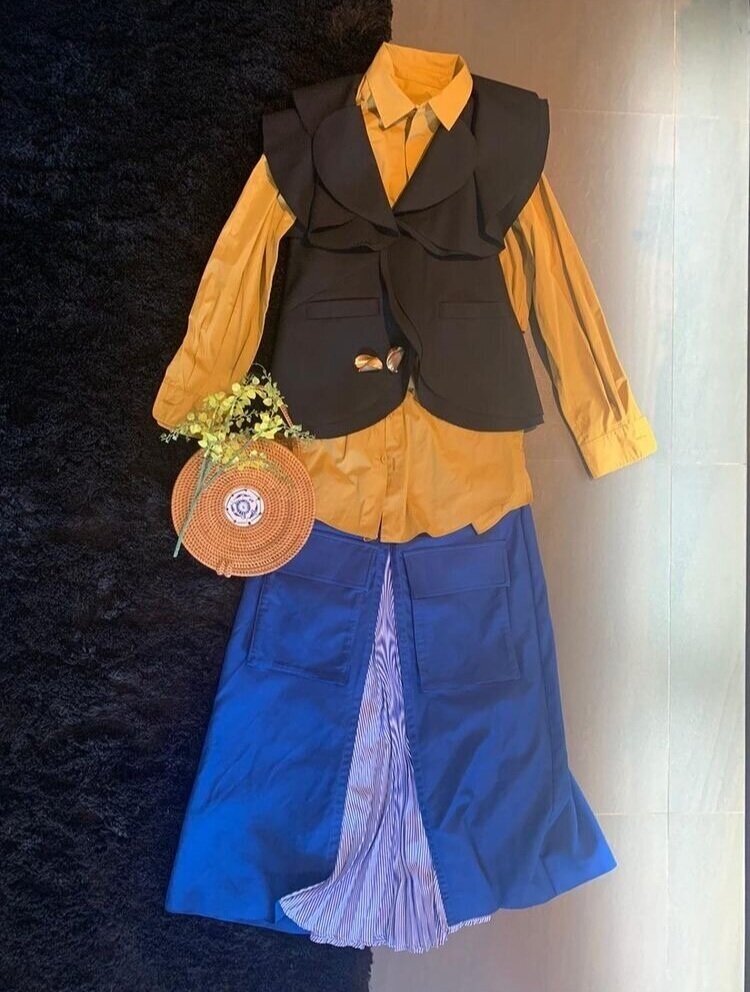
For one of the outfits, we were debating between a red blazer, vs a yellow shirt under a black vest. These are the exact images we used in our correspondence, just to give you a better idea of how things really work in reality.
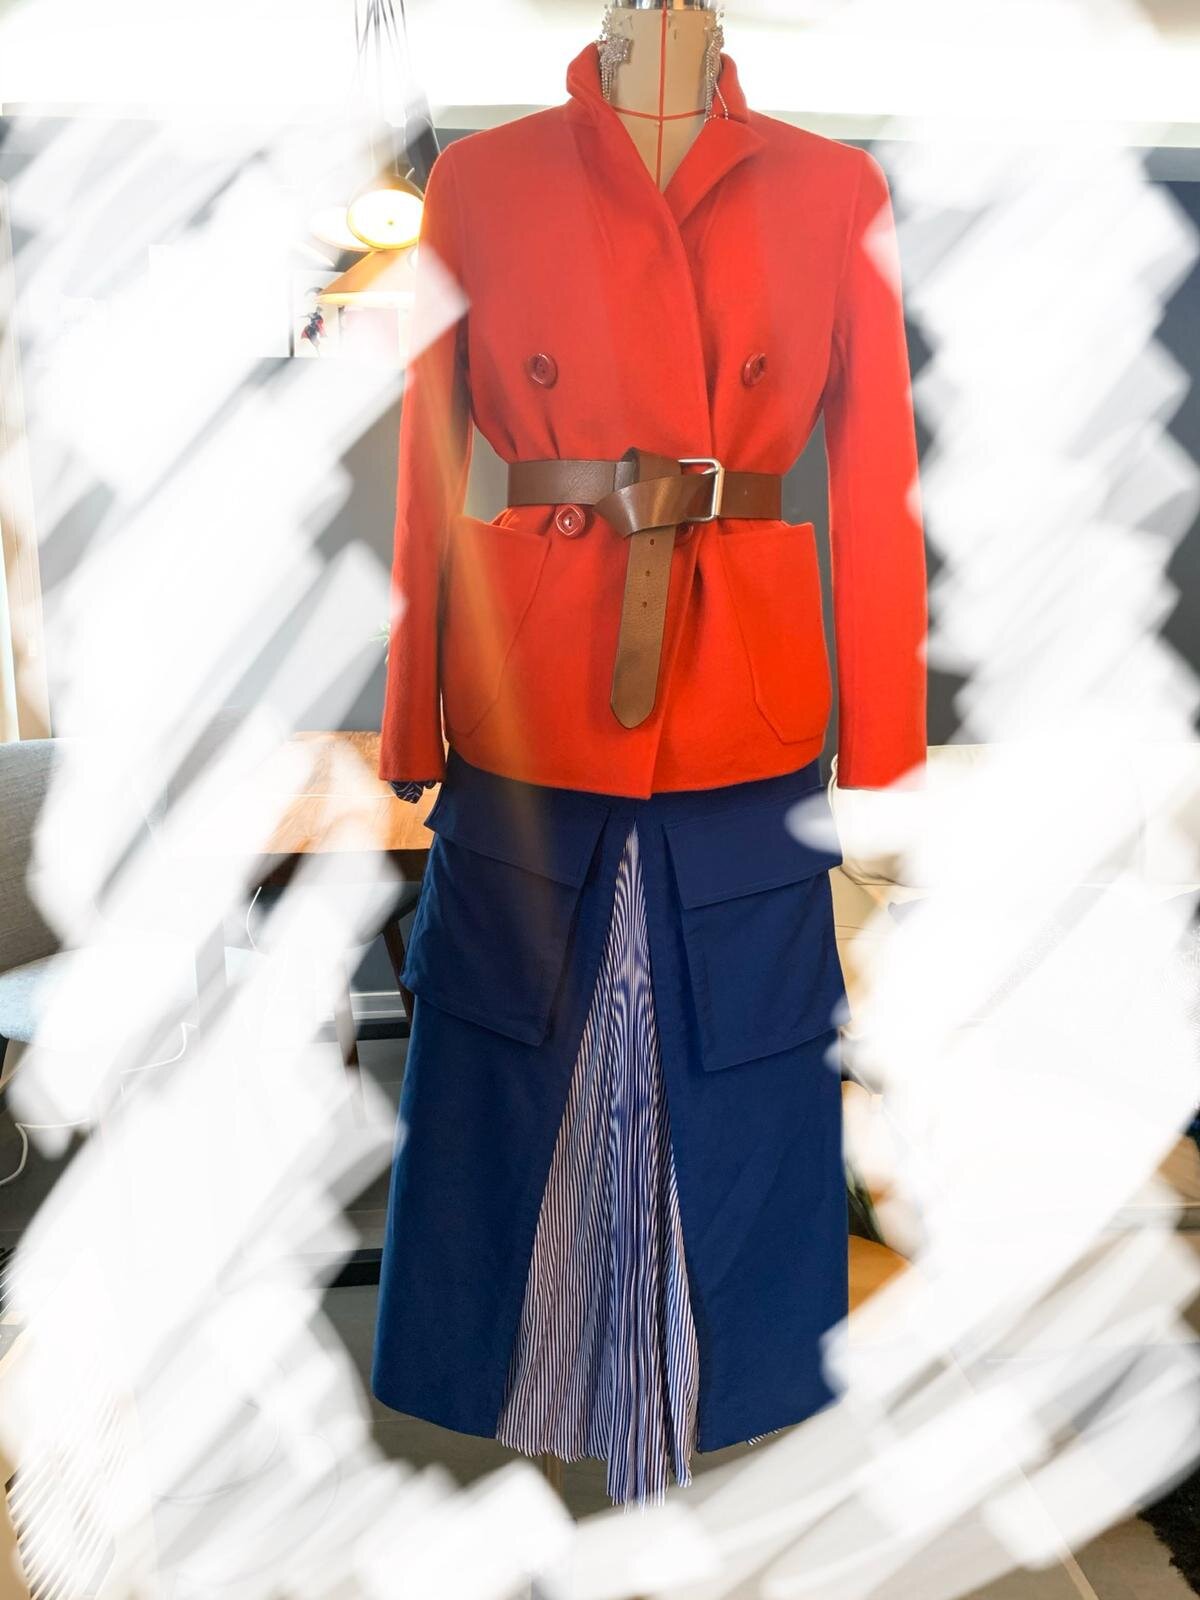

The comment I had was that let’s play with colours throughout this series; we can pick out one colour from each outfit, and make that colour the dominant colour in the photos. Everything else will serve to bring out that colour in the images.
After doing some mix and match, based on the garments we managed to secure, we worked out the combination so that each one would feature one dominant colour, which we decided to be red, yellow and blue respectively.

Charlotte proceeded to fix the miscellaneous items in the outfit, including bags and belts, resulting in three complete sets of outfit for the shoot.
Determine the Theme & Background(s)
The reason why the theme is grouped together with the background under the same section is not because they are the same thing, but rather because they influence each other heavily despite being quite separate in some instances.
What usually happens is that, with the outfits preliminarily selected, the photographer is able to visualise how they would look in a certain set of aesthetics. There might be motifs in the garments through which the designer communicates a message, or a personal style that is consistent throughout his entire body of work. Where the outfits are assortments of pieces from various brands, the photographer might choose to expand on any detail in the outfit that he finds particularly inspiring. In this process of streamlining the major motifs of the outfit, he has effectively decided on the preliminary theme.
When the photographer sees a vision in his head, he usually sees the entire photo. That is, he doesn’t only see the model in the outfit, but also the type of location that the model is immersed in. This can be quite abstract at this stage, but it will make more sense once we get to my example. The point here is that the photographer derives a generic sense of location, based on the characteristics of the garments.
As a photographer, you are expected to know your community well; you are expected to be observant of your surroundings and be mindful of the resources you have access to, (if, of course, this shoot takes place in your home city). It is quite a challenge to take an idea of a type of location, which is just a concept in your head, and map it to a real life location or backdrop. It takes a good instinct to search in the right places that would give you the right look for the photos. It would really help if you have a good idea of what your city looks like, and be resourceful when it comes to getting access and materials.
Sometimes, it happens that you realise that you can’t get access to a certain location, maybe due to lack of permission to shoot, cost, or physical constraints. If there are no workarounds, you will have to consider pivoting on your concept until you come up with a theme that is doable in your circumstances.
My Example: Agreeing on the Floral Theme, and Flower Market as the Location
The road to arriving at the floral theme was not a straightforward process for this series of images; it wasn’t the first direction we came up with. It took quite a few weeks to finally arrive at this decision.
Soon after we ascertained the three outfits, the first vision I saw these outfits in was in a bookstore. The concept that I first extracted from these outfits was ‘the sophisticated woman’ - the attire presents woman as learned, cultured beings, and often takes pleasure in retreating into her own thoughts, into her study of books. Here is the photo from which I drew inspiration, from the renounced Hong Kong based fashion photographer, Leung Mo.

Reference drawn from Leung Mo’s fashion editorial concept.
As a result, we checked with local bookstores about their policy with granting permission for creative productions, and costs involved, if any.
Those that got back to us either do not support private projects, or quoted us an hourly rate higher than we have budgeted for. After an extensive search, I concluded that it is not possible for us to shoot in a bookstore at this time, which also means that we will have to abandon the theme of books because the idea would not work without stacks of books in the background, and it is rather impossible to replicate it from scratch.
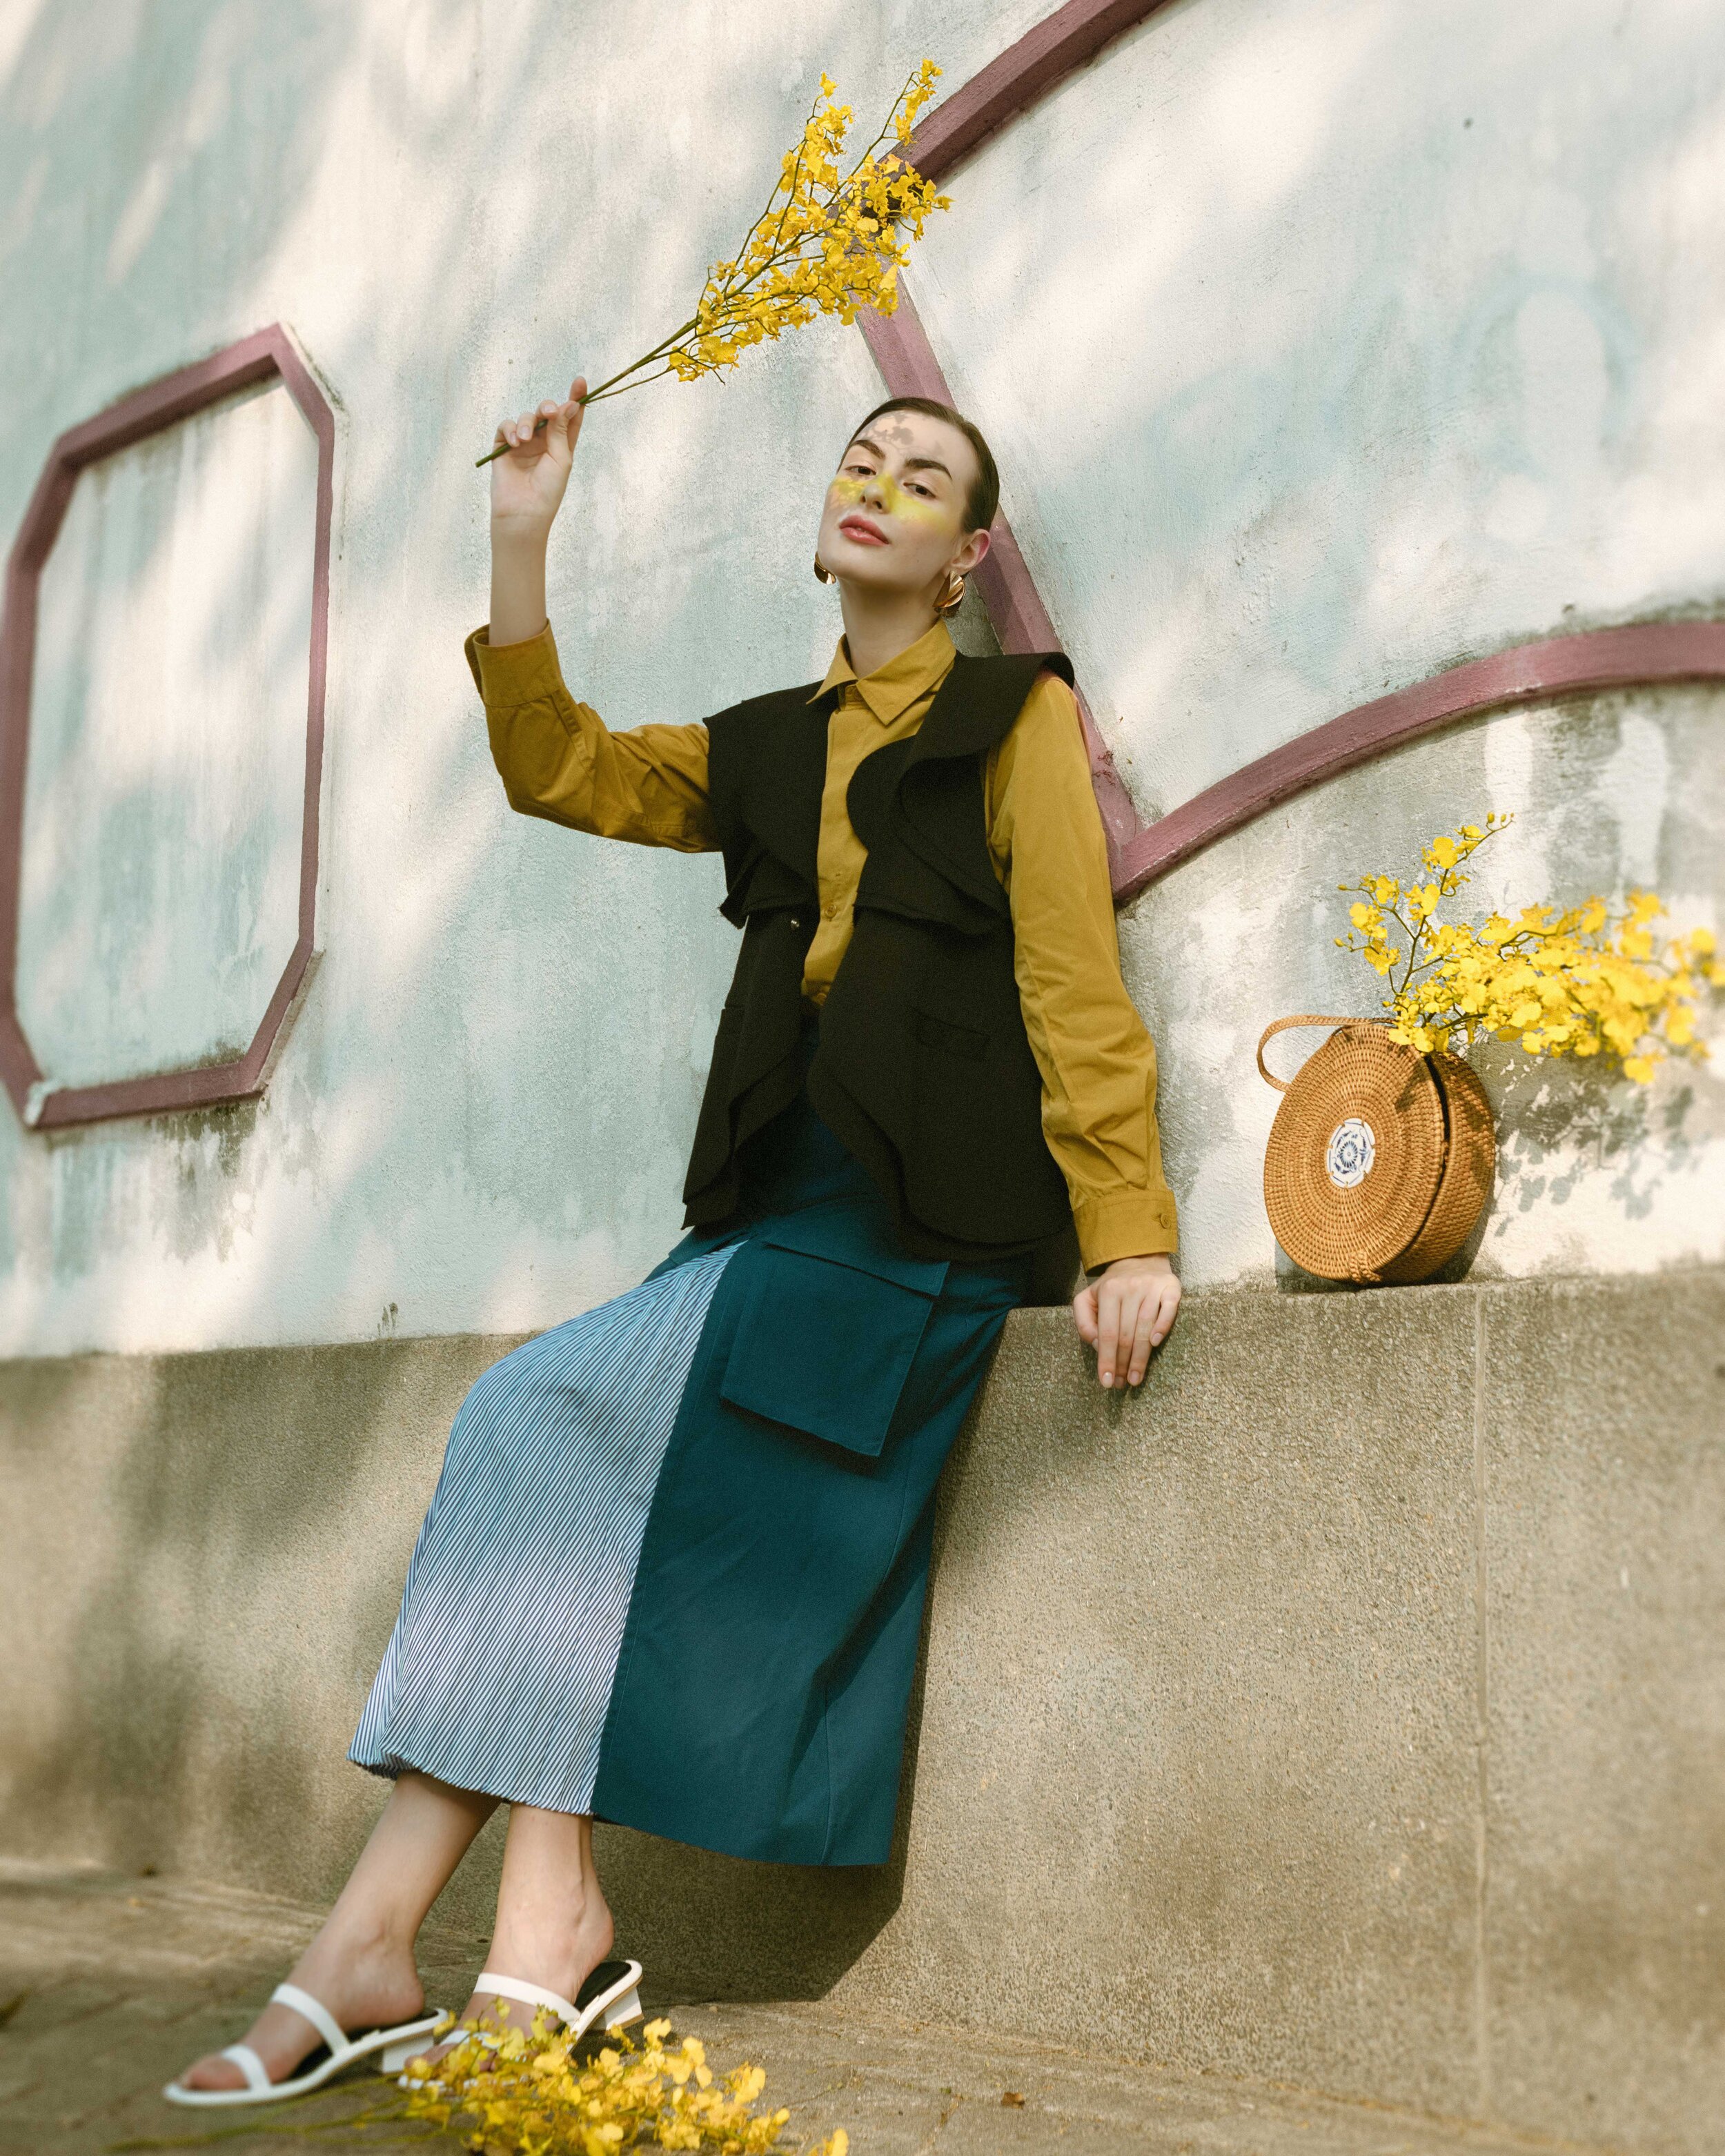
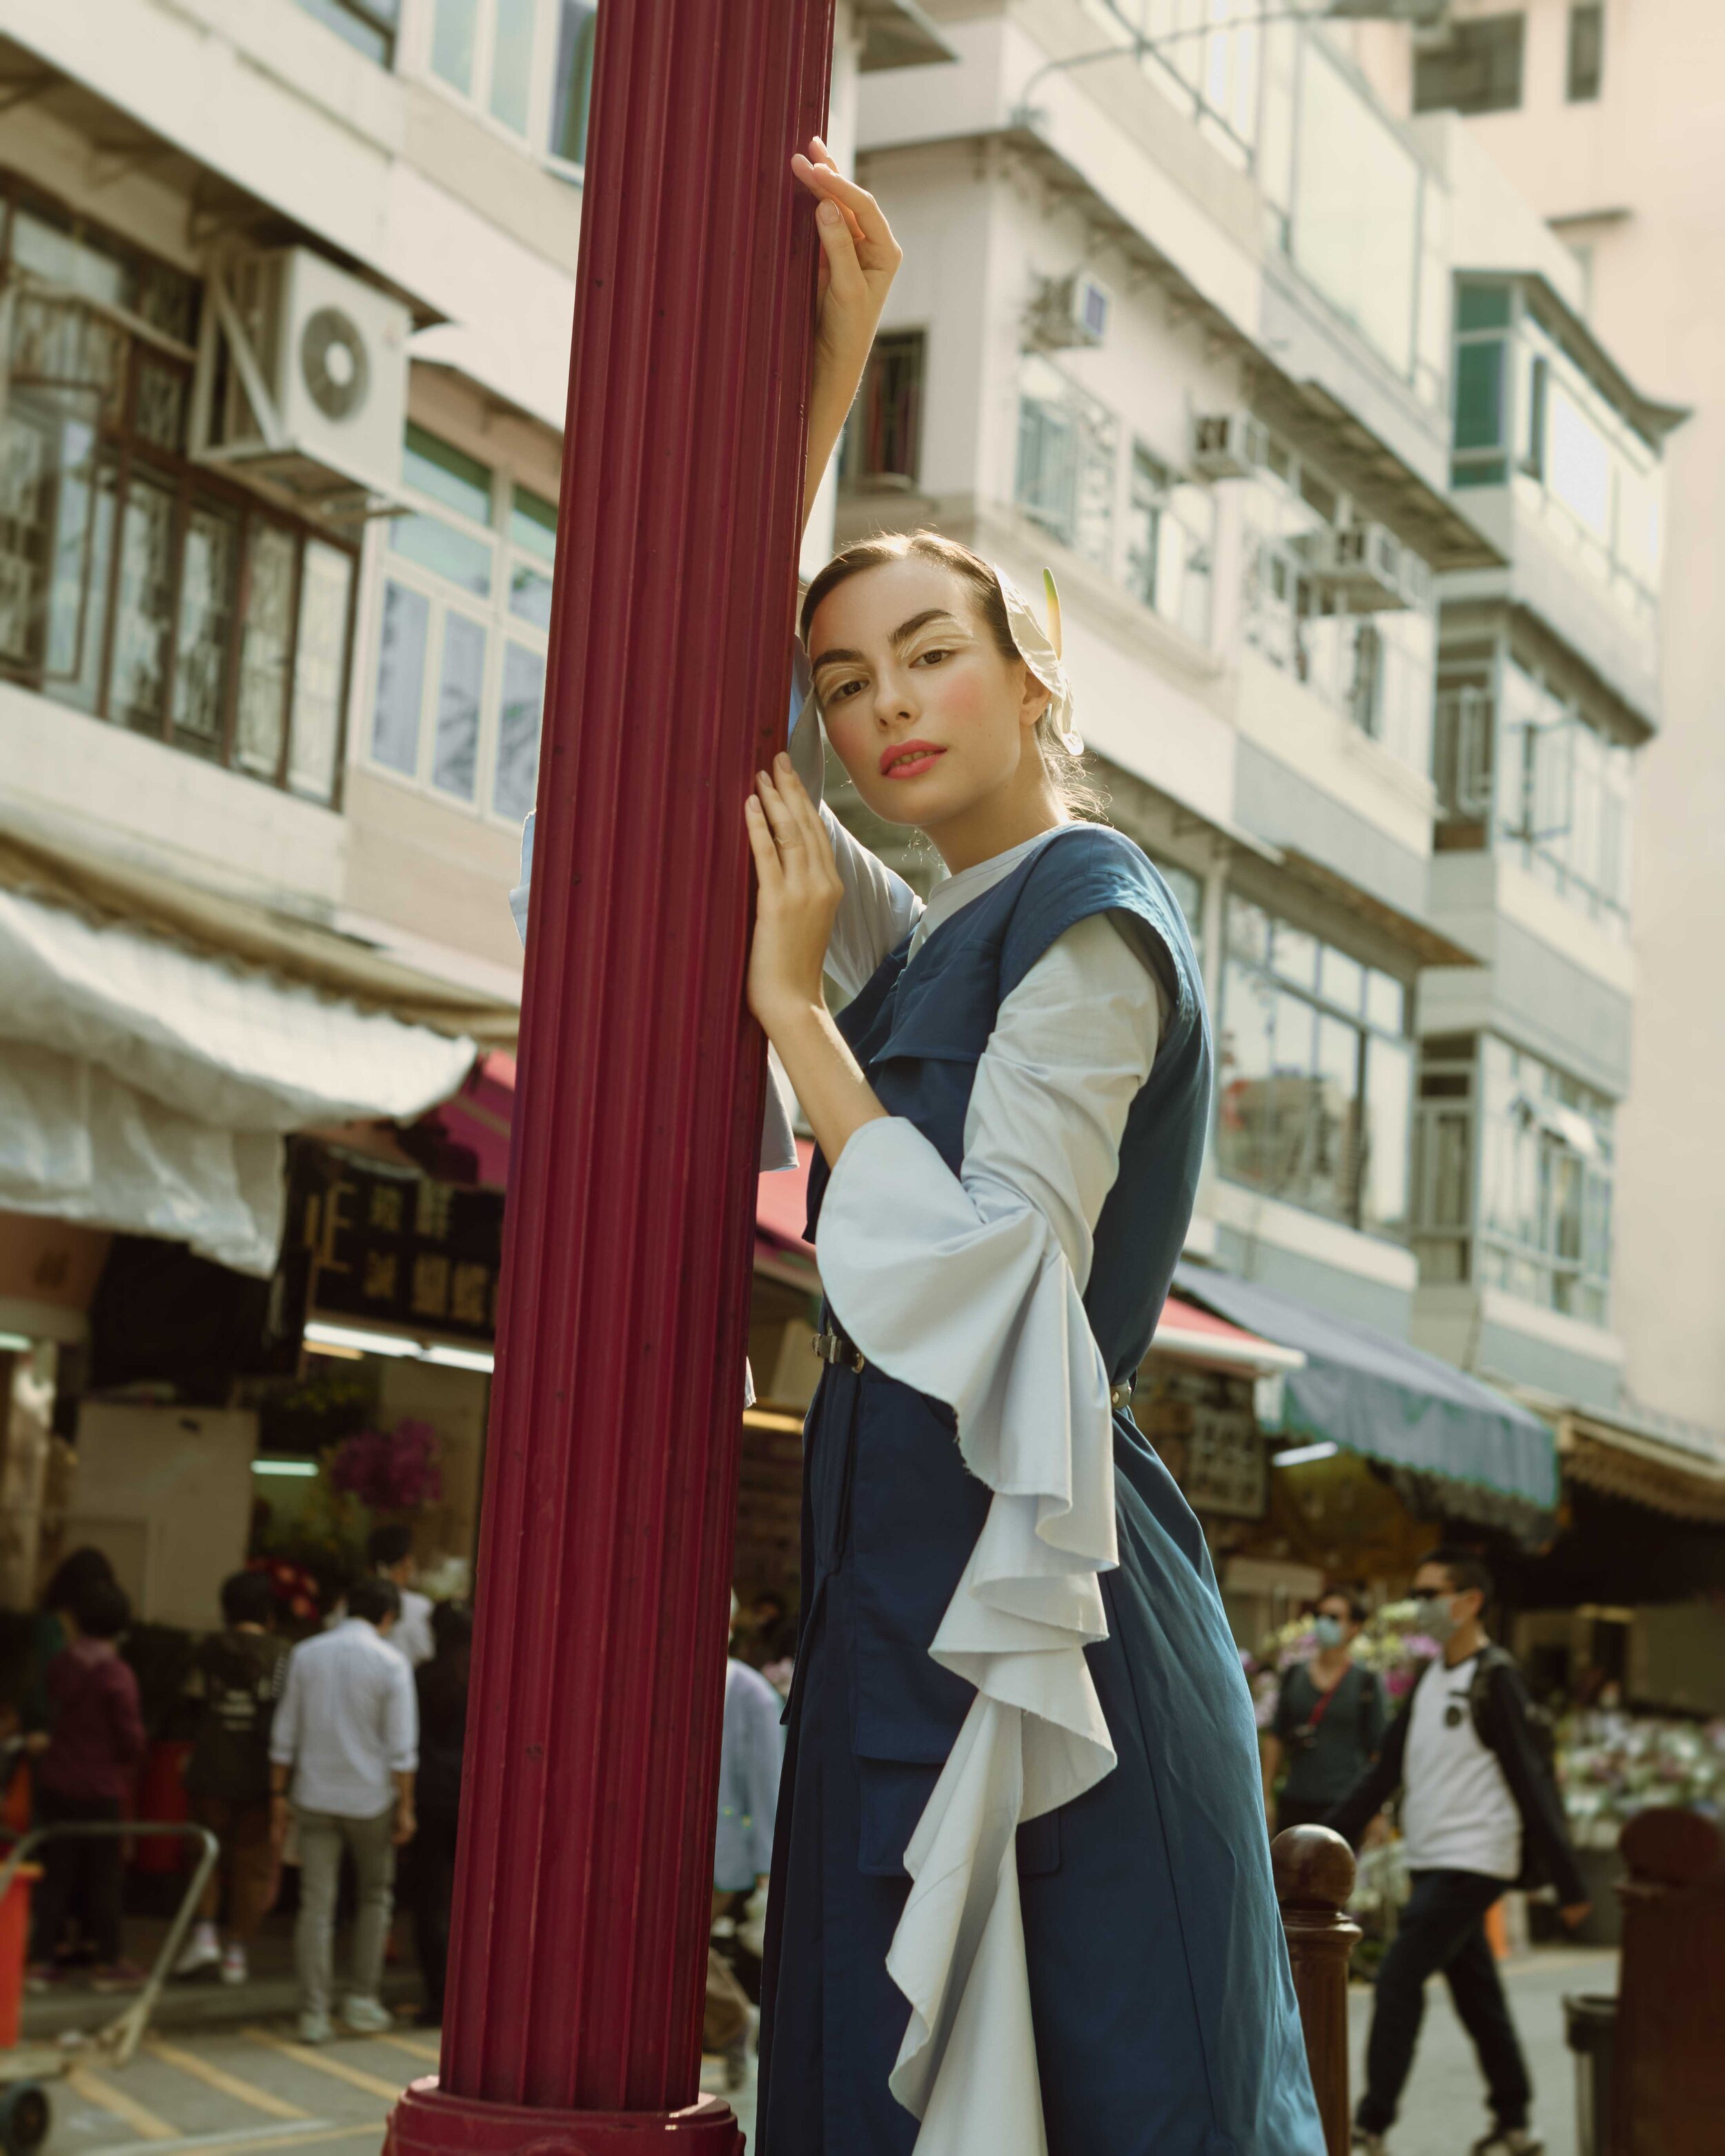
So we had to pivot and come up with something more feasible, given our limited budget. If you observe the sets of outfits from the final images above, you would notice the flowy cutting of the hems in various parts of the outfits. In the yellow outfit, the black vest had a waterfall neck opening; in the blue outfit, the sleeves had a long, draping floral structure; as for the red outfit, the jacket has its bottom hem cut into flaps, which would sway freely in the wind.
Seeing this commonality across all three outfits, we subsequently came up with the floral theme. This is also when I got to know Charlotte a little better, having talked about what she believes in as a designer, and what her vision for her brand is. I learnt that she was interested in establishing a brand which would break traditional stereotypes that dictates women’s fashion. Gender neutrality was in the DNA of her brand, meaning that her pieces would incorporate conventionally ‘masculine’ fashion into the female wardrobe, while retaining the femininity - a refreshed femininity.
Having learnt this about Charlotte’s brand, I now formed a clearer concept in my head for the fashion shoot. The flower motif will act as the main element, but the series would be a study of how females navigate their changing social status - from being strictly feminine in the traditional way, to being less prejudiced in a more liberal social setting.
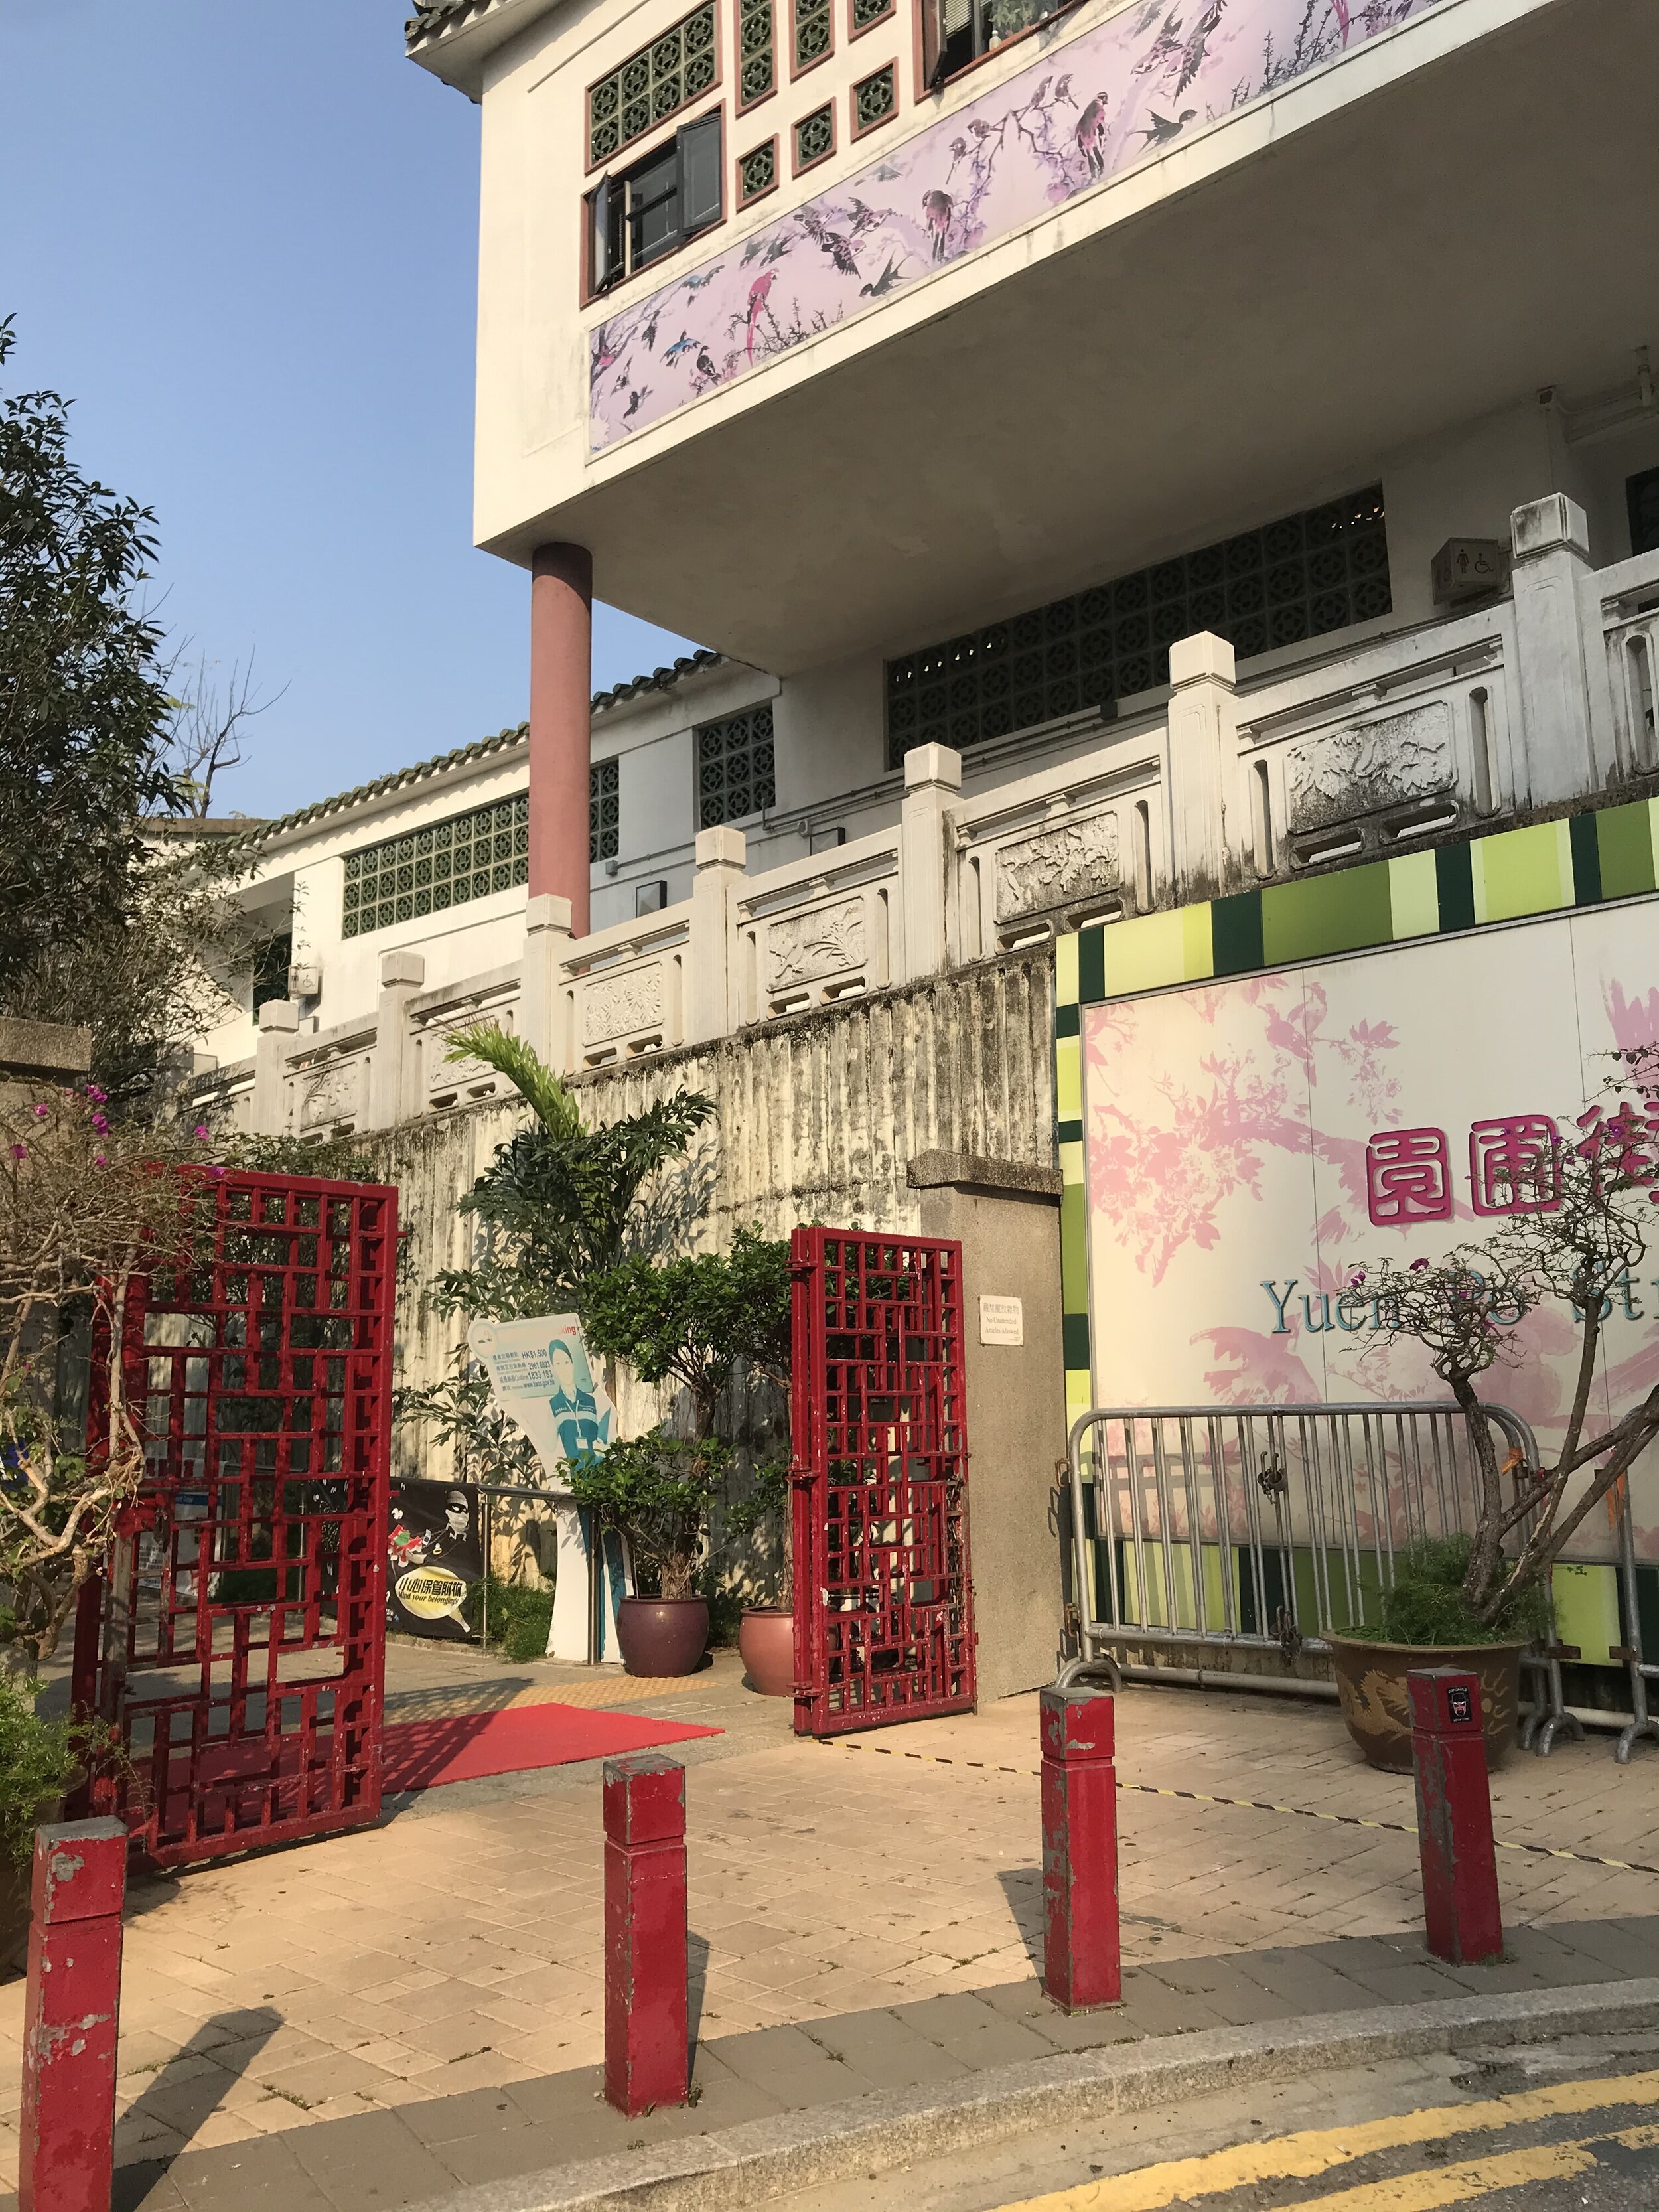
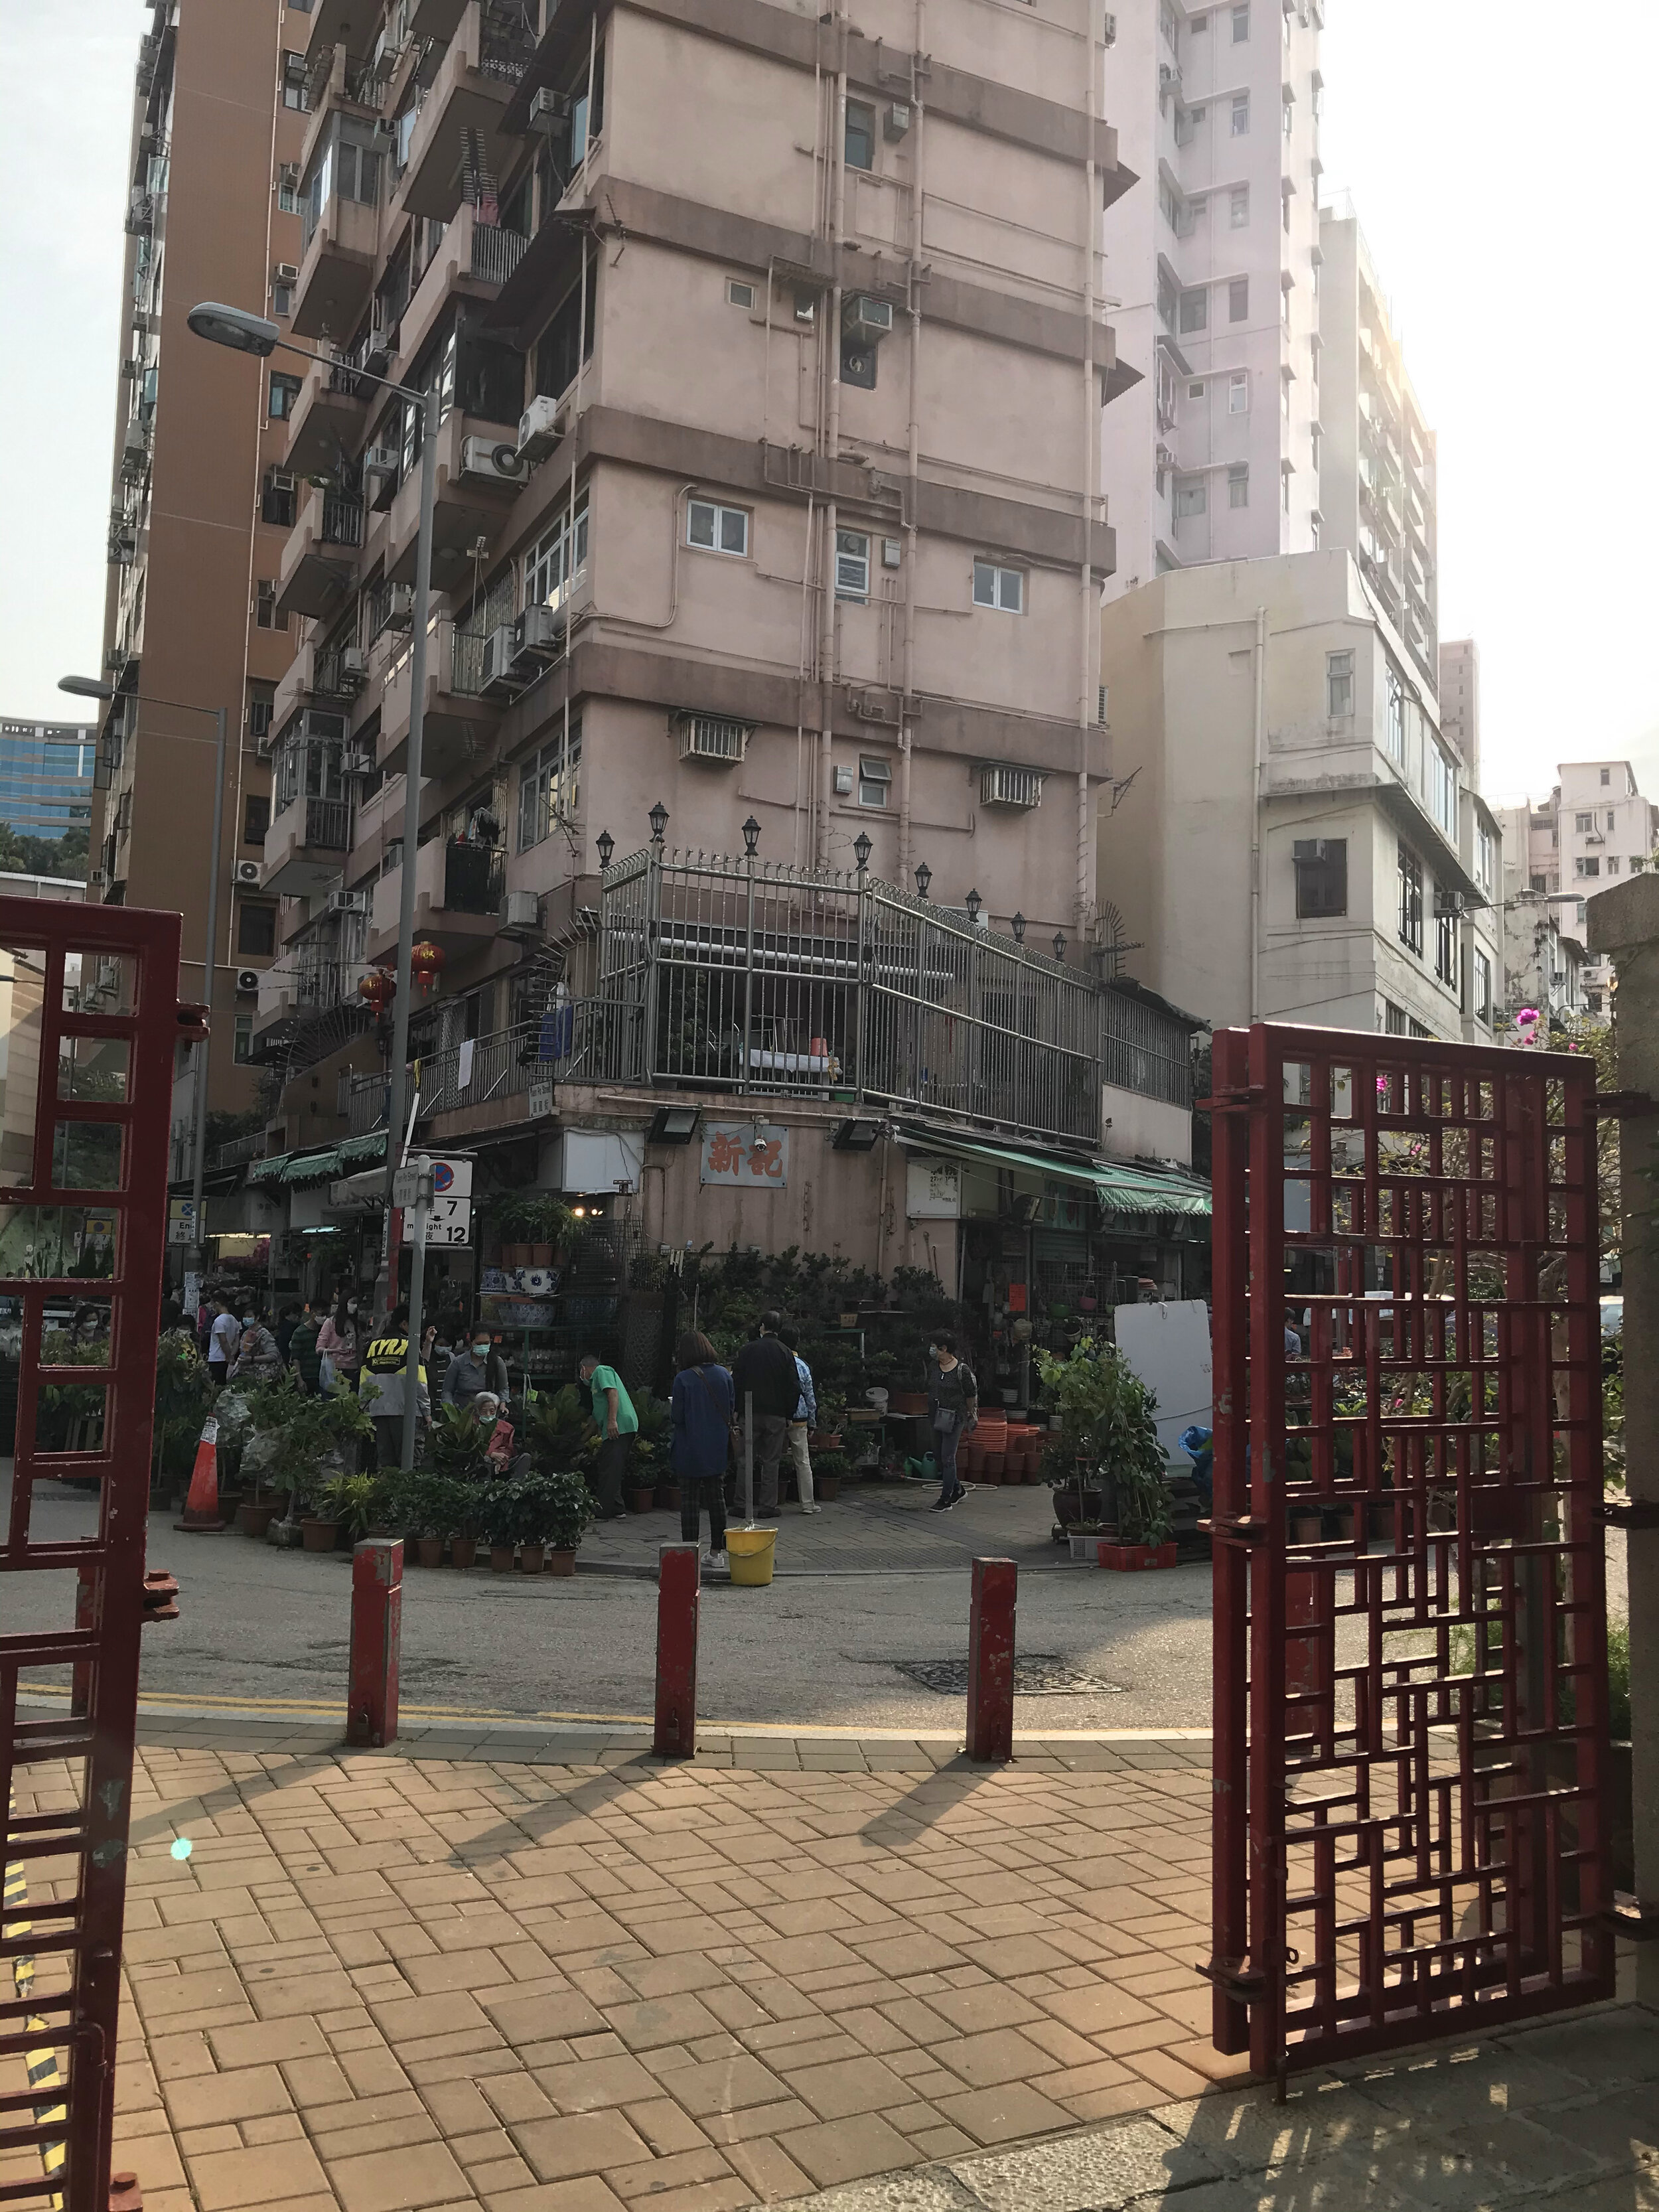
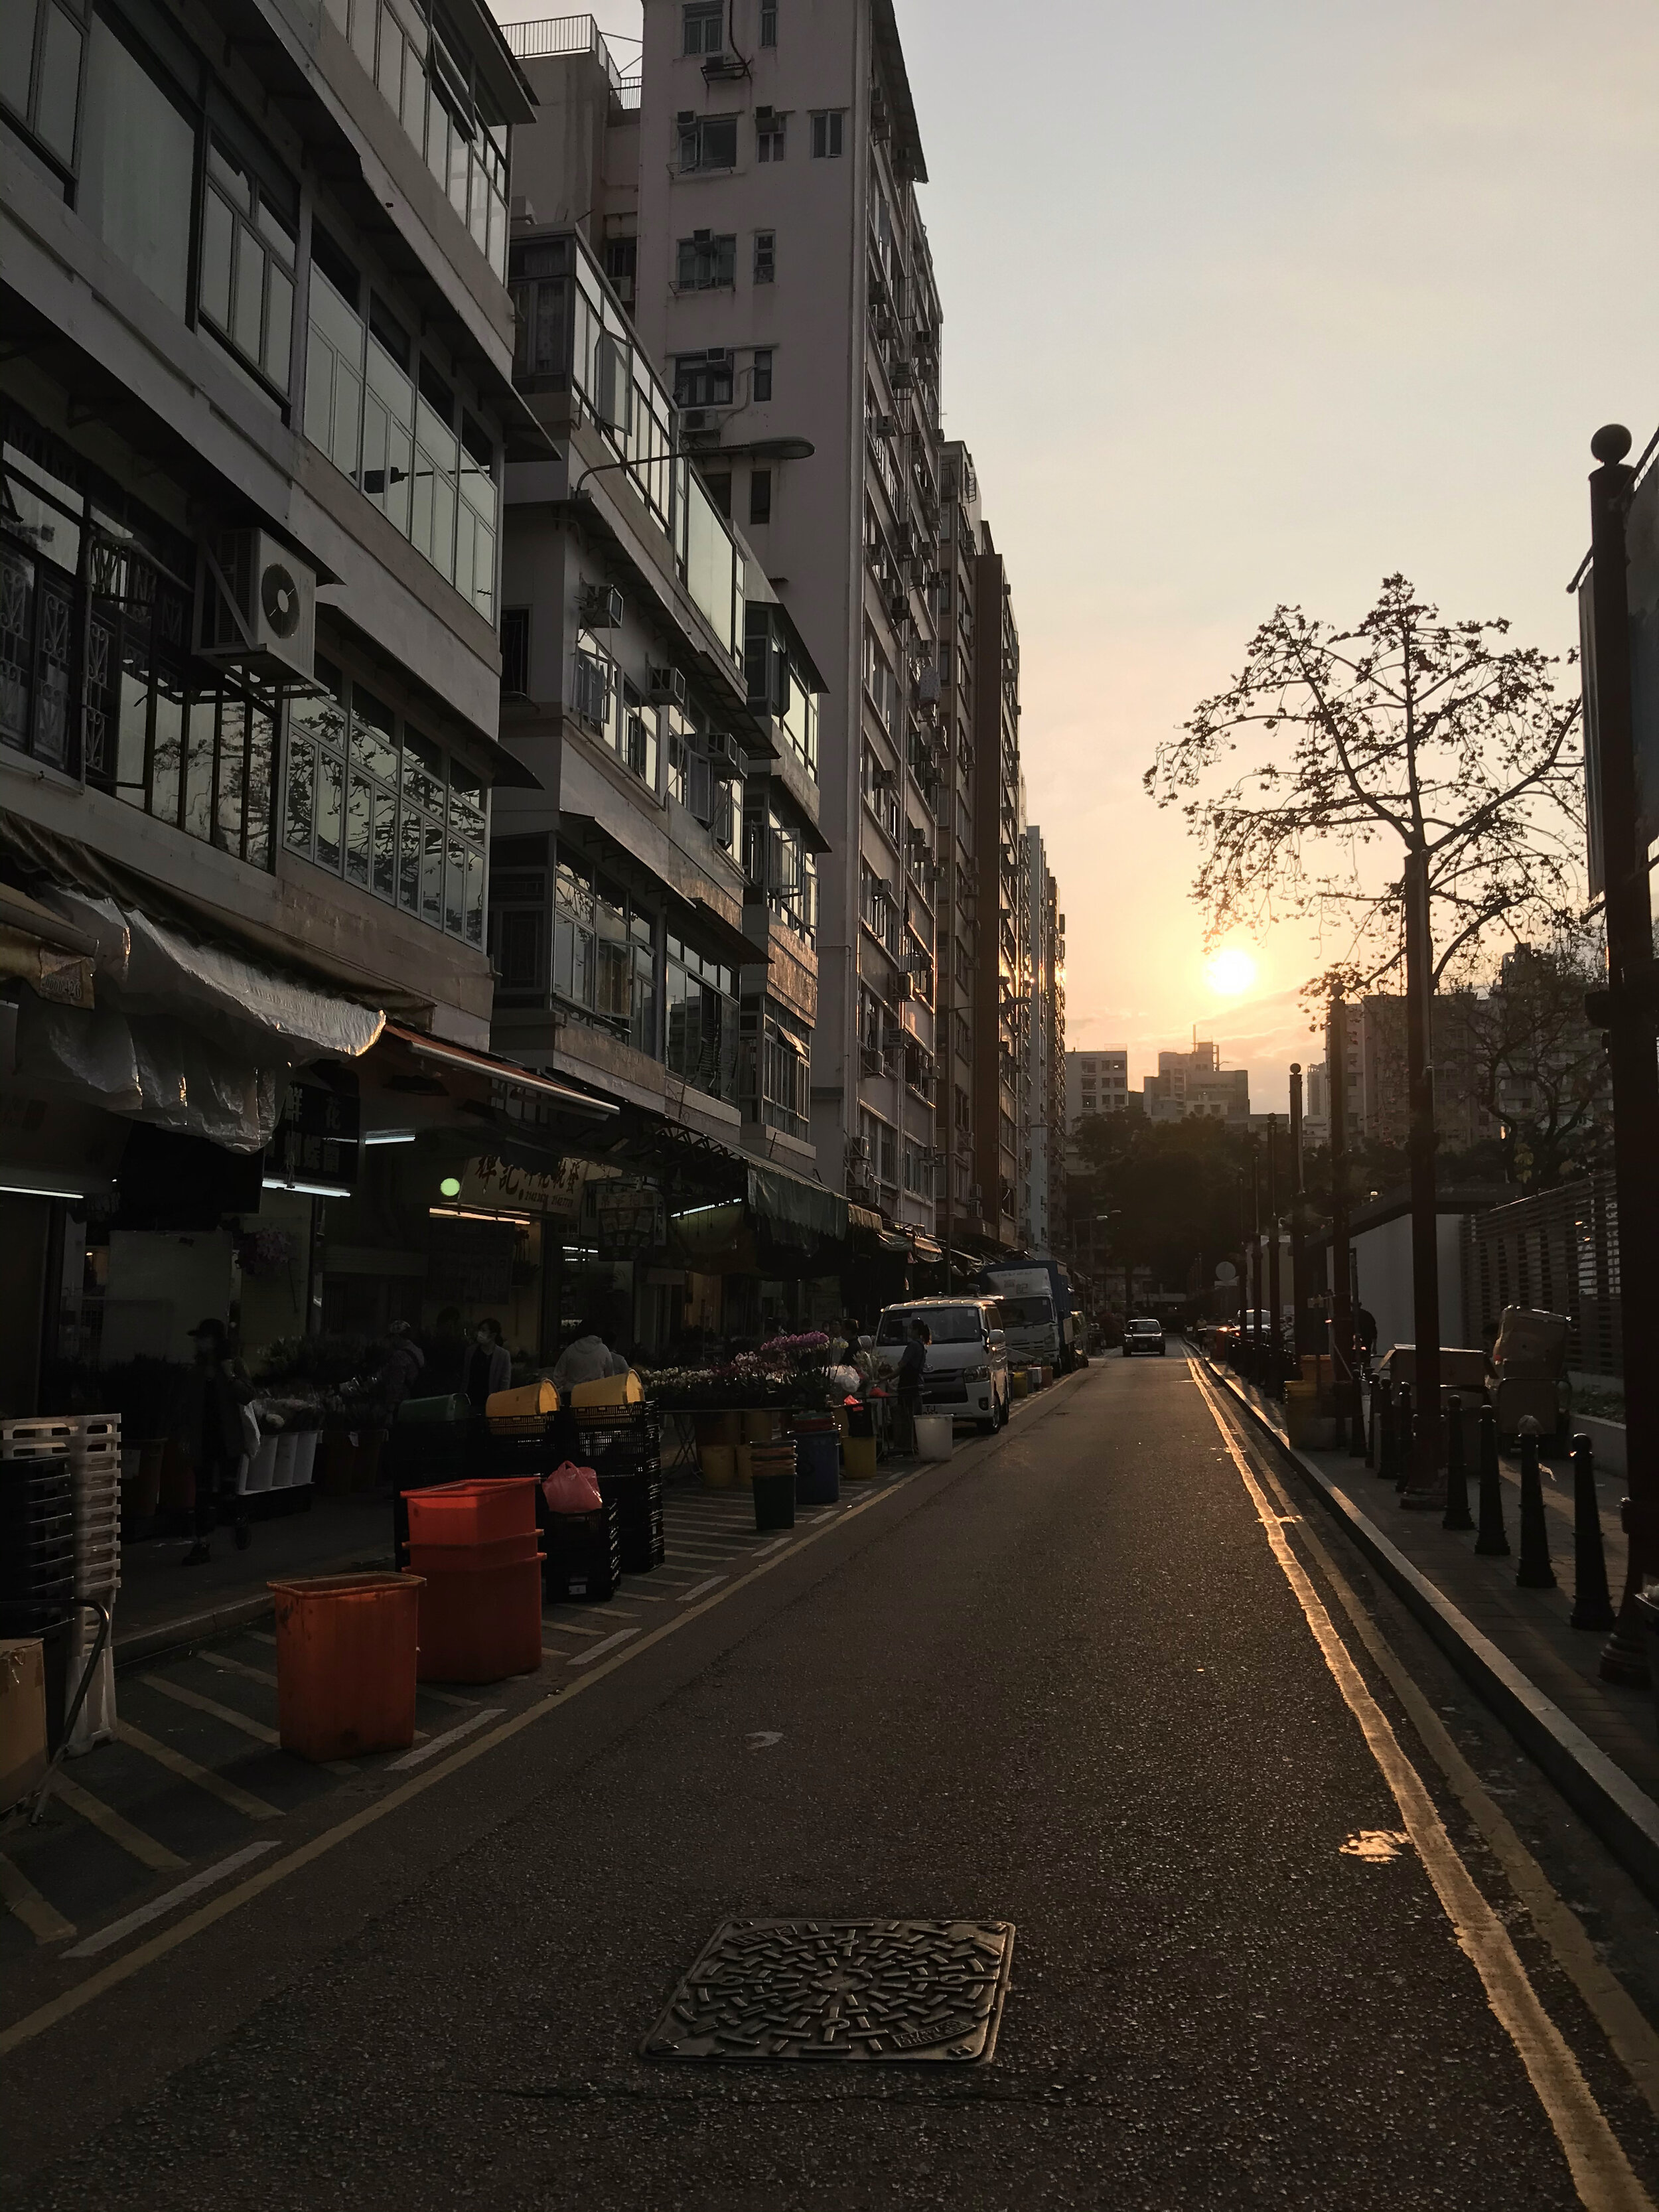
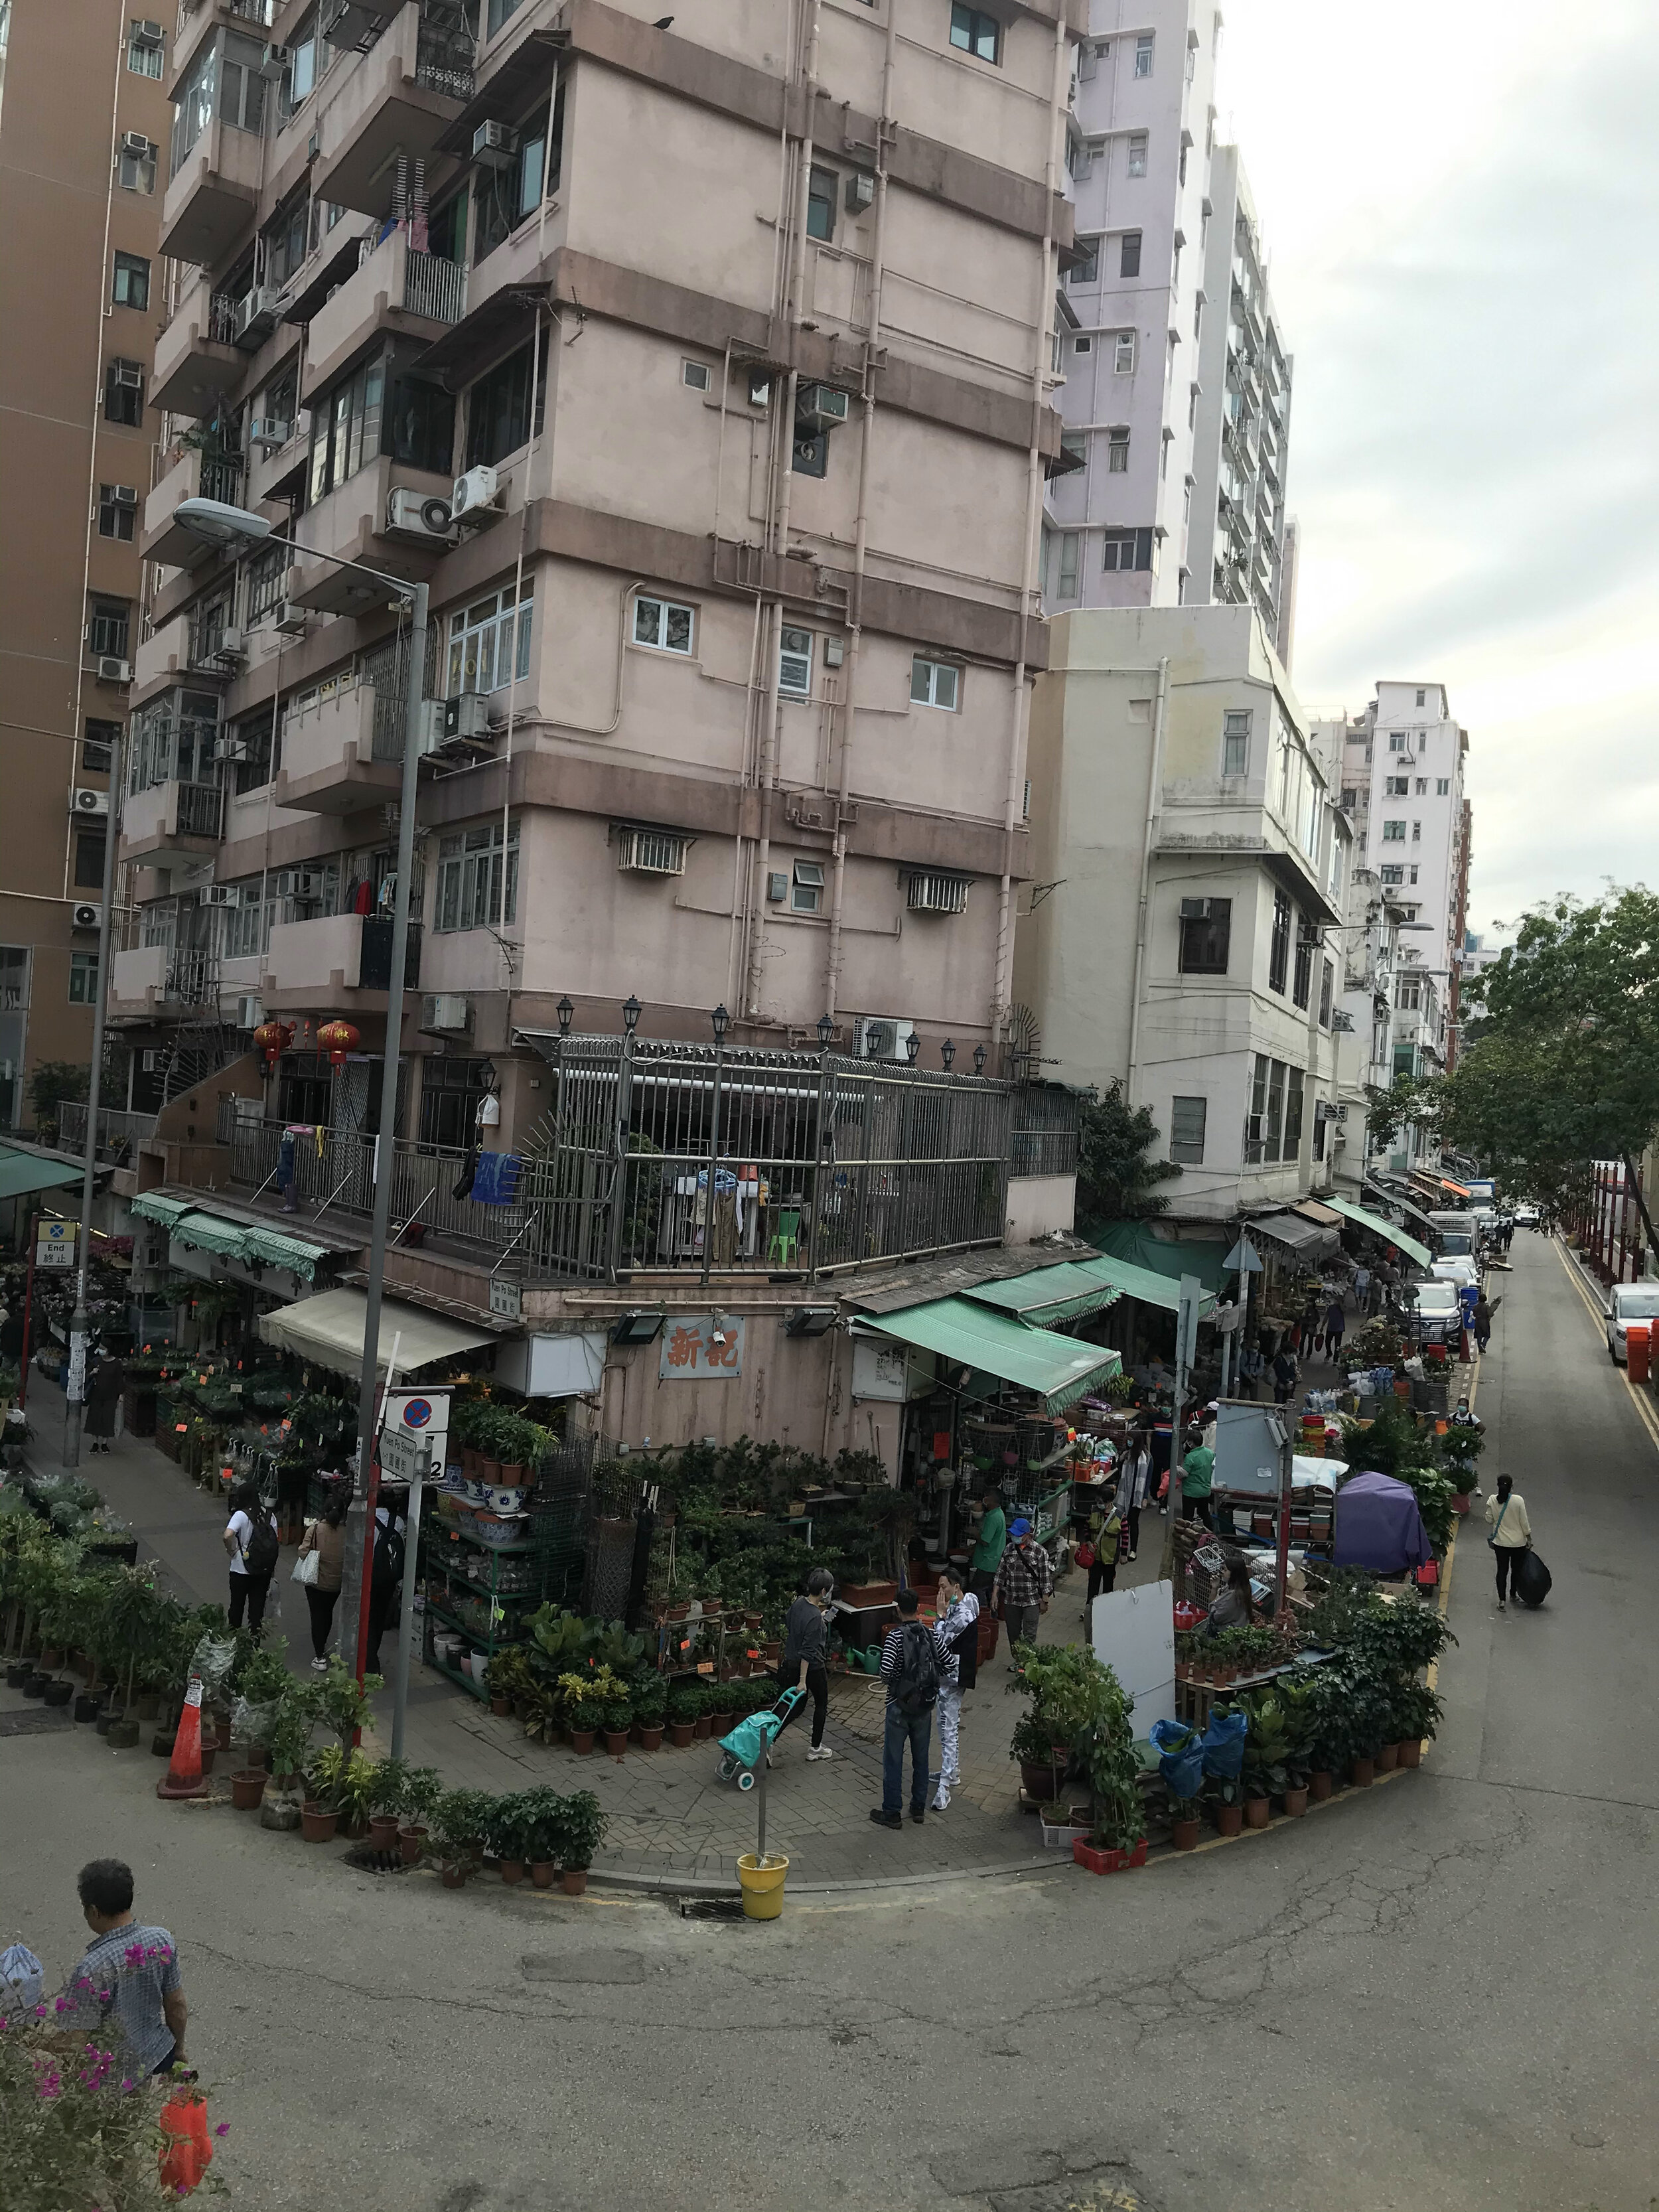
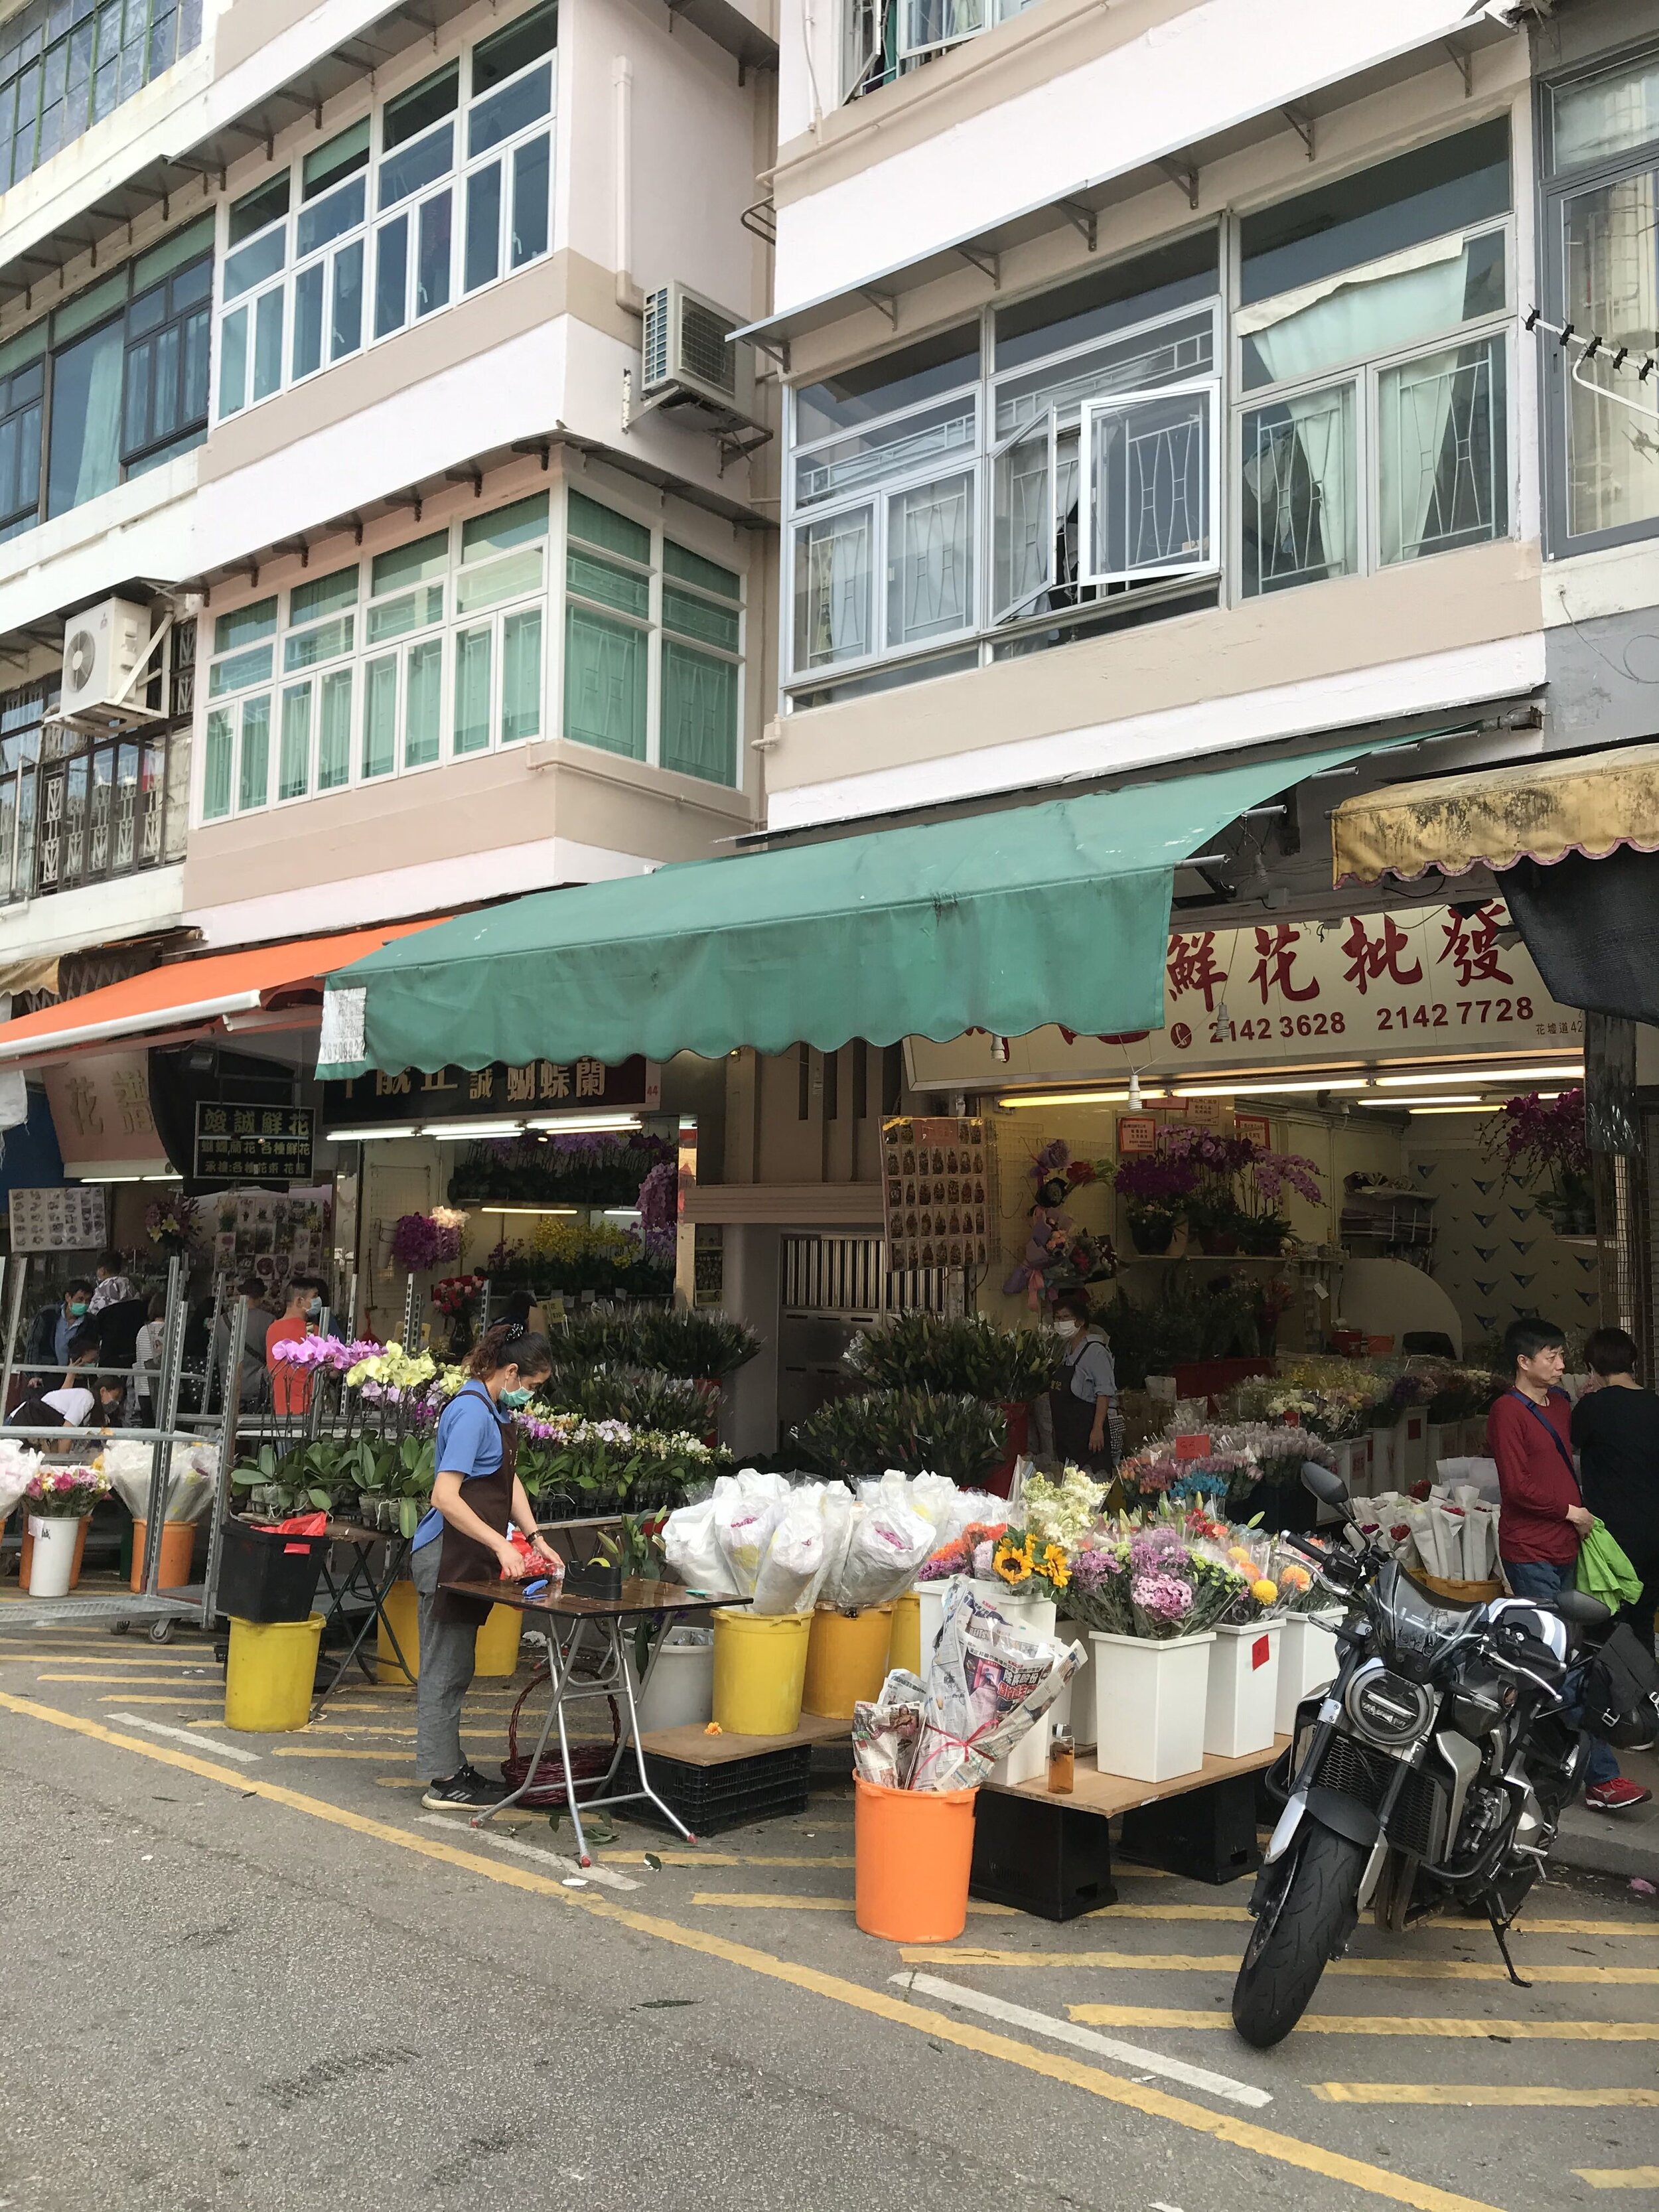
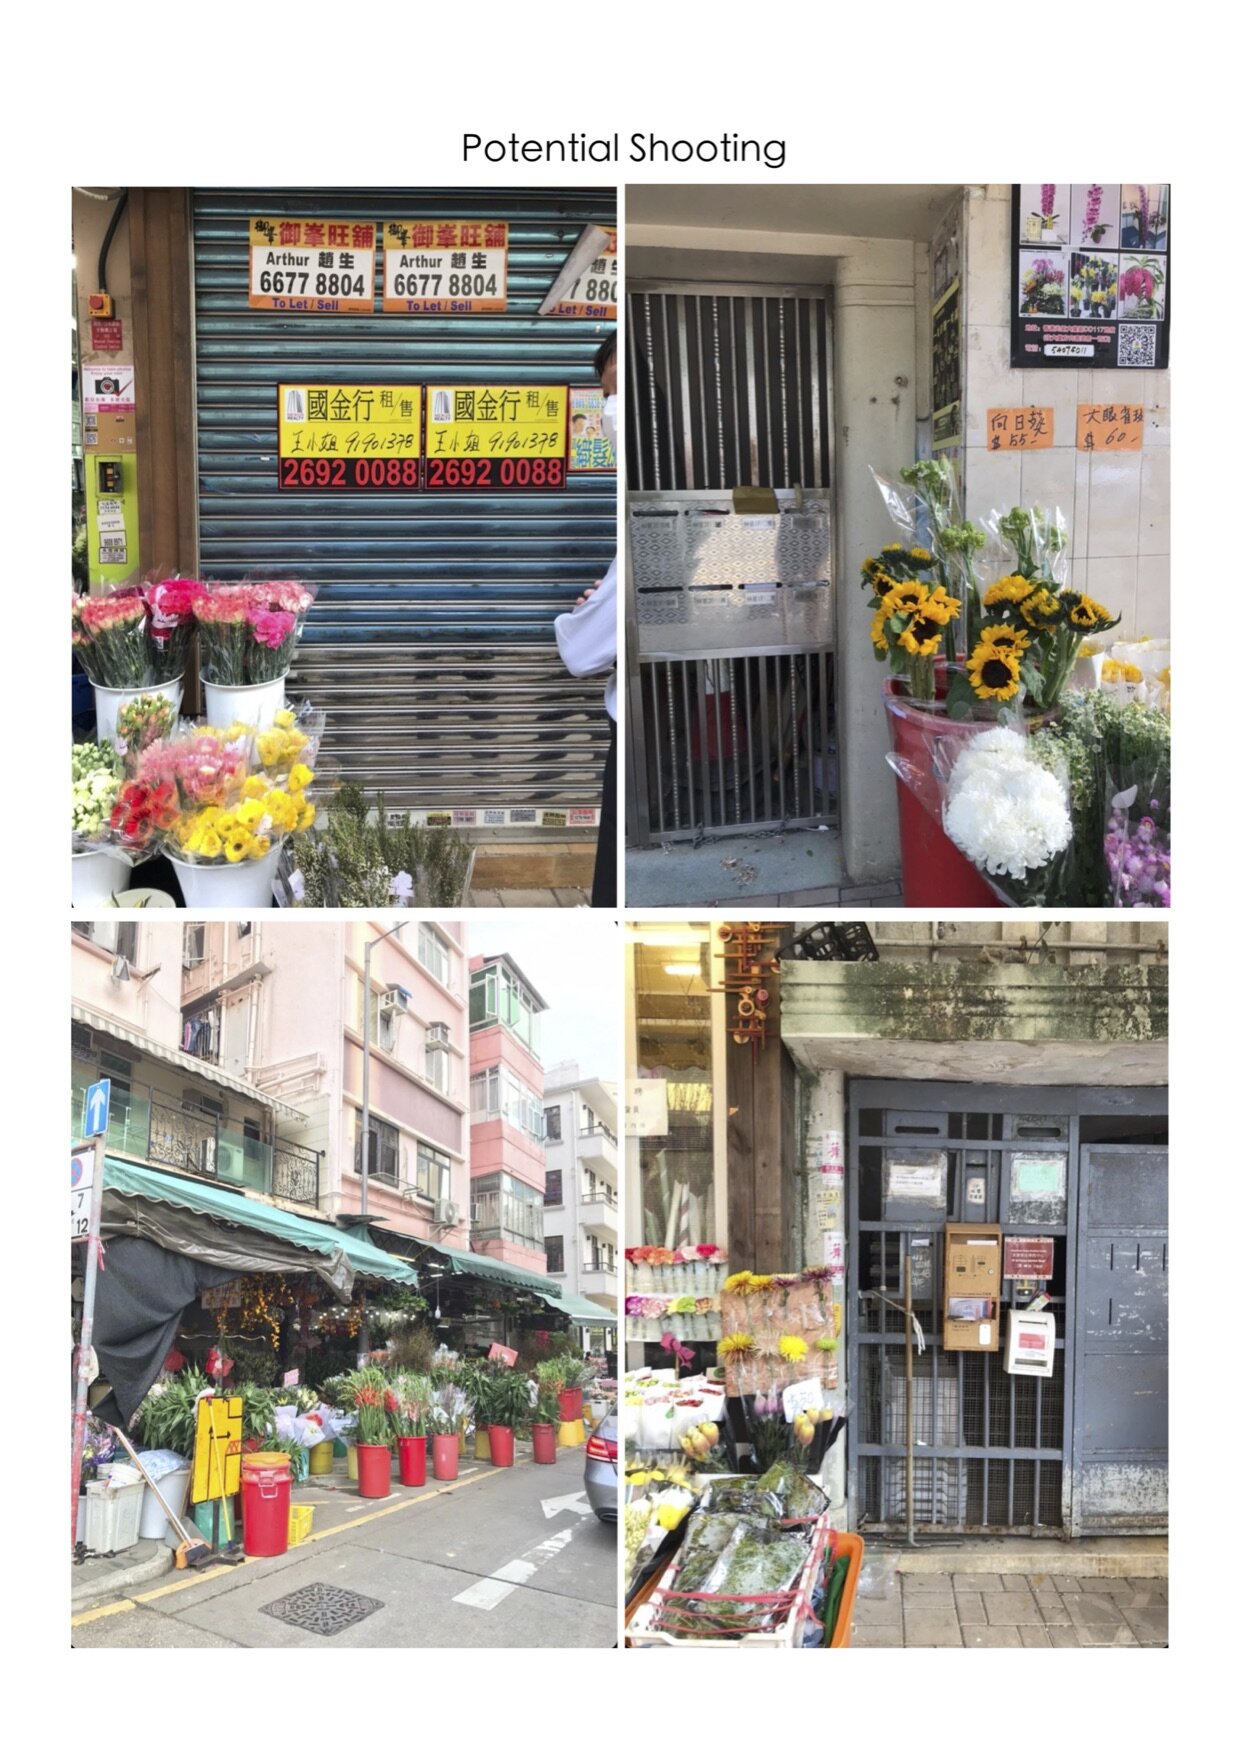
Since we decided to use flowers as the overall theme, we immediately thought of the flower market in Mong Kok, Hong Kong, which is an area in which flower hawkers are concentrated. They sell all sorts freshly cut flowers and plants and because they are packed next to each other, it makes for quite a suitable backdrop to do the fashion shoot at.
Form your Crew
This step probably happens in conjunction with the next couple sections, being the location scout and miscellaneous designs. But forming a crew usually comes a bit earlier for logistic reasons because you need to set a date for the shoot. And the shooting date would then determine the availability of the shooting location.
The absolutely basic crew consists of 4 people - the photographer, the model, the makeup artist and the stylist/ designer/ brand representative. Sometimes, the latter might be absent, but they will still be involved in other parts of the project. So at this point, you have assembled half of the team and will need to find a makeup artist (MUA) and model to join in.
There are no fixed ways of forming a team. You basically reach out to a bunch of profiles you feel would be suitable for the project, and see if they are interested in working together. For MUAs, I mostly just hit people up on Instagram if I see that they are doing fashion makeup. Not wedding or more natural-looking styles, but high-fashion, vibrant styles. As for models, for one, I go through the same process on Instagram, despite with more nuances which I shall elaborate in the ‘my example’ section below; for two, I contact modelling agencies and see if they could provide suitable faces for the project.
Specifically in relation to finding a model, I am aware that a lot of photographers have questions in relation to this. I have walked through the entire process in granular detail in this video, which is the process that I still adopt till this date. This is another topic in itself that I should not go into detail to repeat myself here. For a written version of my extensive guide, read my earlier article ‘First Portrait Collab Shoot: Industry Norms, FAQs, Do's and Don'ts’.
Having confirmed the members of the team, you will then have settled on a shoot date, which provides you with a guide as to when to start the location scout subsequently. You could also provide the team with a basic overview of the artistic direction of the shoot.
My Example: Recruiting Yana (MUA) and Daria (Model) into the Team
You could check out Yana and Daria’s profiles on Instagram - prior to this project, I have never met them, and only started talking on Instagram because of this collaboration.
Yana was an Instagram contact and we have been following each other for a while. The fashion creatives network is rather tight in Hong Kong and there aren’t many of us. Most people would know about each other, despite not having actually worked together yet.
Daria was a model I found via A1 Management (a1m), a boutique modelling agency in Hong Kong. I got in touch via email with a booker from a1m, and was presented with Daria’s profile. Me and Charlotte felt that she was a really good fit, because of her very feminine features and her expressive eyes.
So this was how the team came to be, and we agreed on the date of shooting. I started a group chat on Instagram, which is where I introduced everyone and provided an overview of the art direction we had decided so far. Everyone knew briefly the three outfits that we are shooting, the theme of the shoot being floral, and also the aim of this shoot is for editorial submissions.
Scout the Proposed Location
This part is usually the job of the photographer, because the main purpose of a location scout is help the photographer better visualise the scene, so as to speed up the time taken to spot compositions and find angles. It also helps the photographer sort out the logistics, such as making sure there is a secure place to store gadgets and equipment, and that the place is indeed available and suitable for shooting.
I have included my entire workflow on a location scout in this video here, which can serve as another example of how I plan out the location and operations of my regular portrait shoots with clients.
On a location scout, the photographer takes snaps of walls or specific spots within the targeted area, for the purpose of making a visual note himself, and also sharing it with his team to make sure everyone is on the same page regarding the vision for the shoot.
Typical things to look for, as I elaborated in the video in greater detail, include how much vehicle and human traffic there is around the area, any safe space for luggage storage, whether there will be enough light etc.
One main point that was also mentioned in the video is that it is better to go about two weeks prior to the agreed shoot date, and be sure to go at the same time during when your shoot will take place. Because you want to allow enough time for the team to make accommodations to the particular circumstances of the location, but also you want to go close enough to the shoot date so that the conditions remain more or less the same between your scout and shoot.
For a written guide on how to scout locations and a list of things to take note of, read my earlier blog article [Pho. Talk] How to Help Clients Find the Best Street Portrait Locations in Hong Kong.
My Example: Checking out the Flower Market in Mong Kok, Hong Kong
Approximately one week before the shoot, I set off for the flower market one afternoon, as the tentative shooting schedule was set for the afternoon. This is to keep conditions consistent between my scout and the shoot, so as to eliminate unpleasant surprises that would negatively affect the shoot.
Specifically for this shoot, I was looking to solve a few logistical issues:
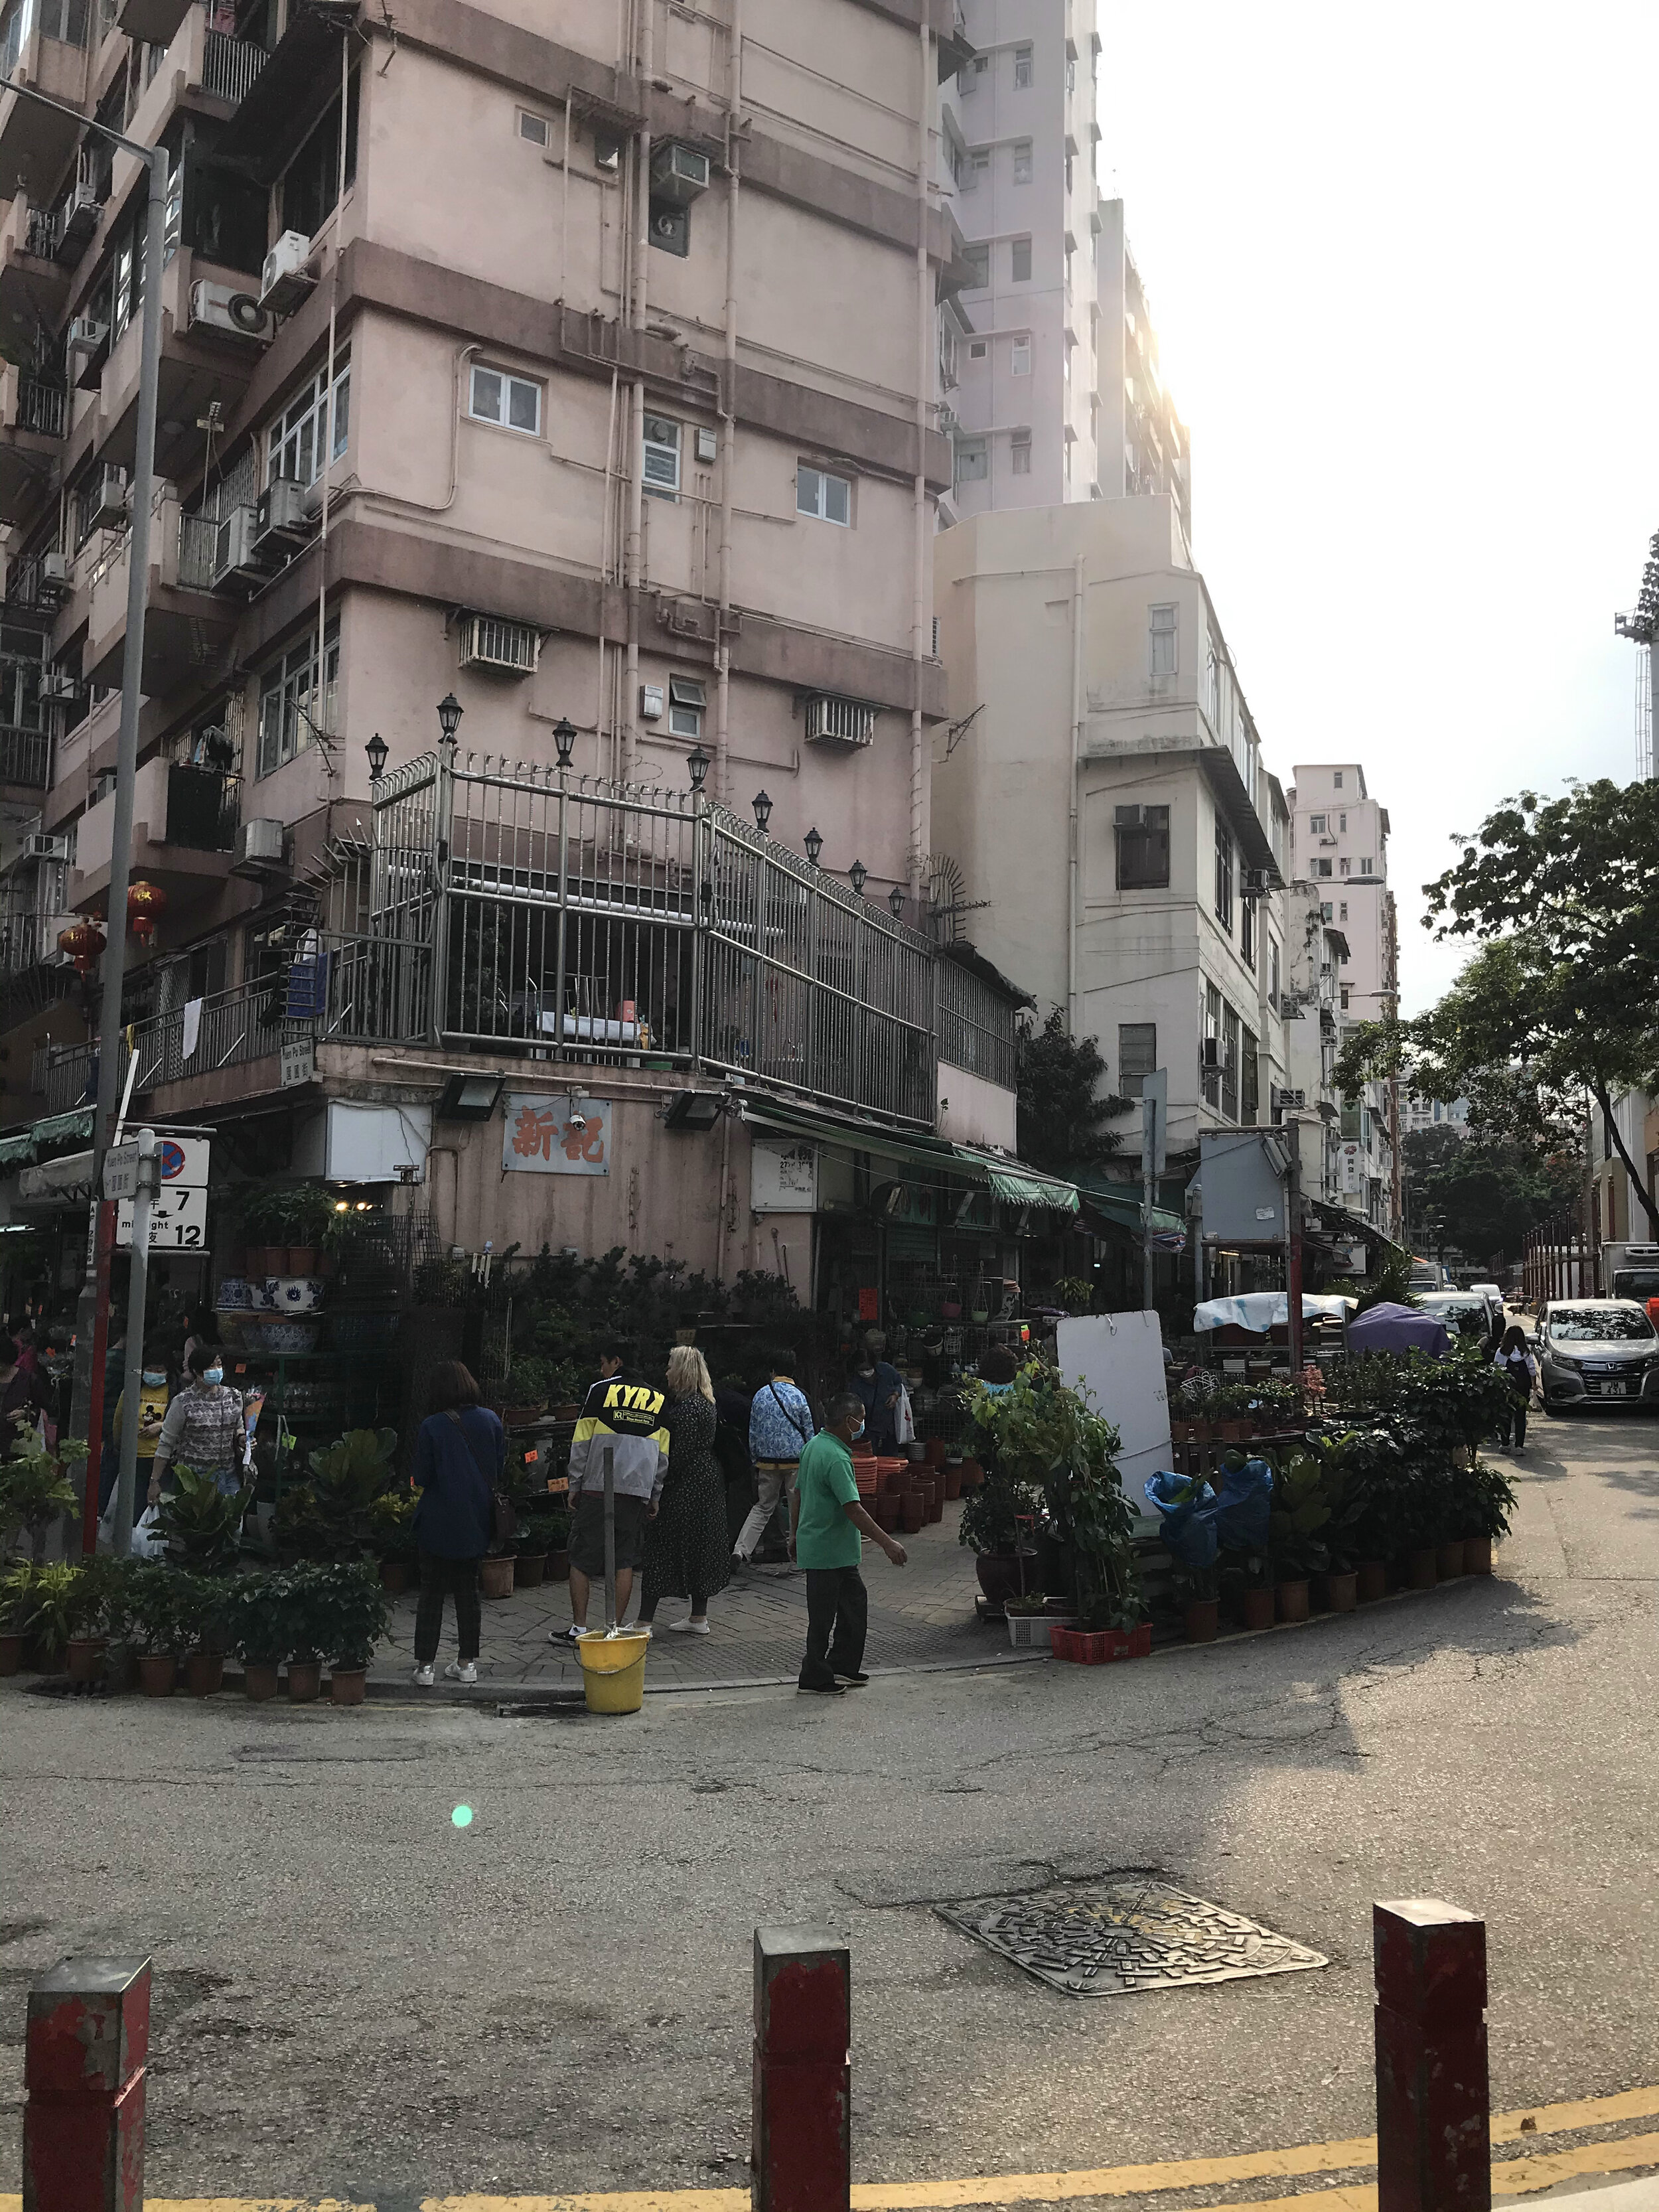
Firstly, how crowded is that place? If you have been to Hong Kong you would know - the place is just so damn crowded. And we are talking about shooting at a MARKET, not just any street, but a market. And this flower market is the largest and the most accessible one in Hong Kong which makes it so popular - it is going to be a challenge for me to fit in my entire team, albeit just four people, into a shooting spot without blocking the road and having people cuss at us. Since we had three looks, I had to look for at least three different backdrops, one to go with the three outfits each.
Secondly, how can we keep our belongings safe? I as the photographer would bring a suitcase of gear with me, Charlotte the designer would take the three outfits in her suitcase too (it weights a considerable amount because remember - a look includes shoes, belts, jewellery etc, which really adds up), and Yana the MUA has another suitcase of makeup equipment. And of course, we all have valuables that need to be kept safe, especially in such a crowded location.
Thirdly, where should the team set up? Although we hadn’t worked out the exact makeup and hair design, I find it the best policy always to find an indoor location that has tables and gives access to electricity. Some MUAs I worked with need sockets for styling hair, I might need to do some last minute charging for my equipment, and ideally the crew could charge their phones just in case. With table and chairs, the model could sit down throughout the entire setup, which could take hours, and everyone can set up their equipment on the table. I have been to on-location shoots where the crew had to lay our stuff on the floor publicly, which was a totally disaster. Being indoors also insures against extreme weather conditions. Hong Kong summers can be unbearably hot - the makeup might melt before we started shooting if we set up outdoors. I had to find a cafe that provides decent shelter, while not too crowded so that we wouldn’t be kicked out for staying too long.
And lastly, the miscellaneous stuff, like food, water, toilets, Since this shoot was taking place in the summer in Hong Kong, I can expect the crew members will need to get water and refreshments in the middle of the shoot. Also a human necessity, we would need toilets, which unfortunately is not always an apparent solution on location. I made sure that I had these things sorted out so that everything runs smoothly while the crew’s needs are taken care of.
Now, on to the more creative decisions, which is finding out good backdrops for the photoshoot. The absolute minimum that I needed was three, but to play safe, and to possibly add more variation to my shots, I usually prepare roughly double the amount, aka six in this case.
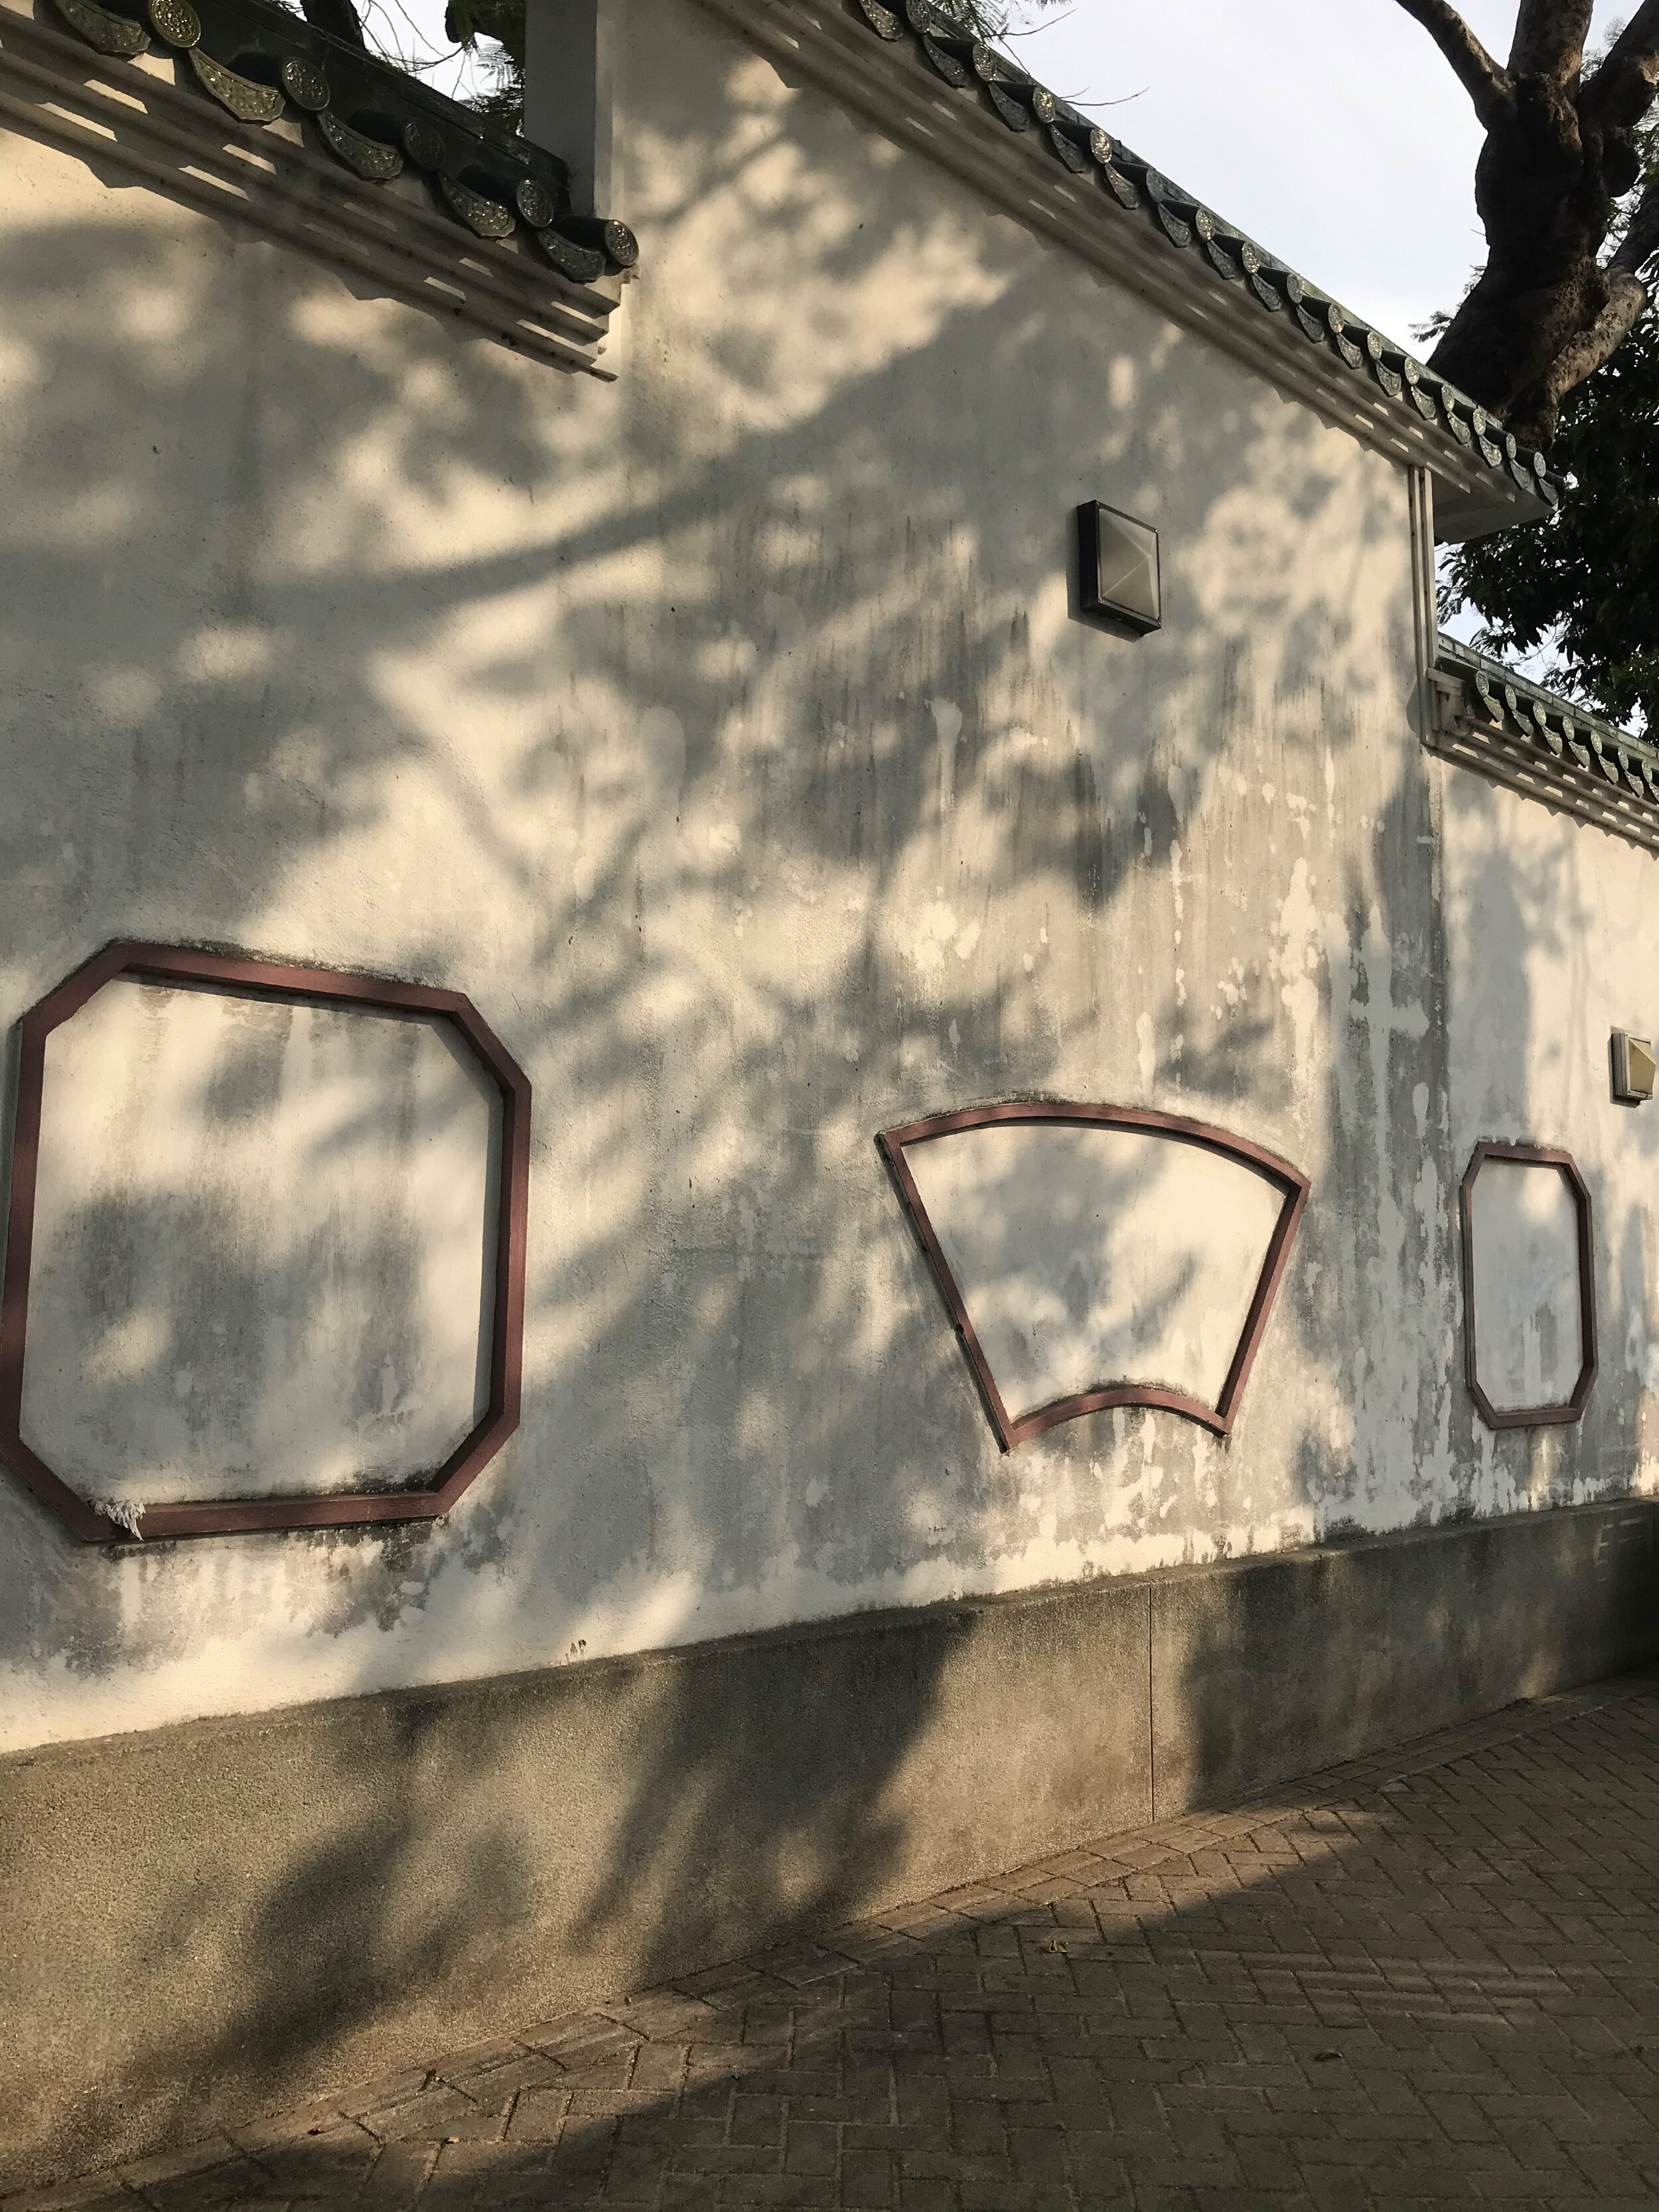
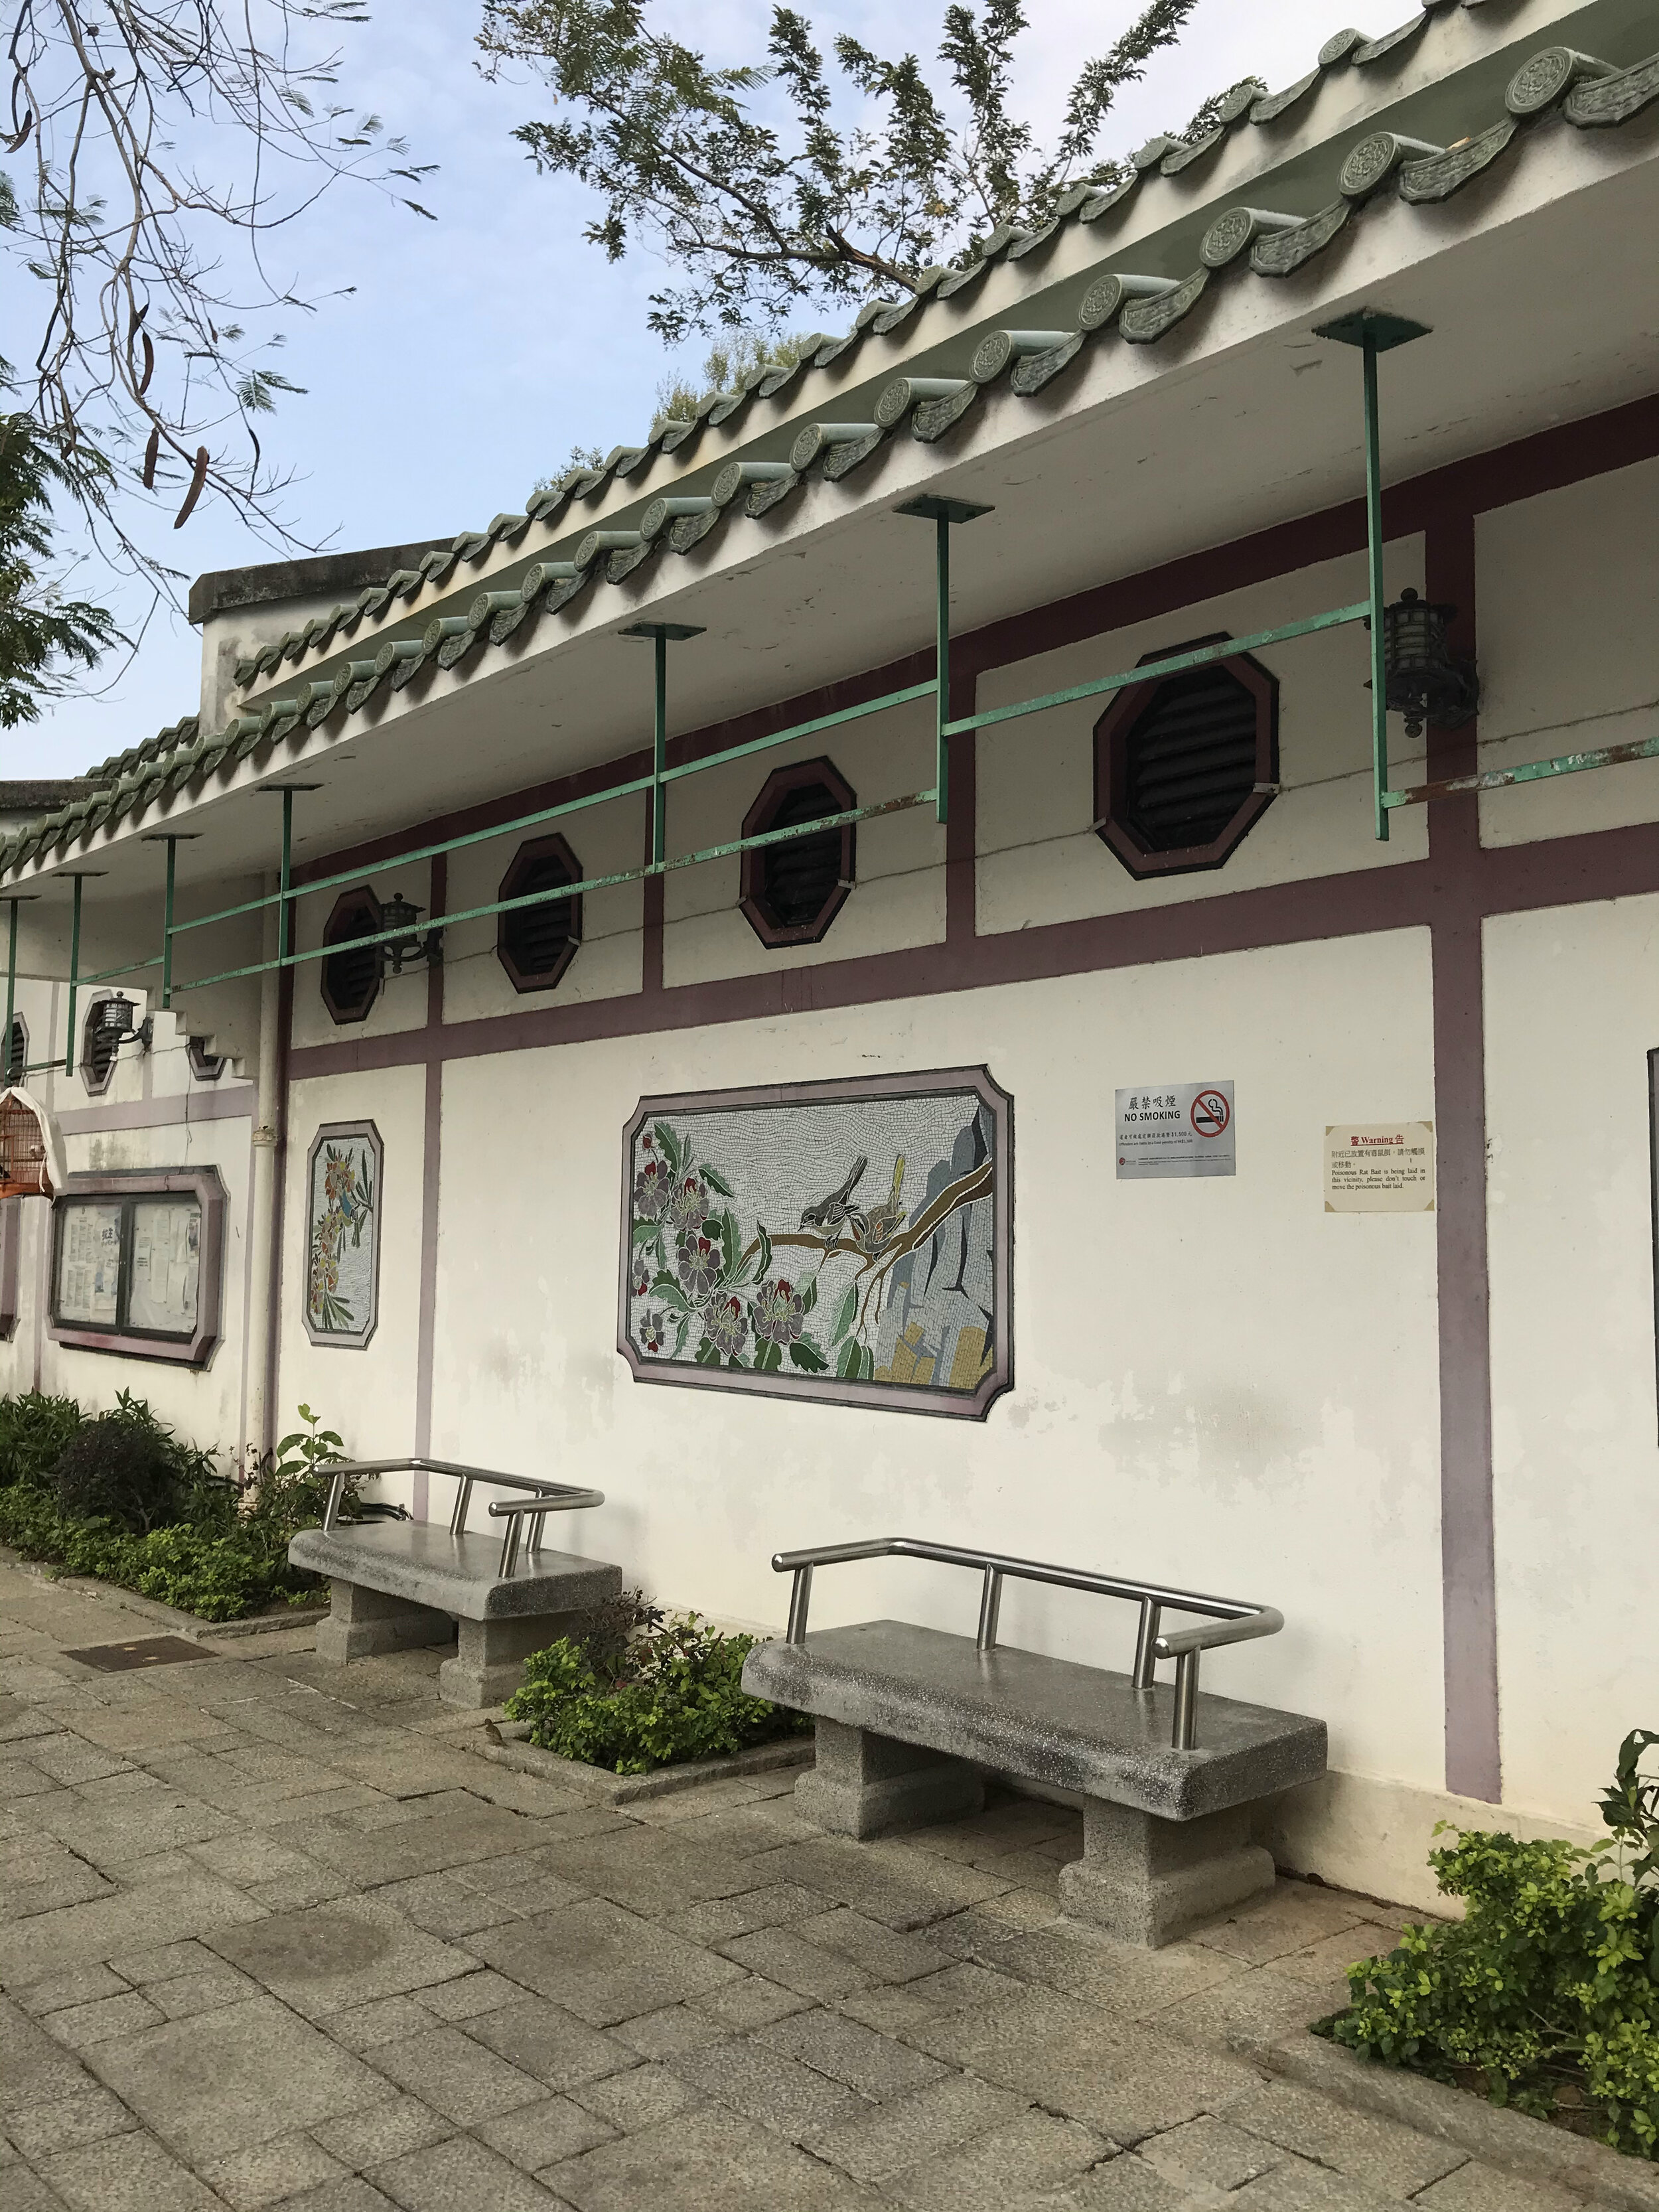
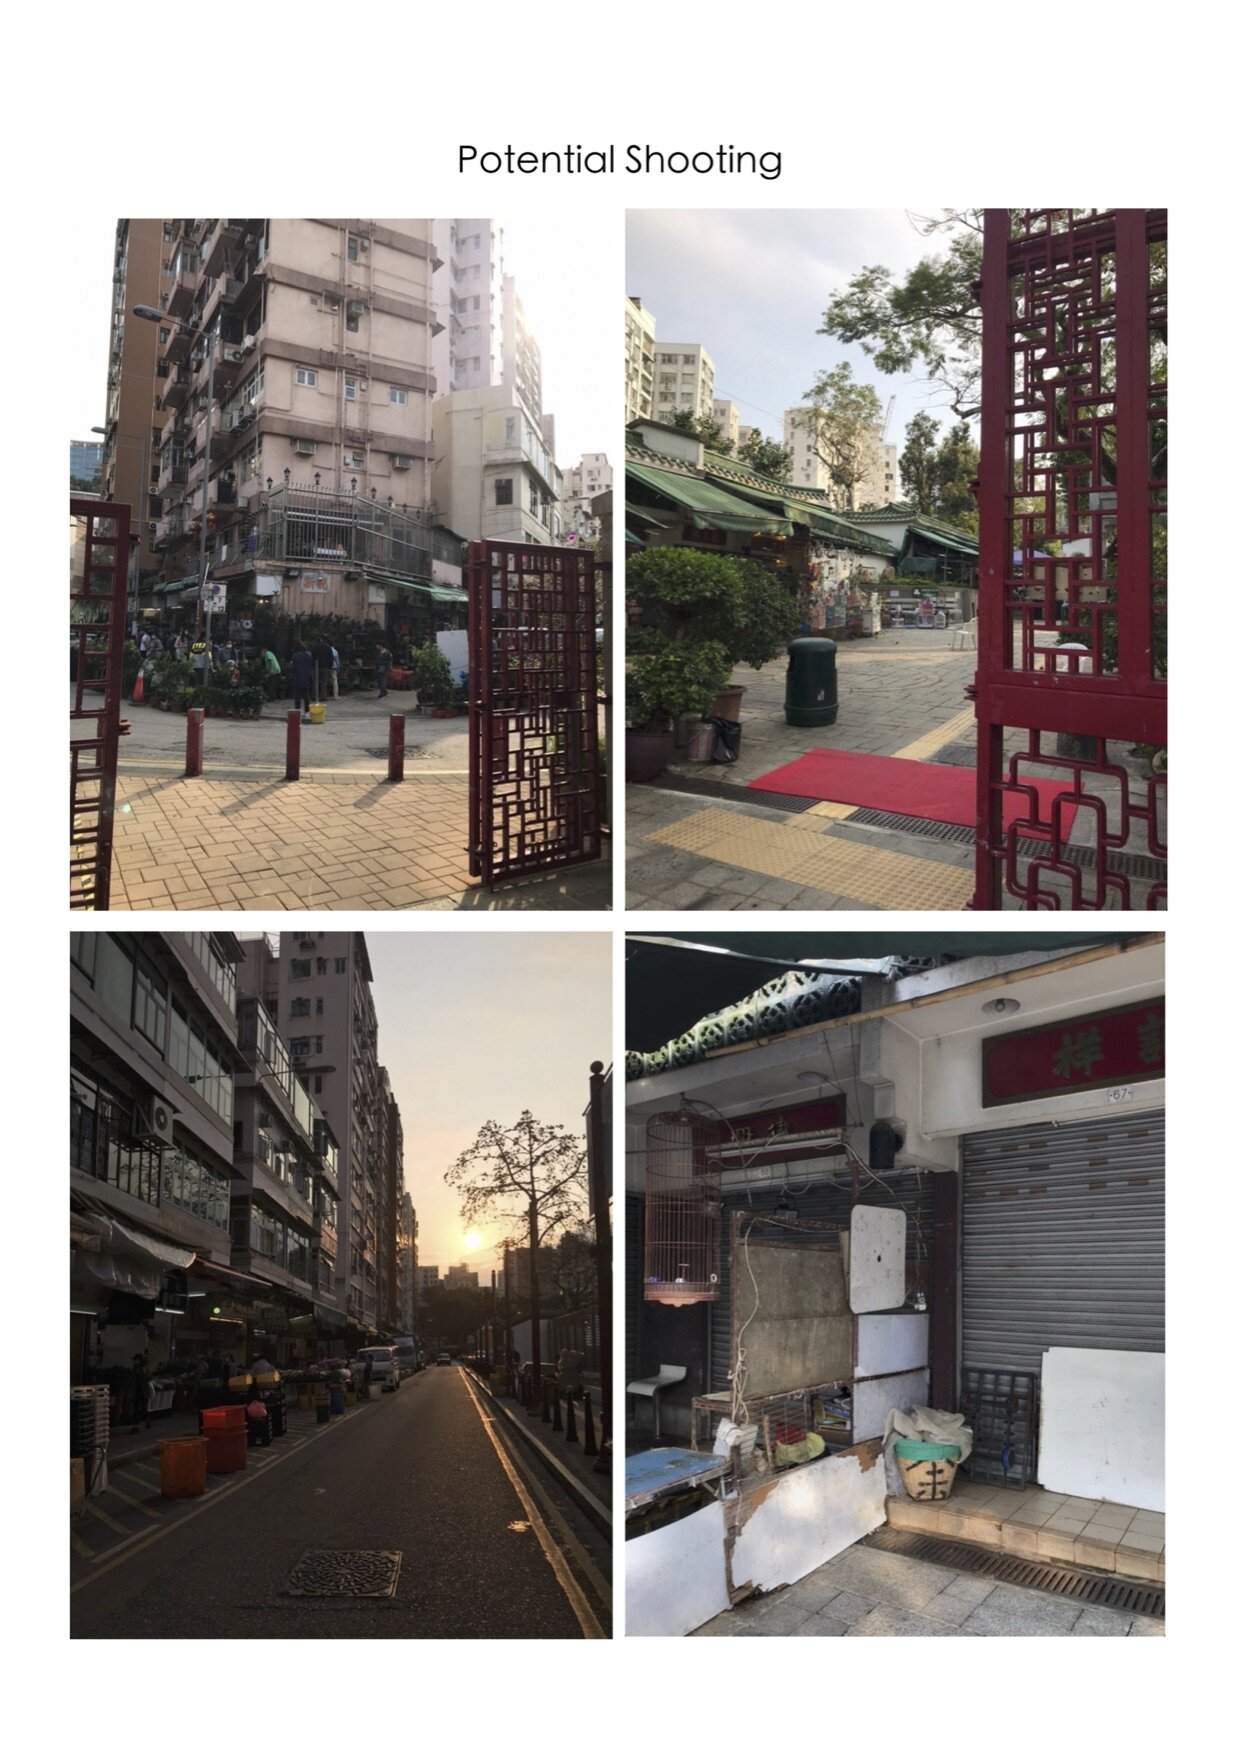
The first area I scouted out was targeted at the red outfit, so I kept my eye open for any red infrastructure in the market. I also found a park right next to the market which had a red entrance in Chinese architectural style - perfect for the look!
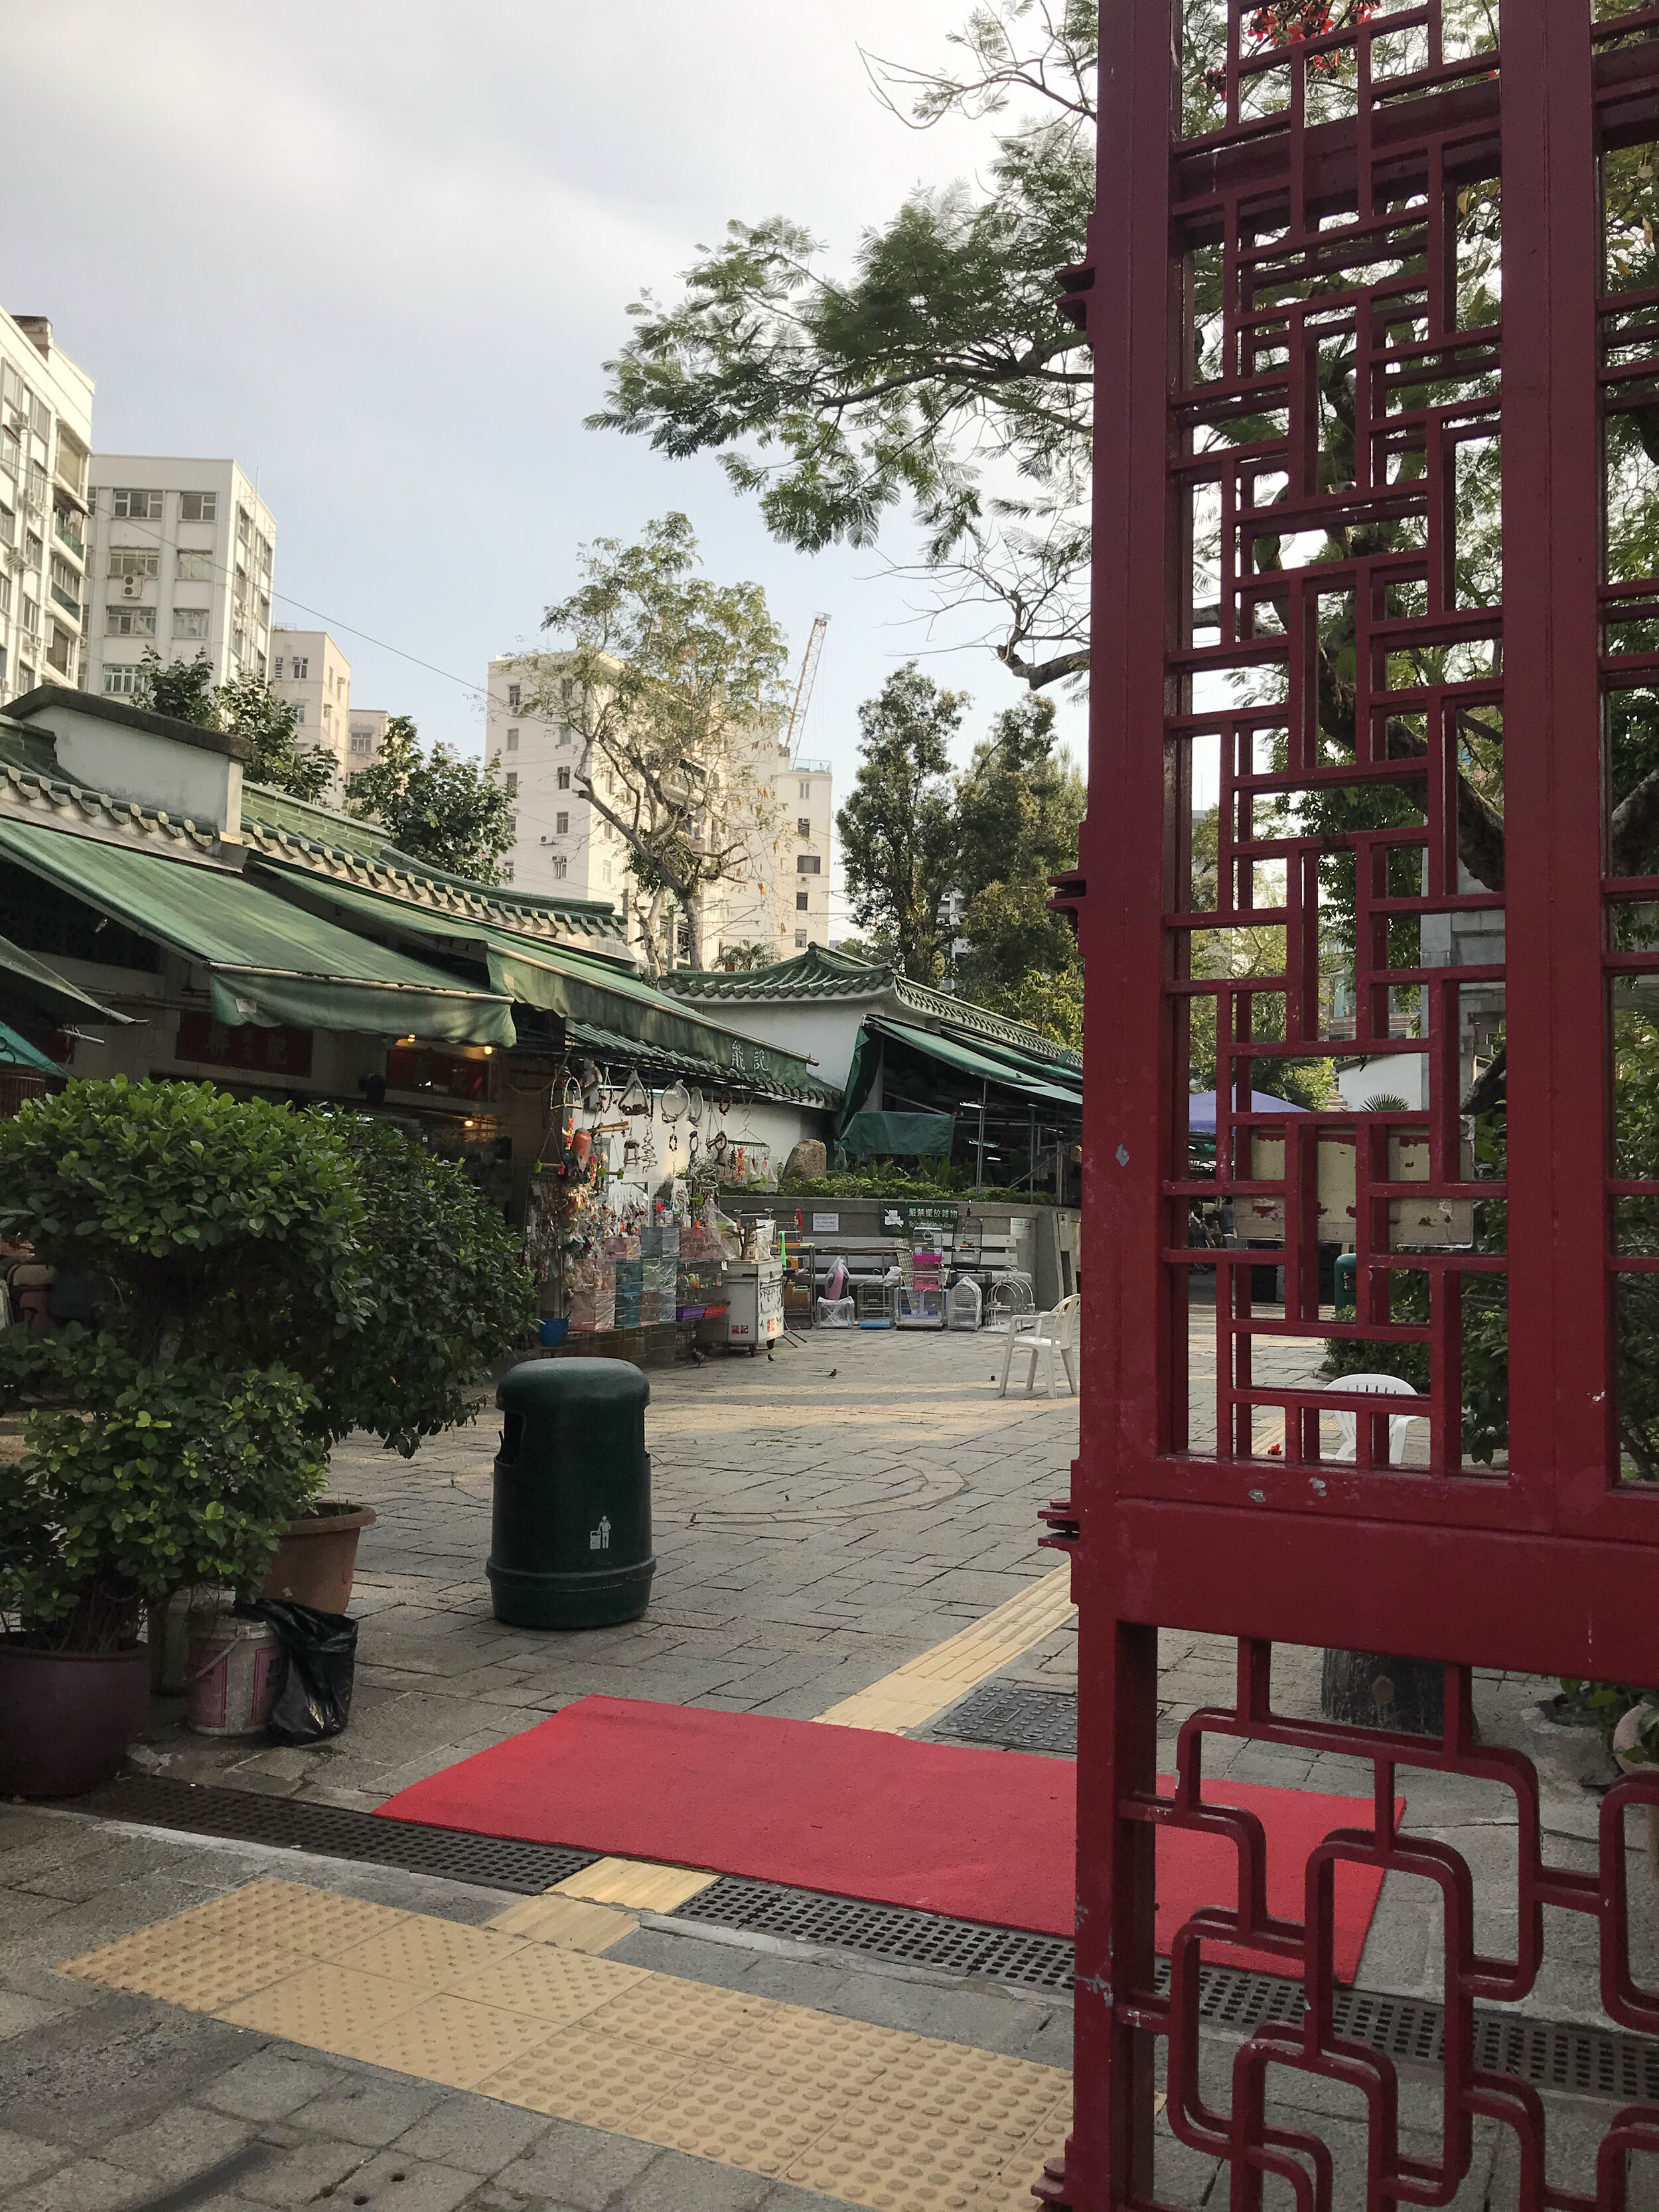
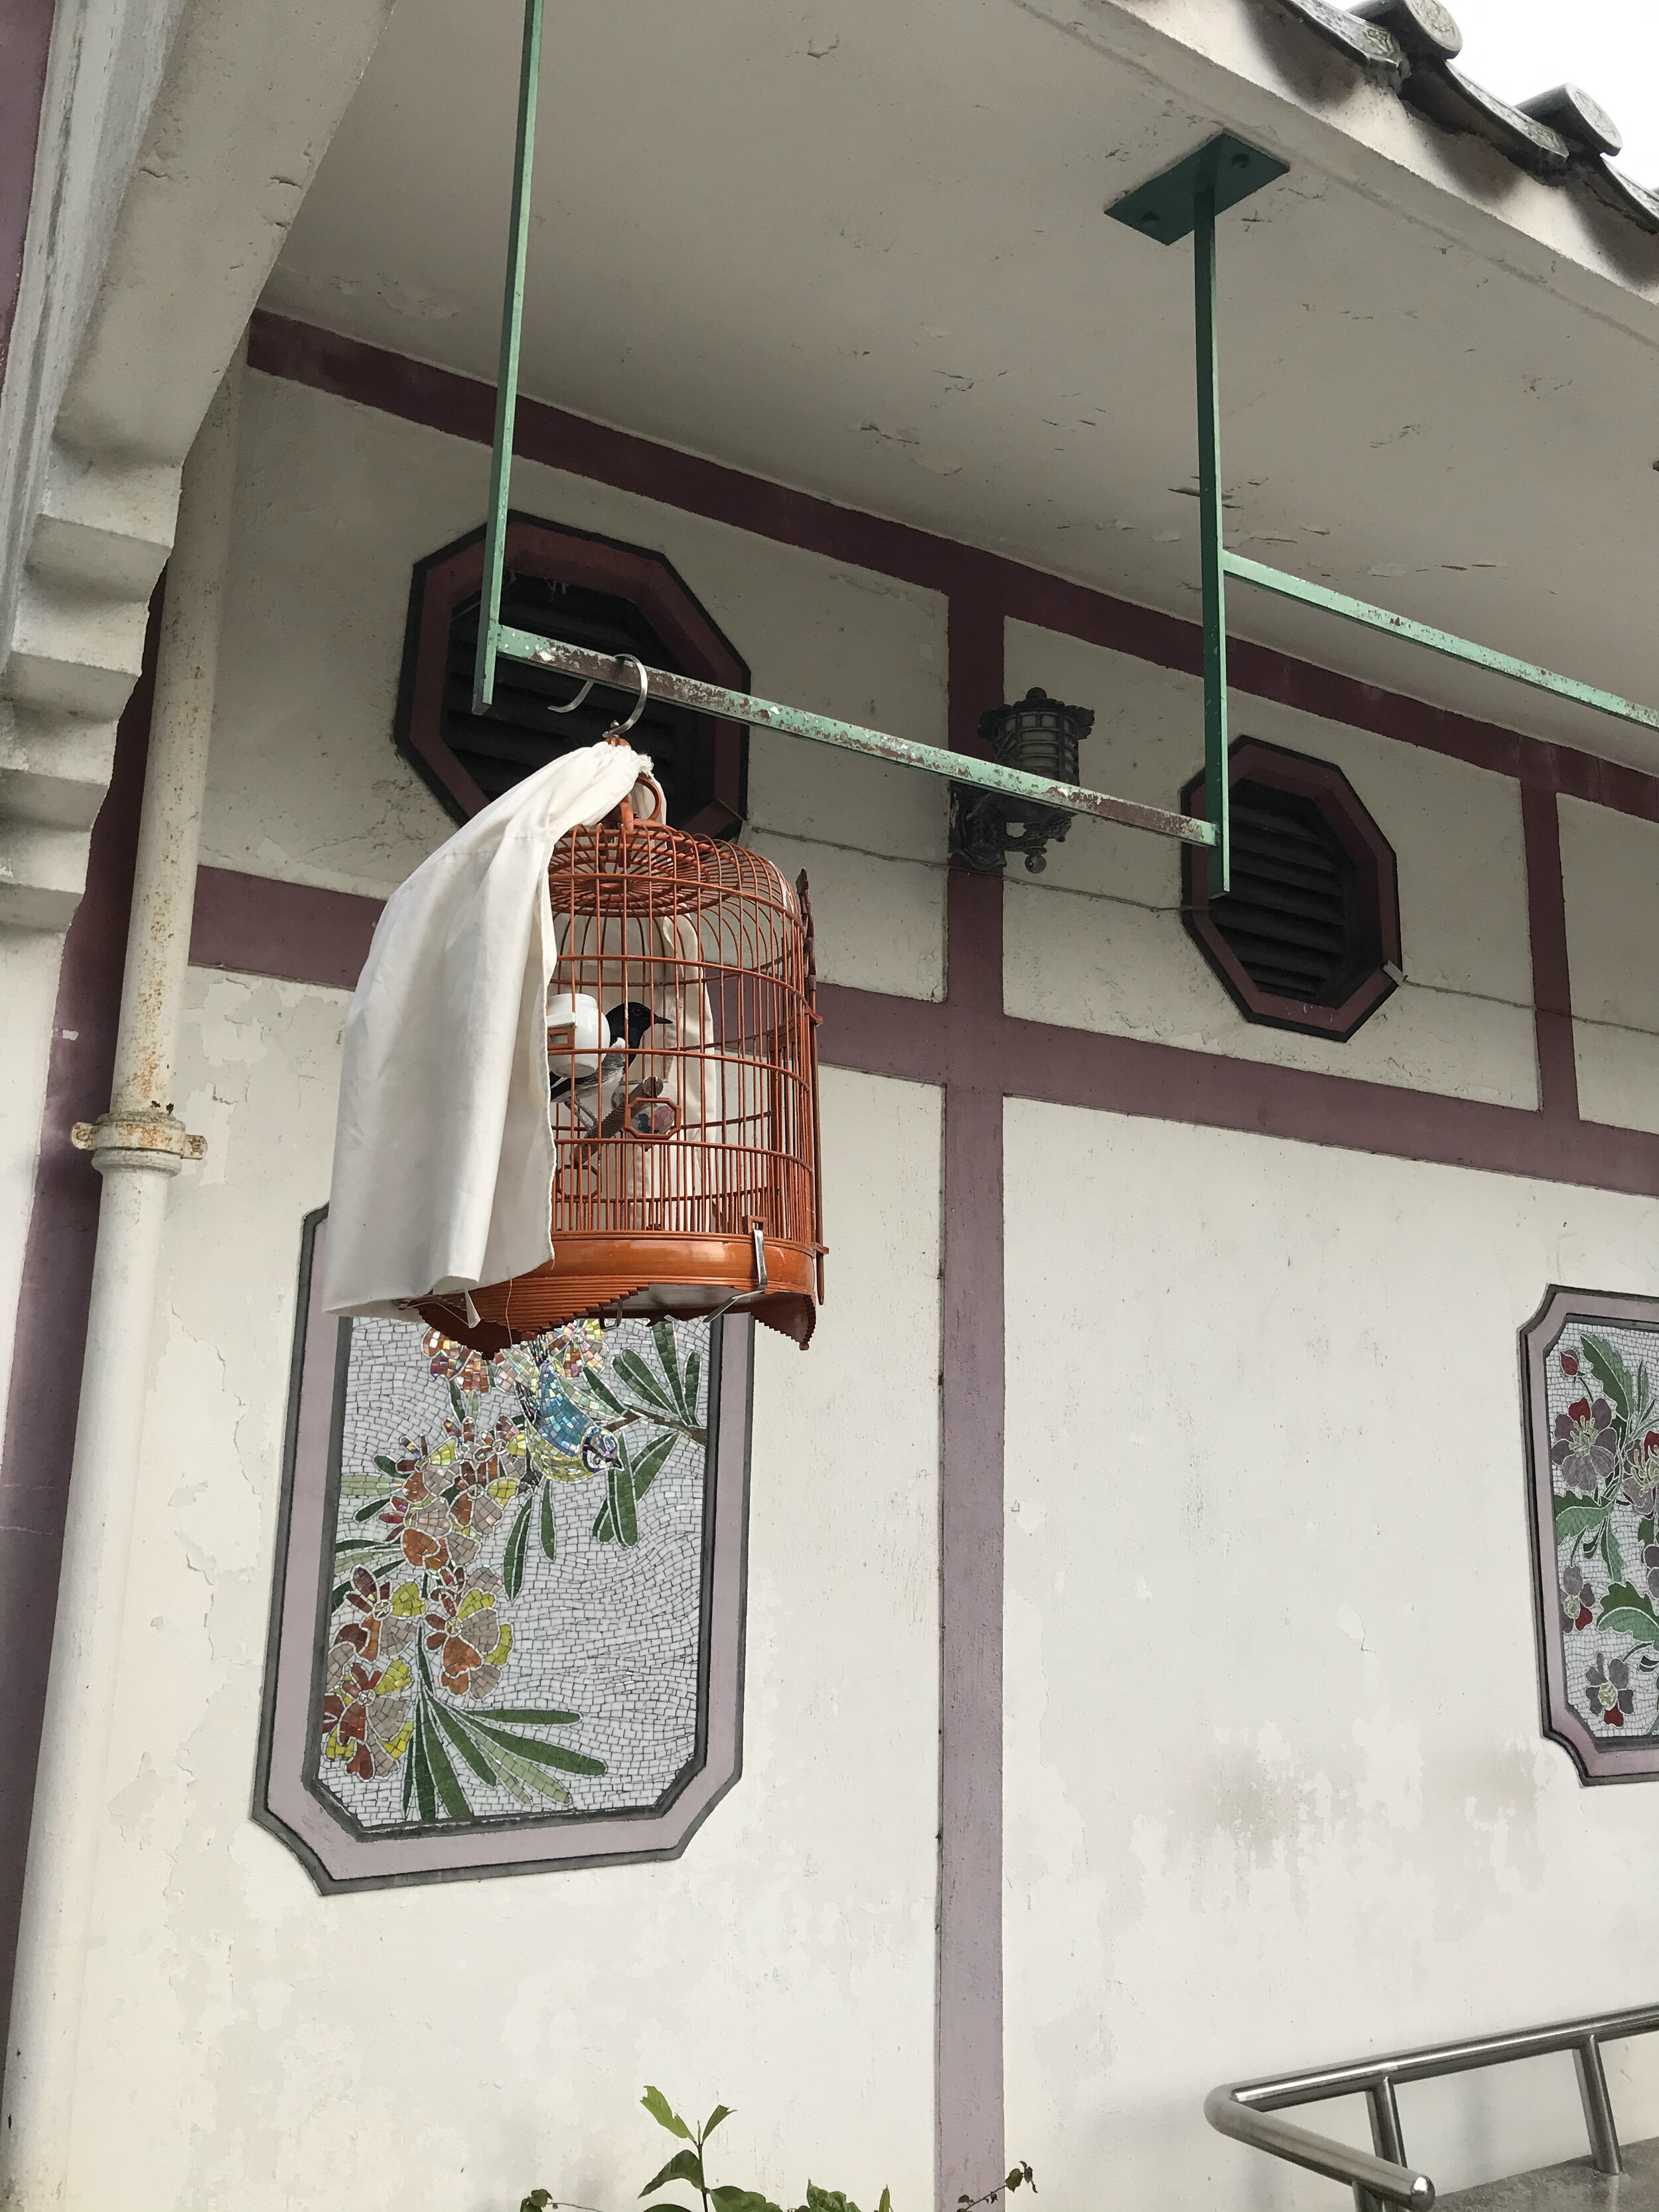
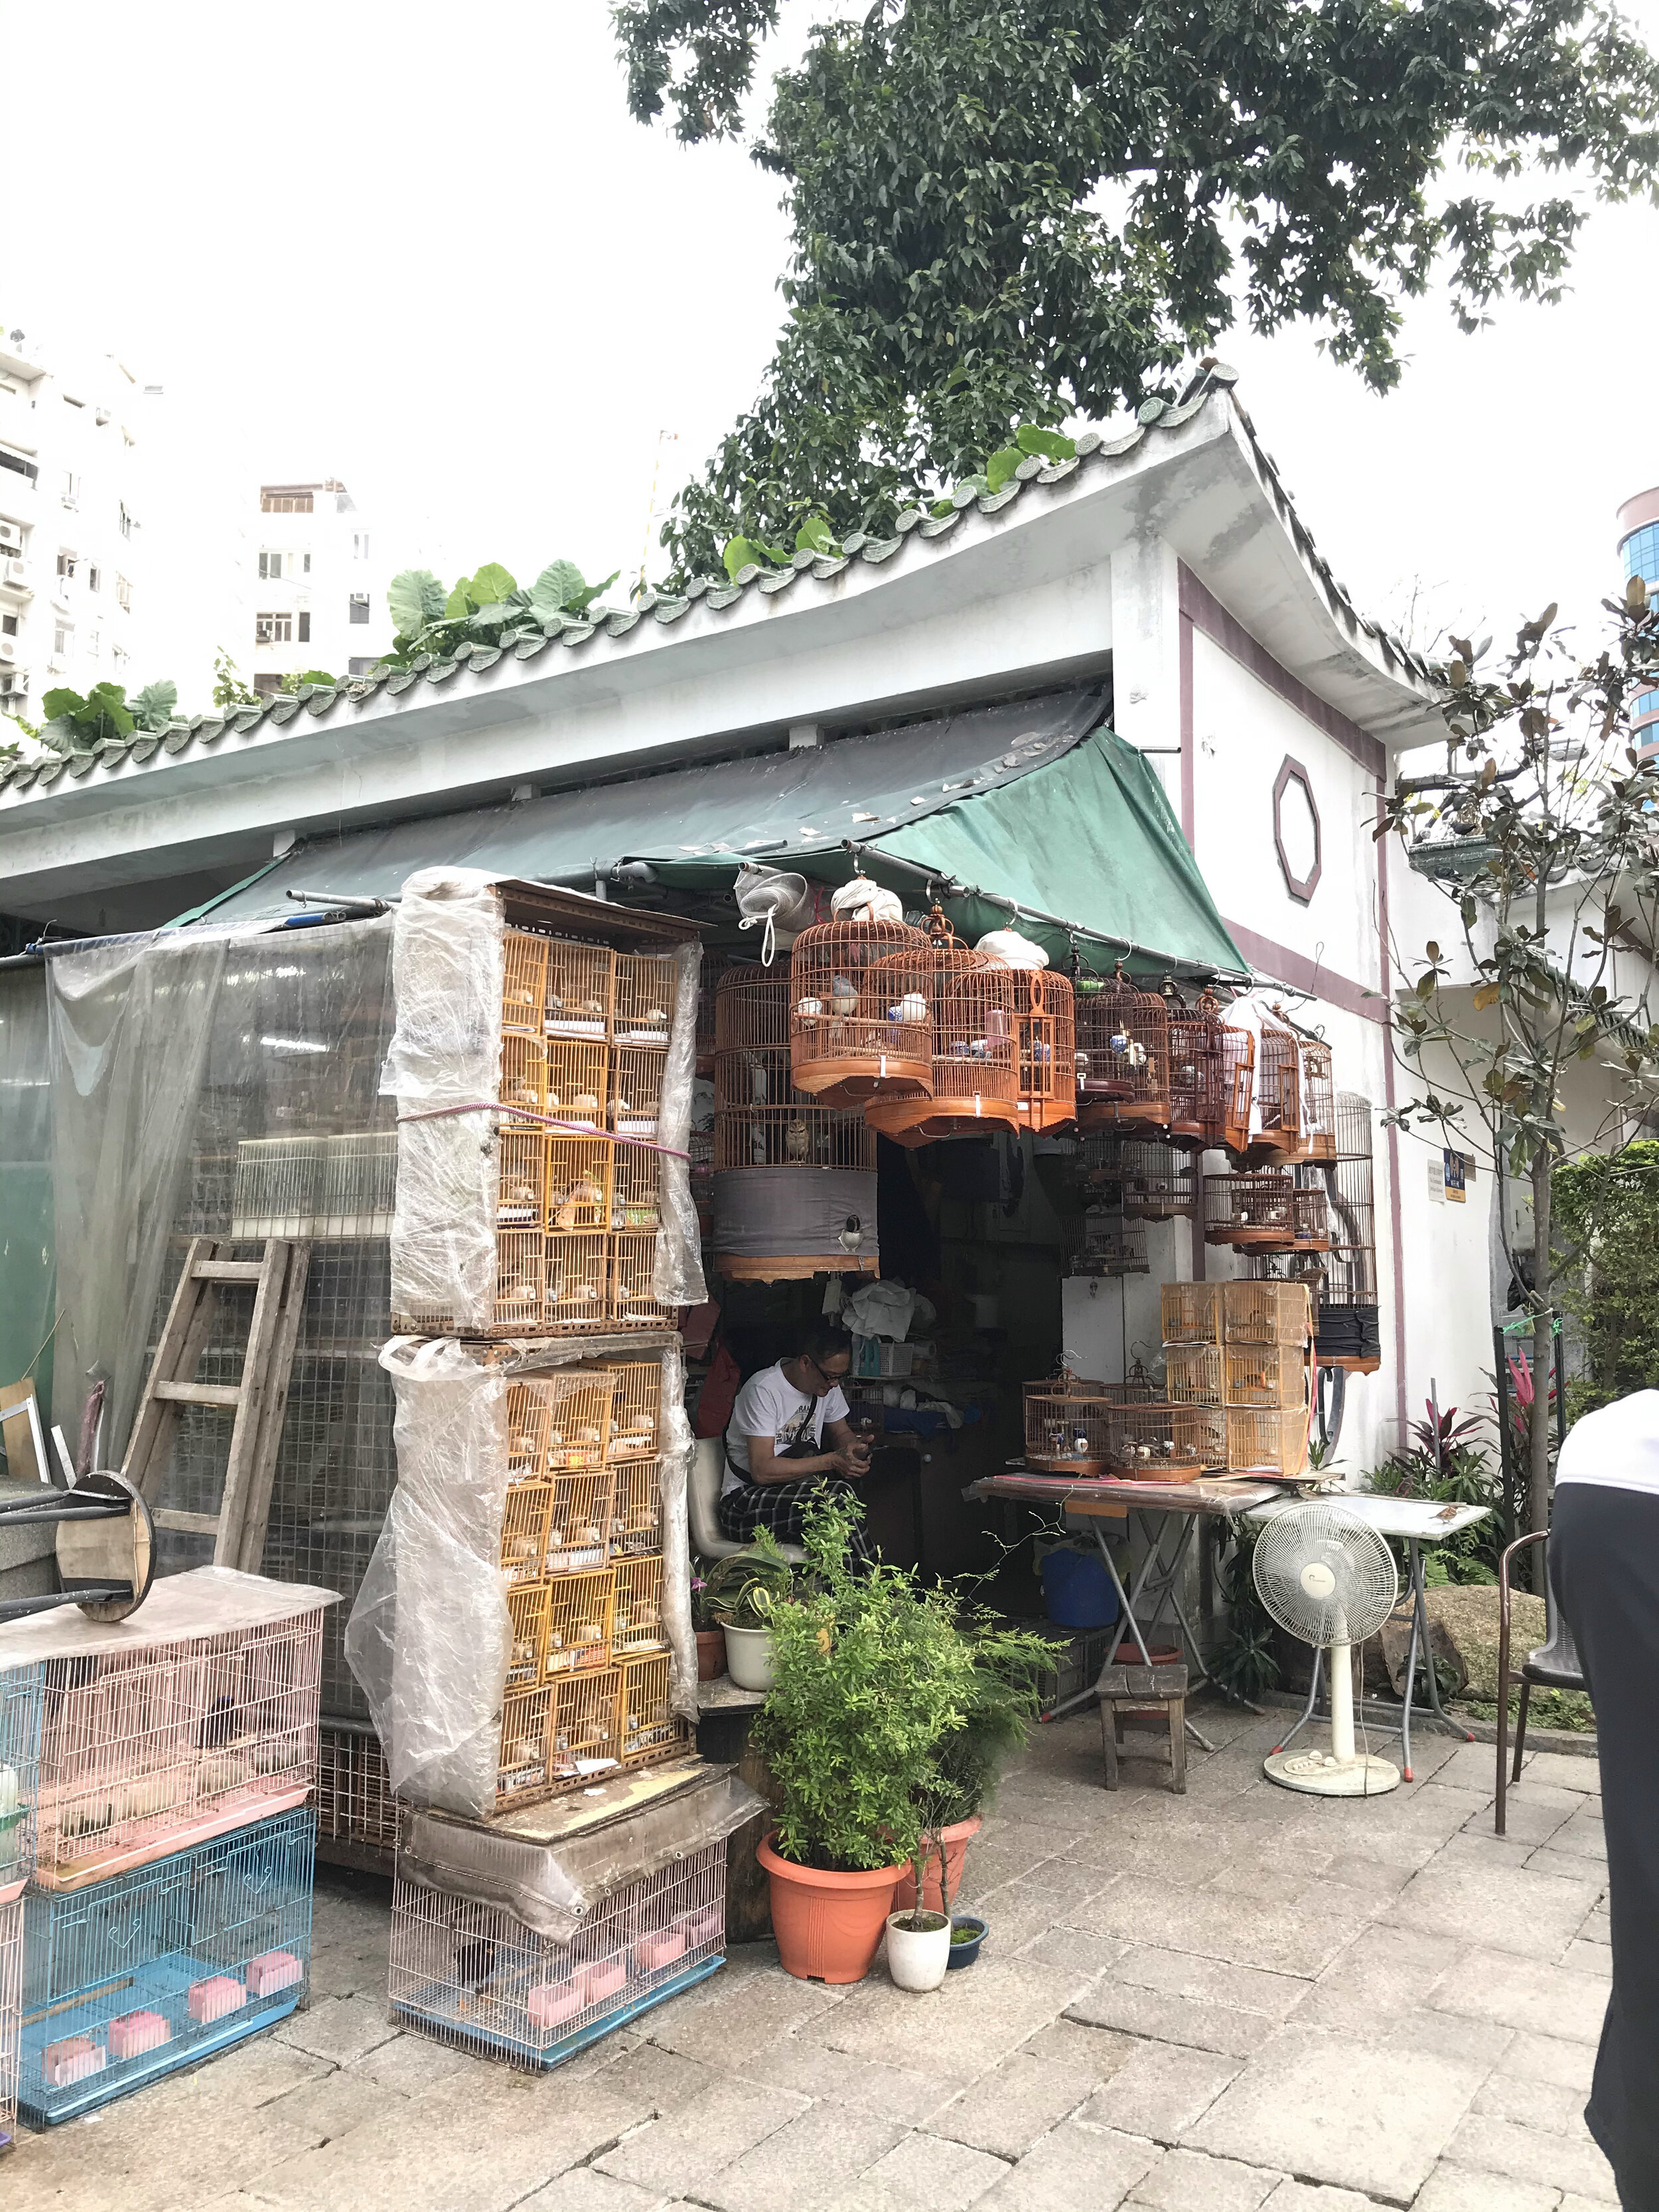
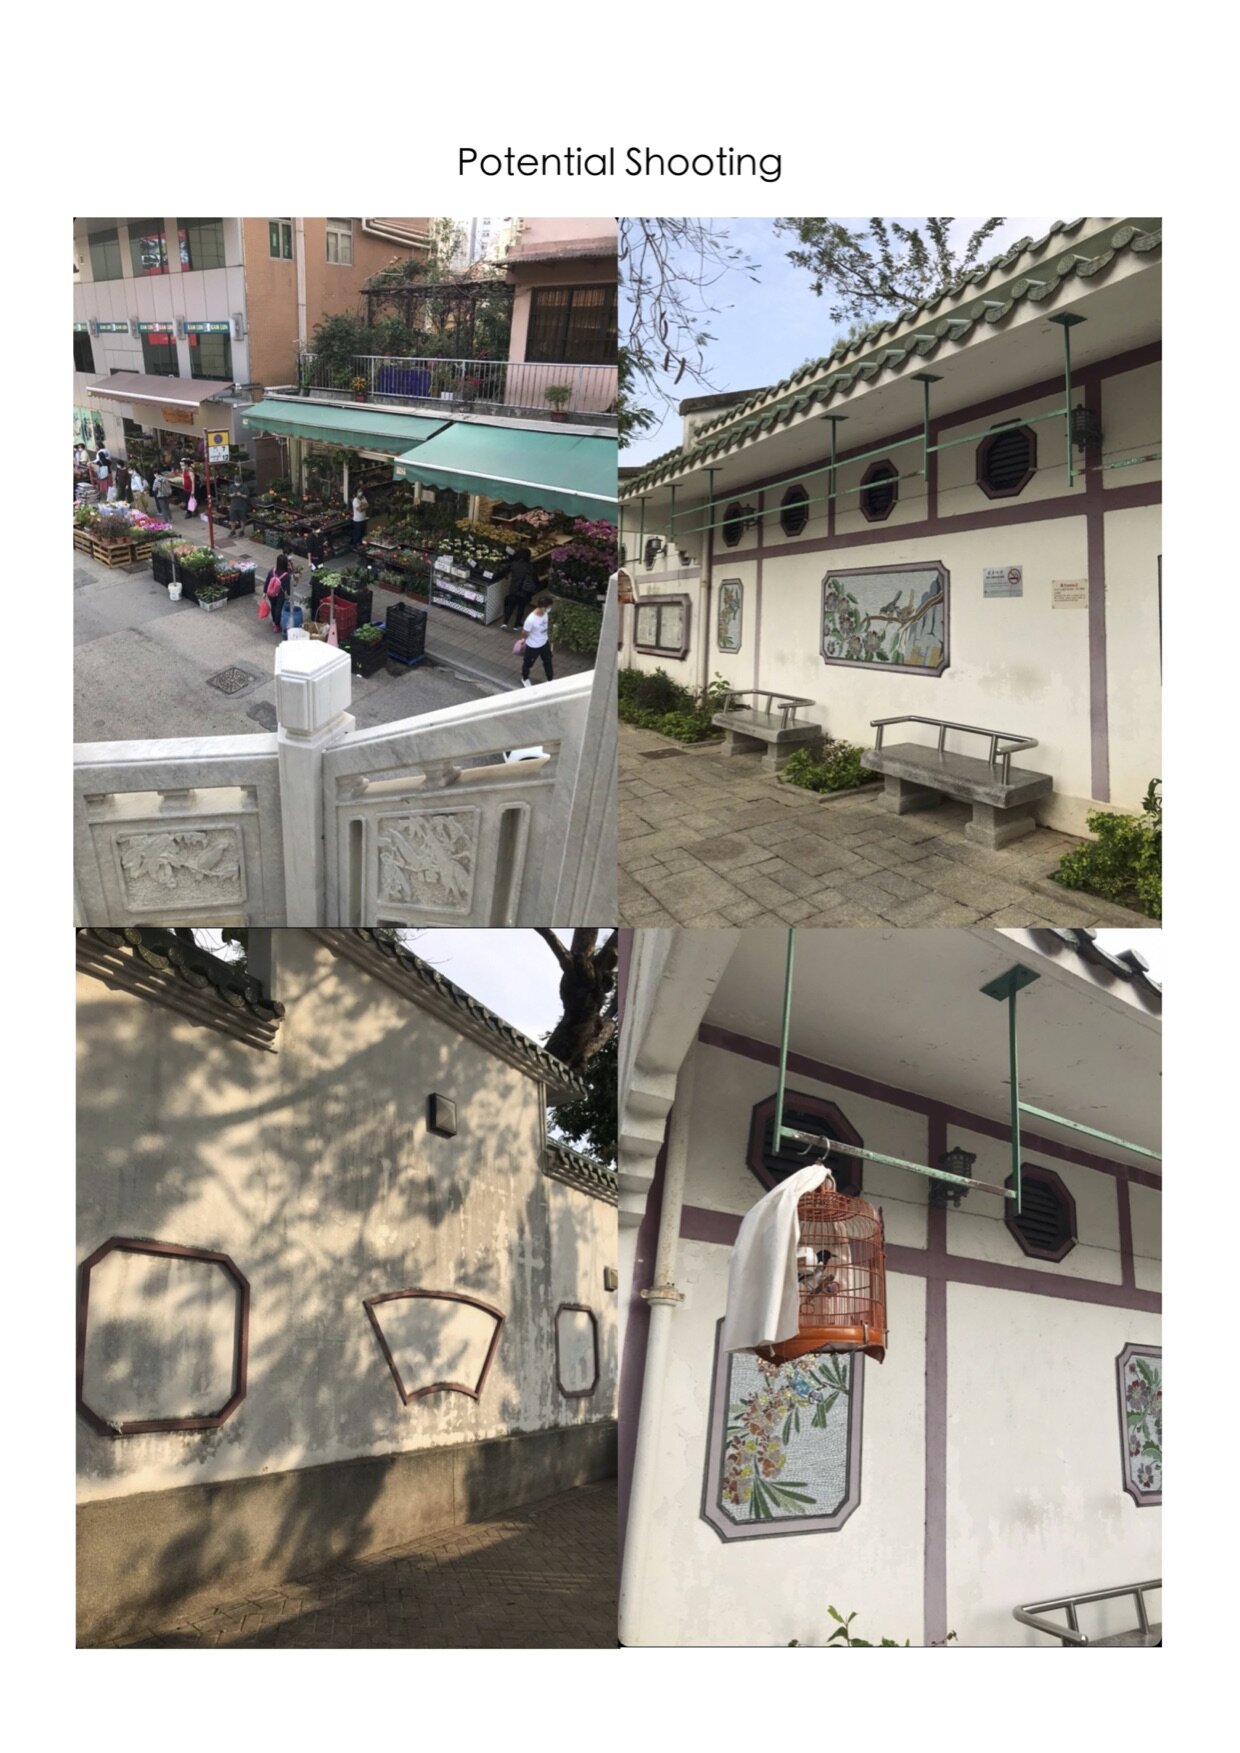
For the yellow outfit, I was inspired by how there were bird cages hung everywhere inside this park. I could see how it could act as an interesting background, because for this look I am mainly looking for earthy tones in in the backdrop to go with the yellow. Because the yellow is quite a bright hue, preferably the items in the background need to be darker shades.
Here at this location, the architecture and surroundings were a nice fit - they were darker variations of the earthy yellow of the shirt that the model would be wearing. So I decided that this is good for the yellow look.
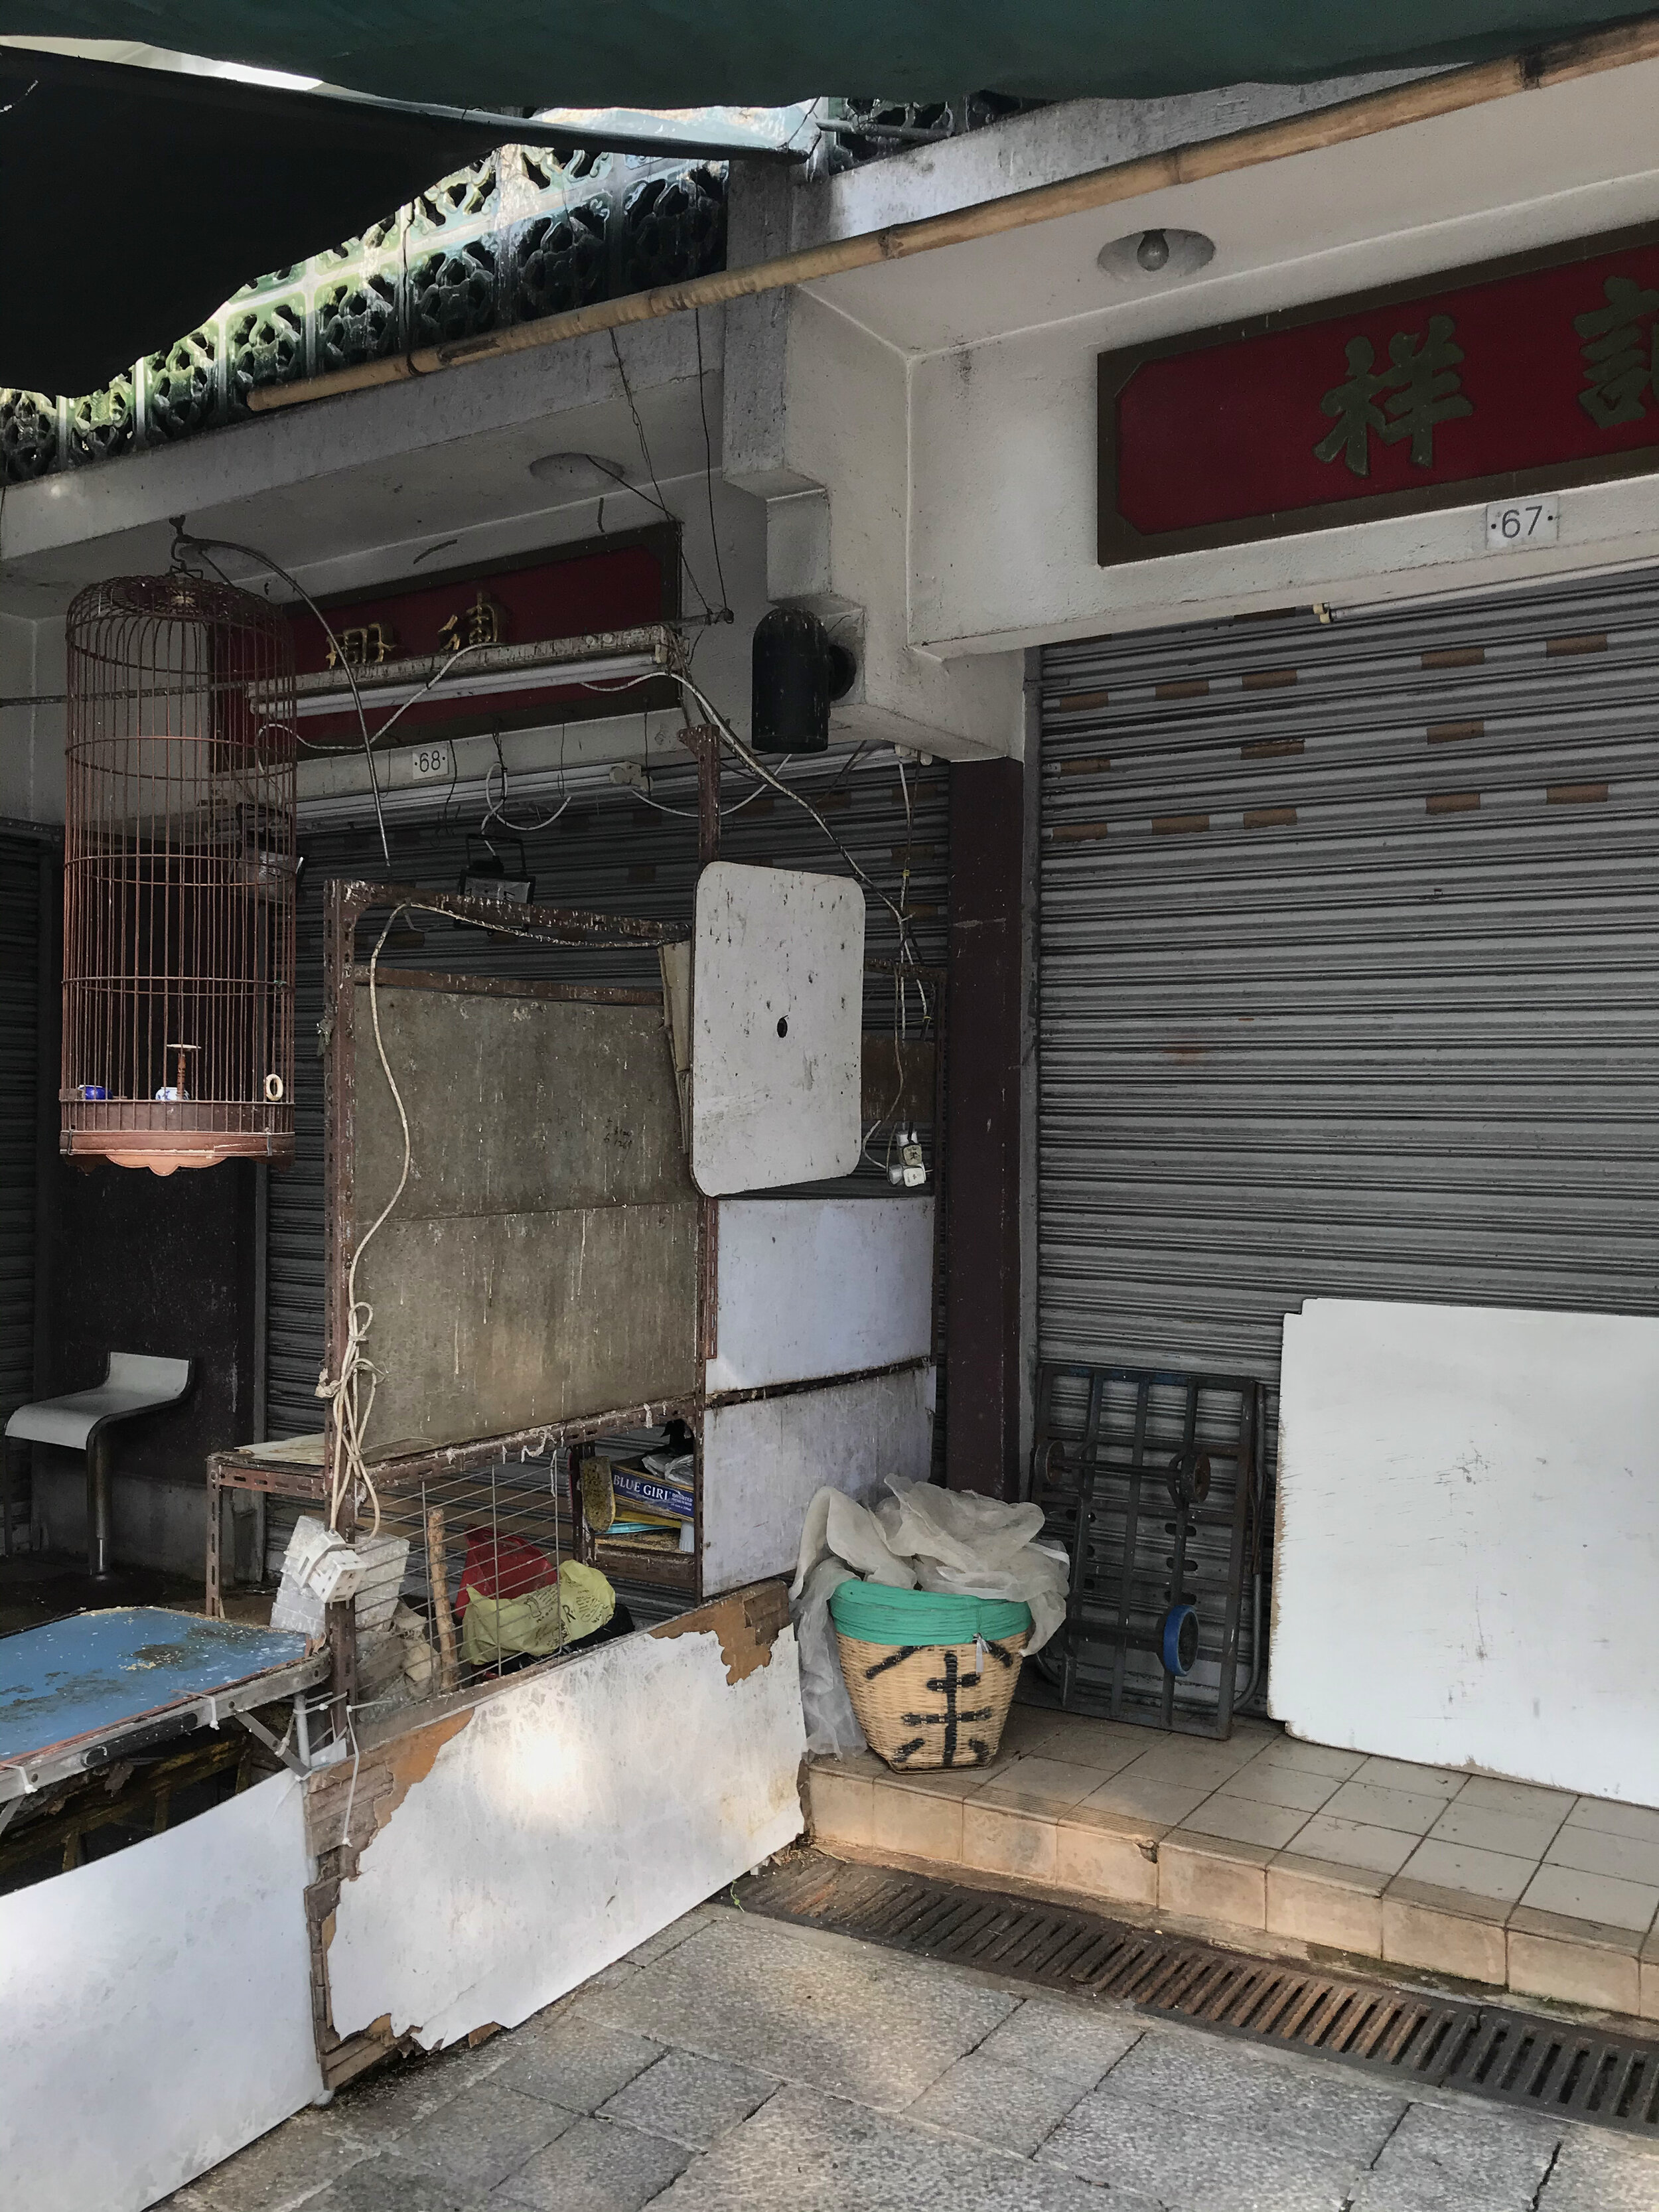
As for the blue outfit, I found this bit of blue on the lowered gates of idling stores - and coincidentally this wall was surrounded by flower with lovely bright colours on both sides. This actually added to my inspiration, because it is quite impractical (nor aesthetic, is my guess) to find blue flowers for props. So it is good that I found a blue backdrop, but might need to use the flowers as foreground or background to add a bit of pop to the blue look.
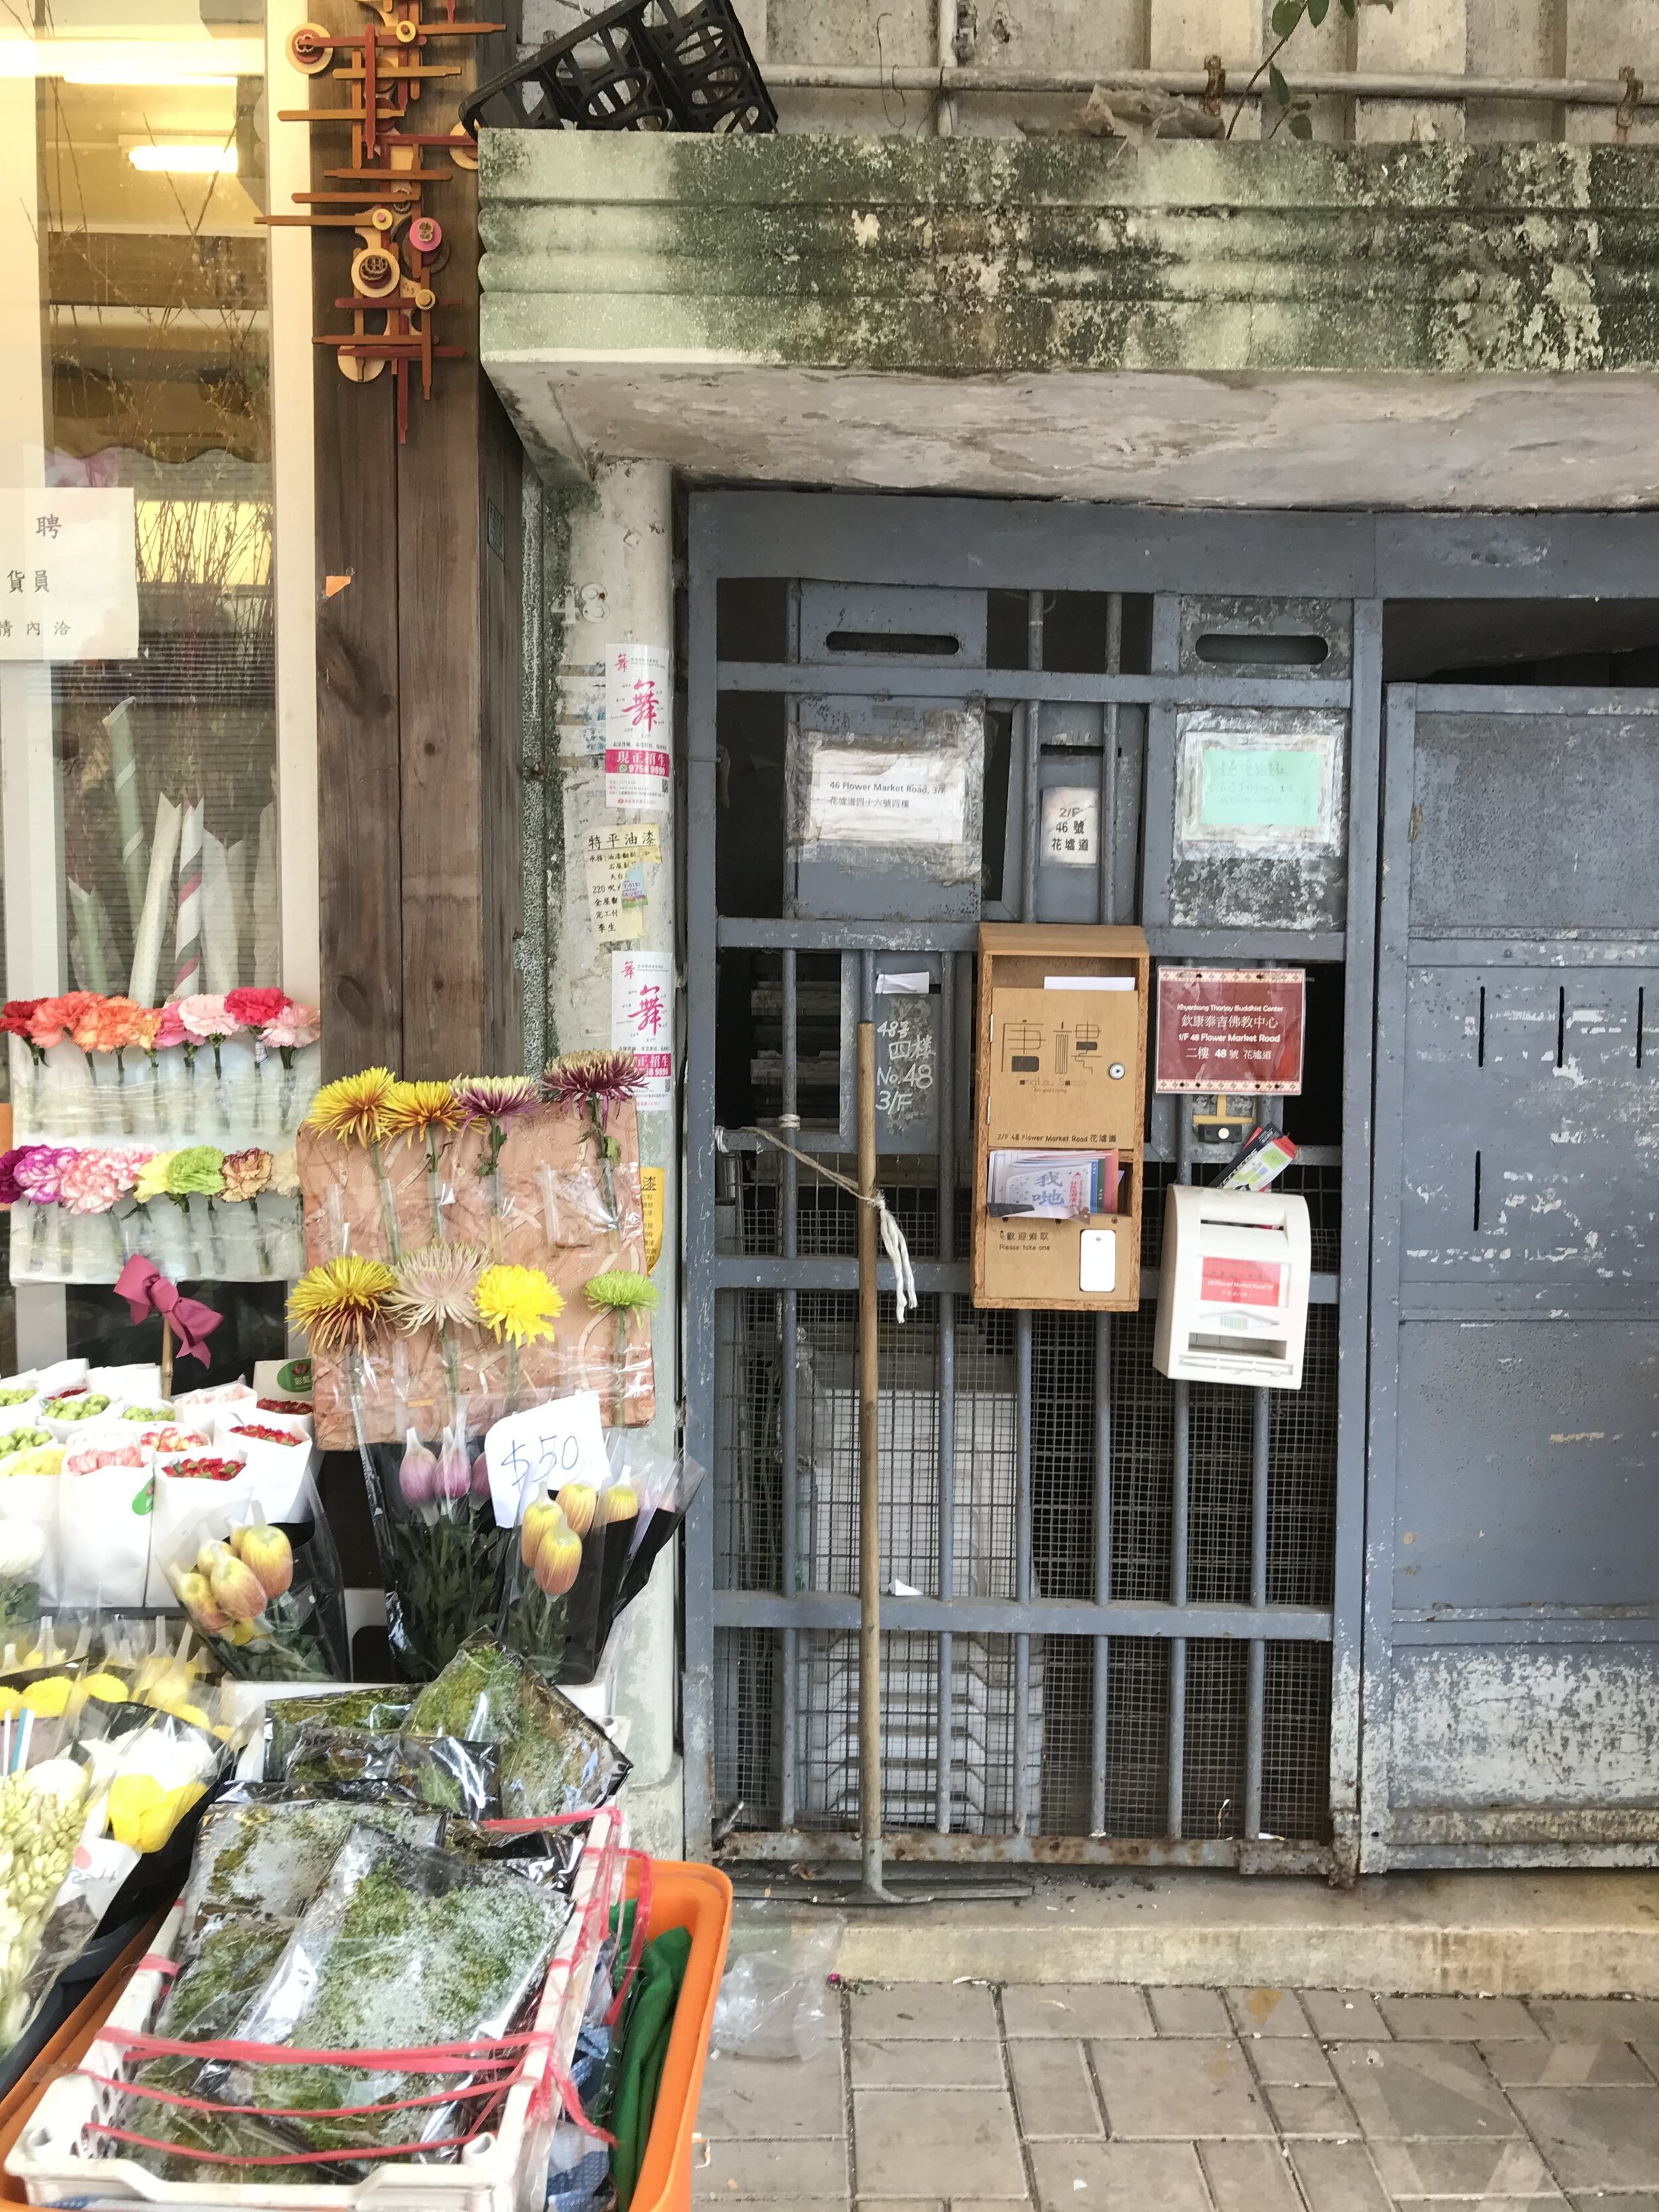
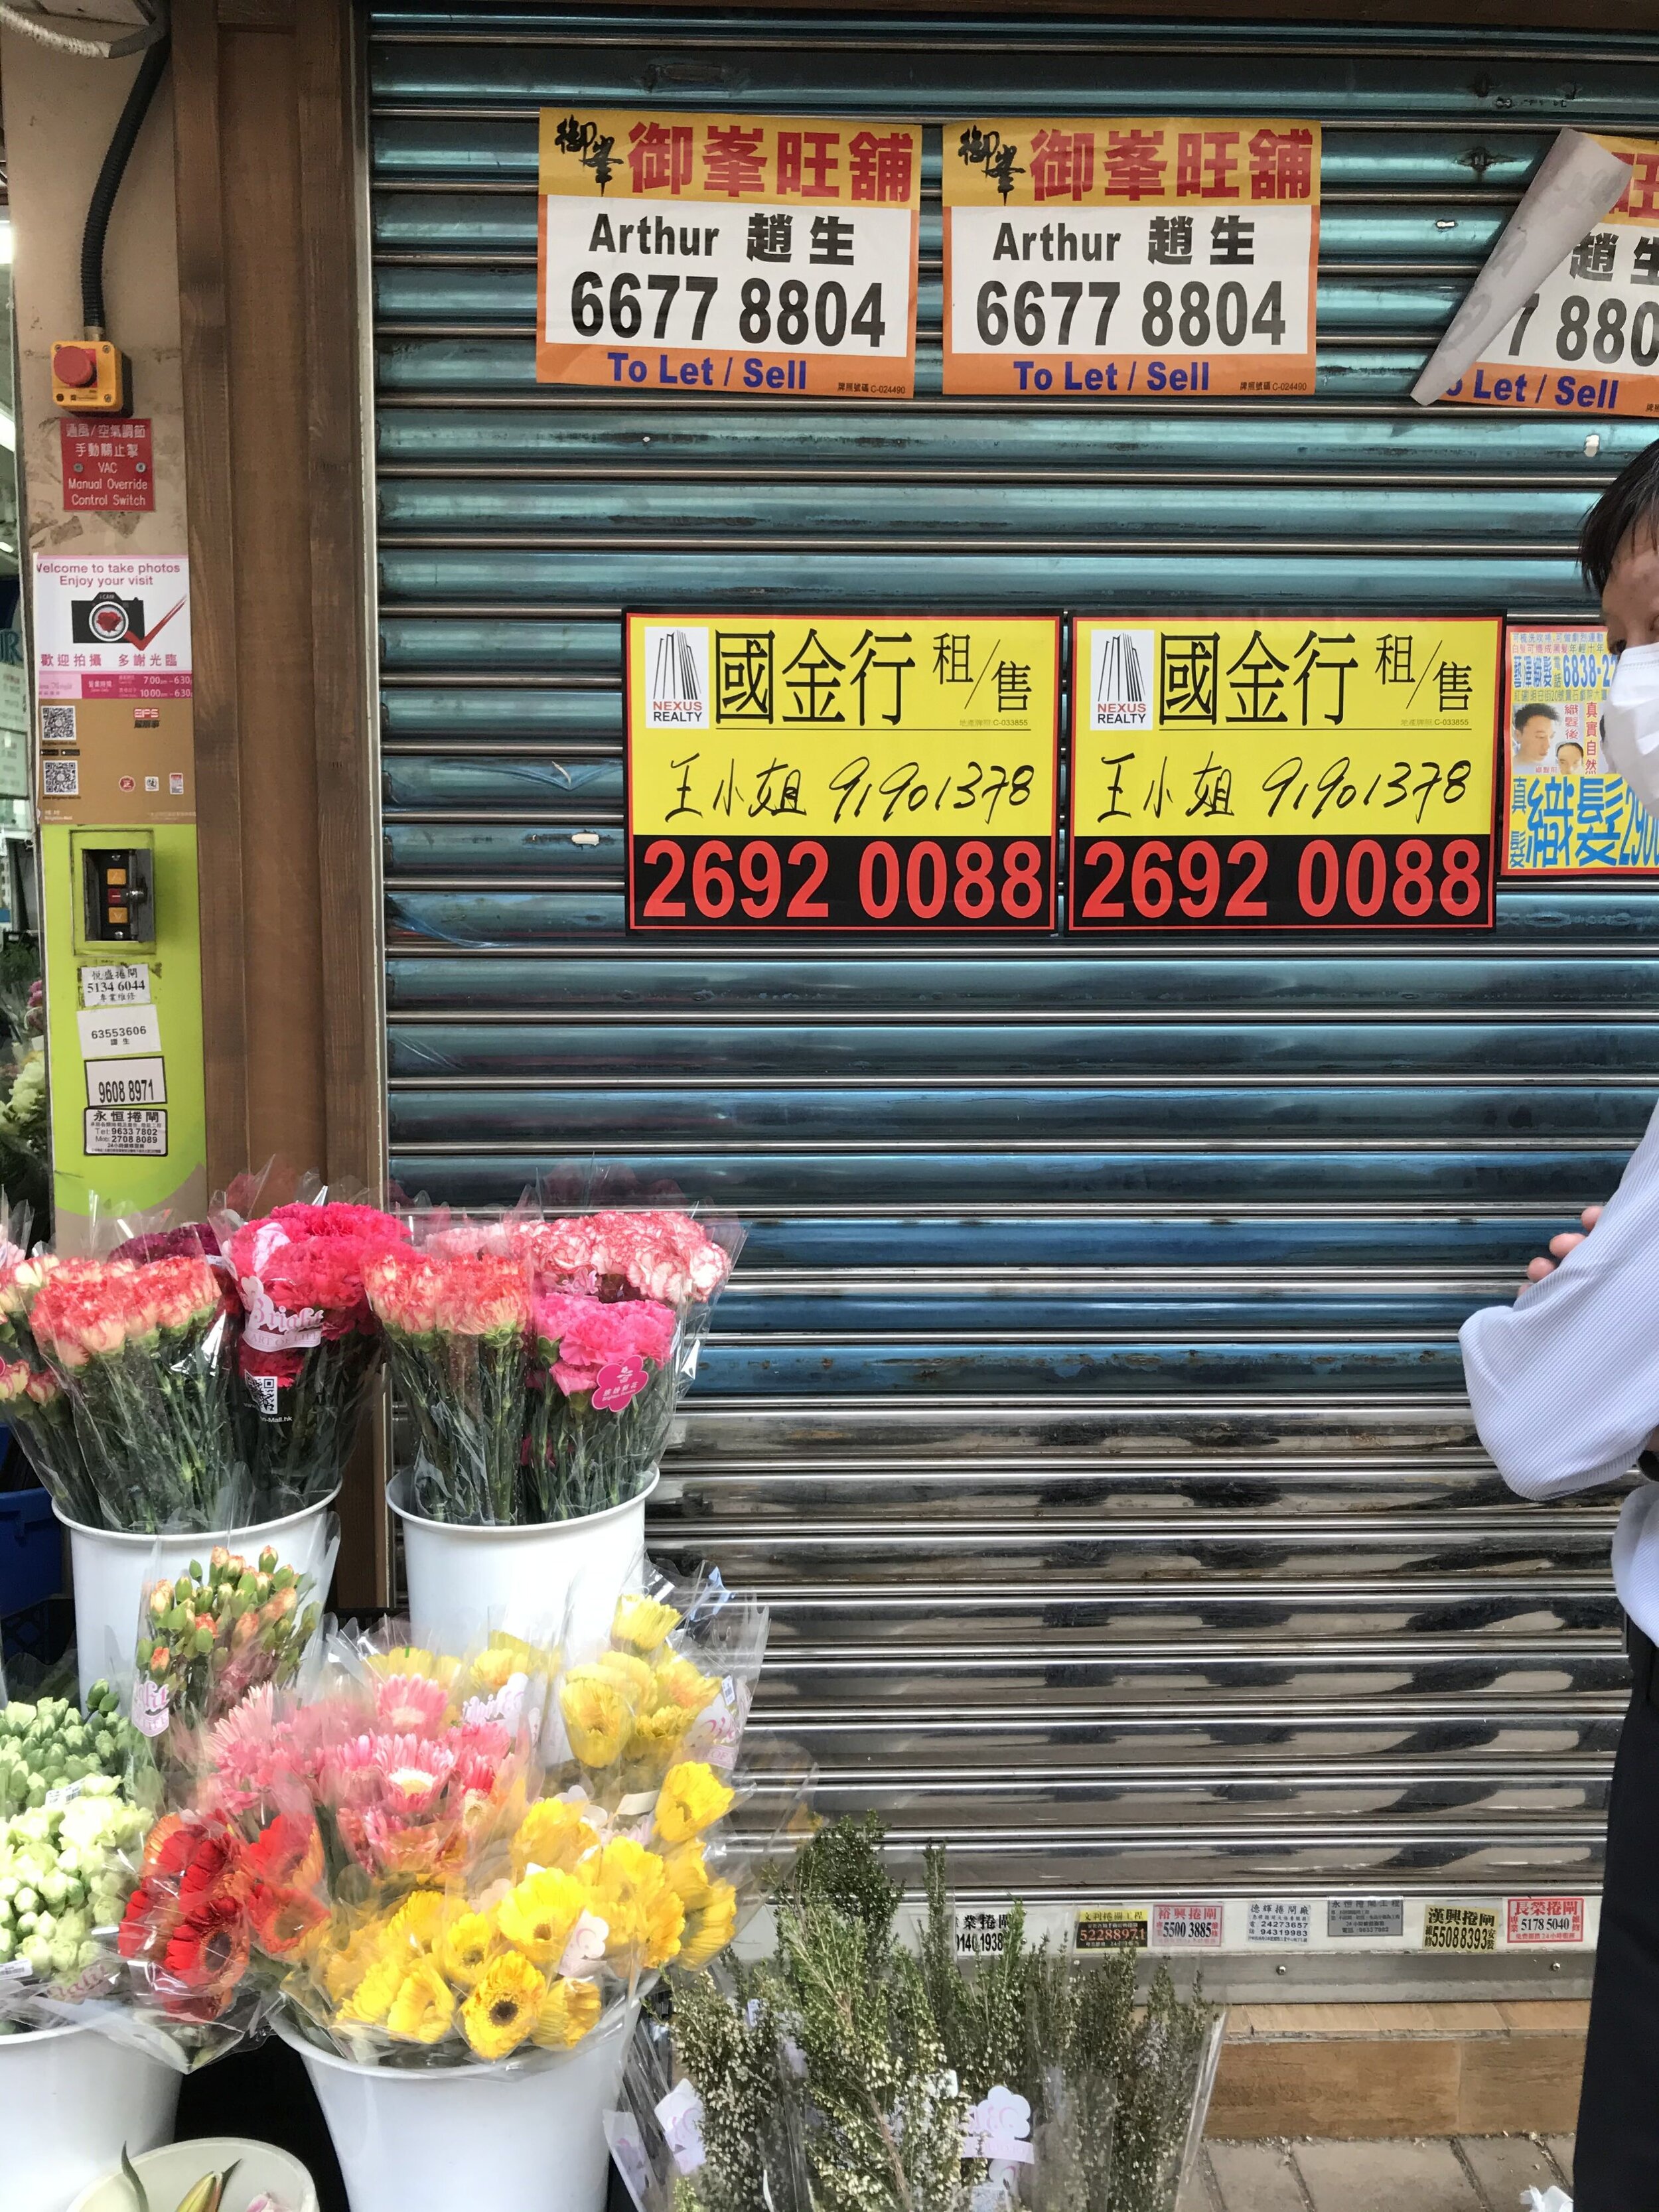
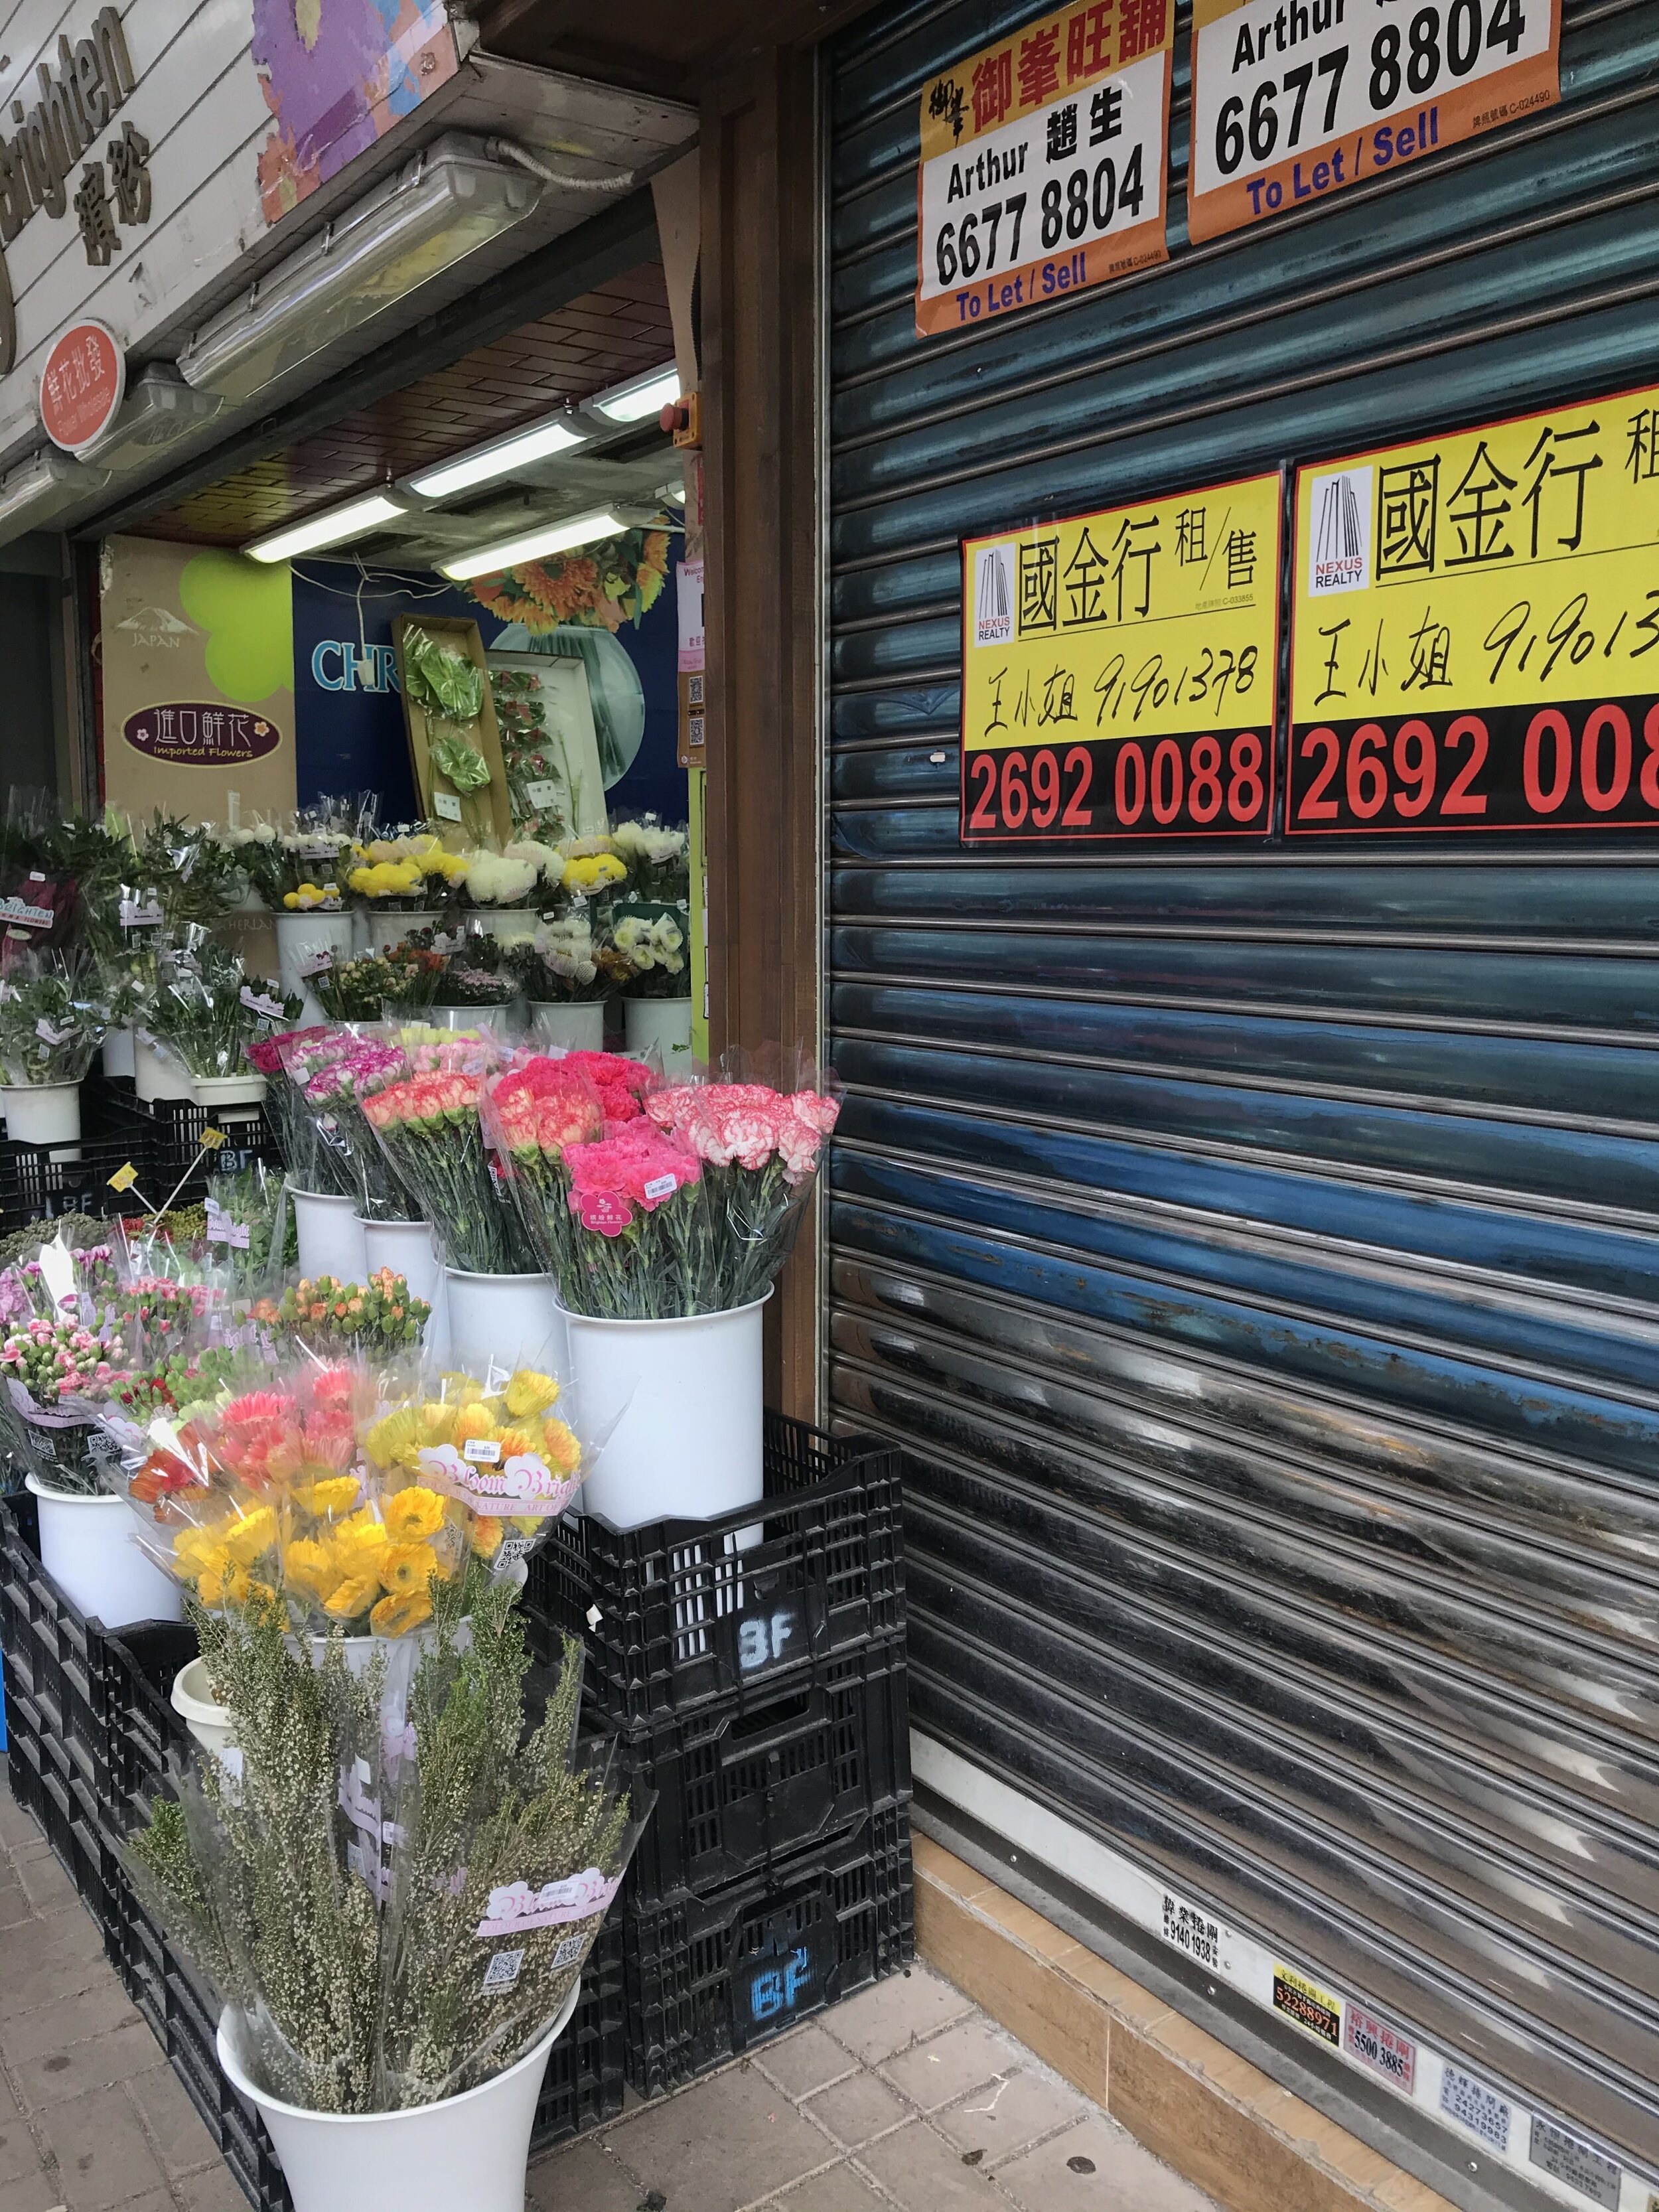
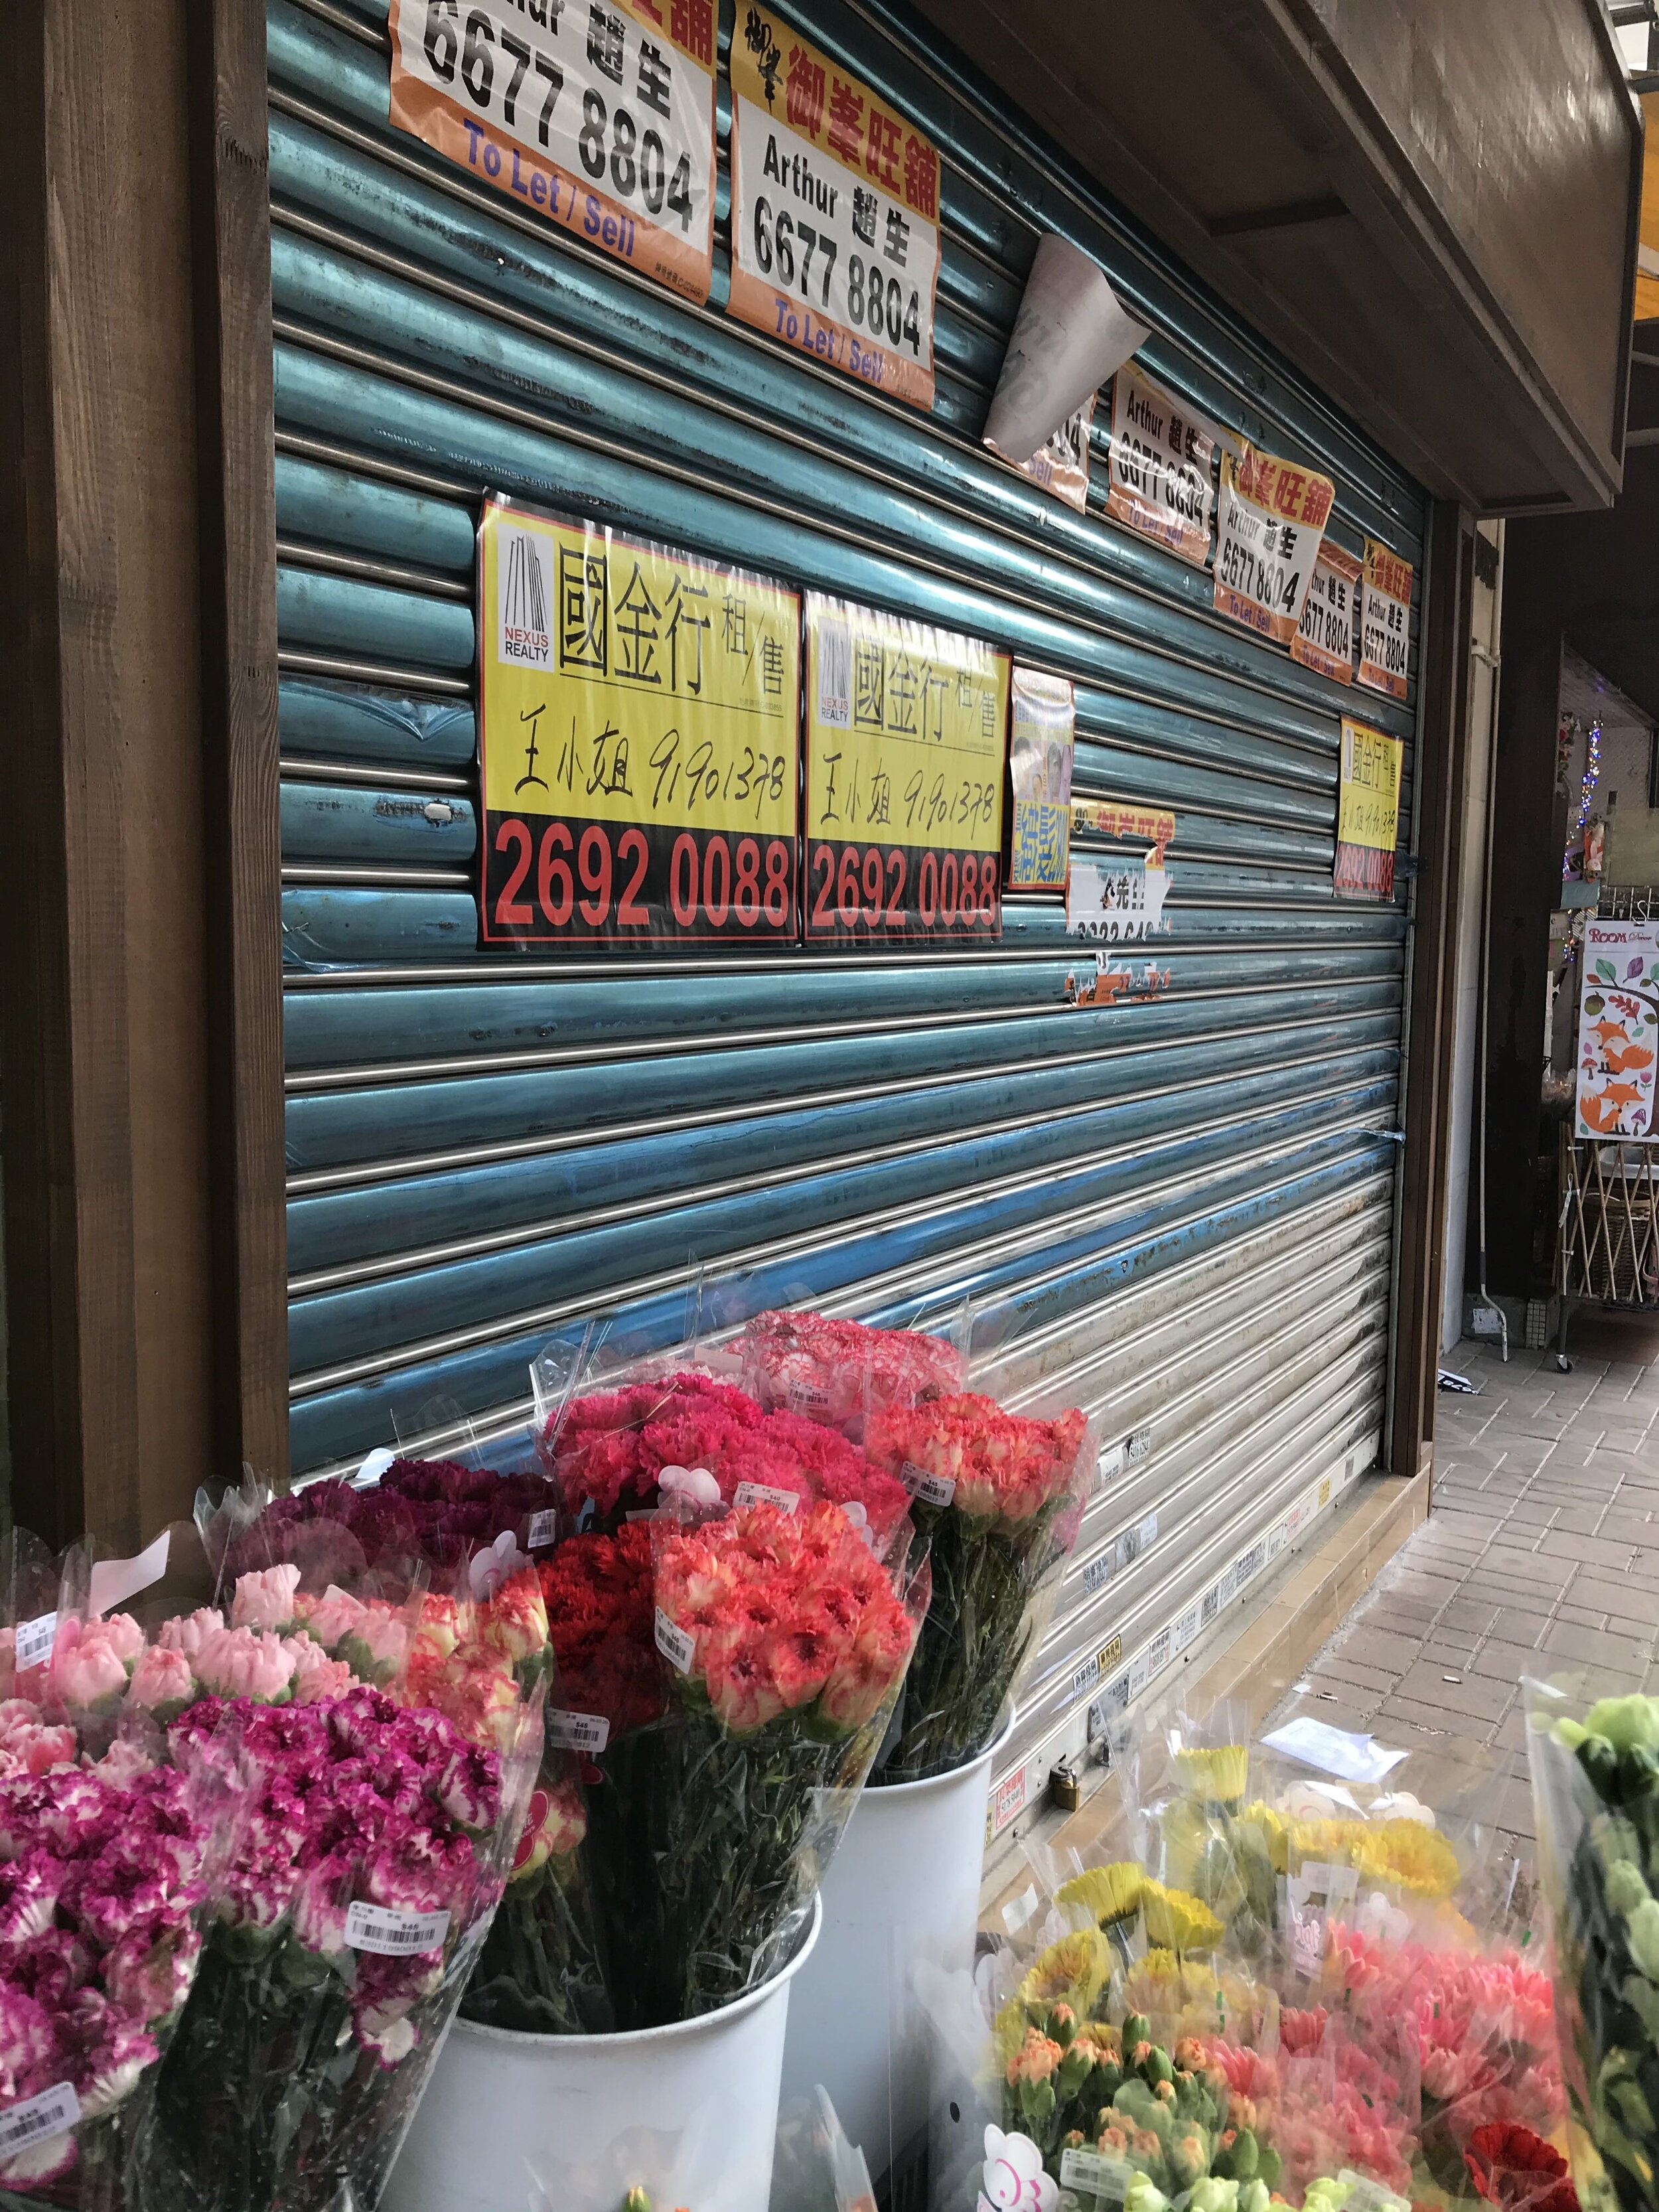
By the end of the scout, I selected the relevant snaps and sent them to the team. This invites the rest of the team to jump in and bounce ideas off of each other because we now have something more concrete to based our discussions on.
Create Hair, Makeup and Prop Design
As I said, the hair, makeup and props are closely related to the outfit per se and so you might already have some idea on these things when you are deciding on the outfit. Now that you also have the backdrop sorted out, you can proceed to discussing the exact details of these styling items so that everything fits into your designated theme.
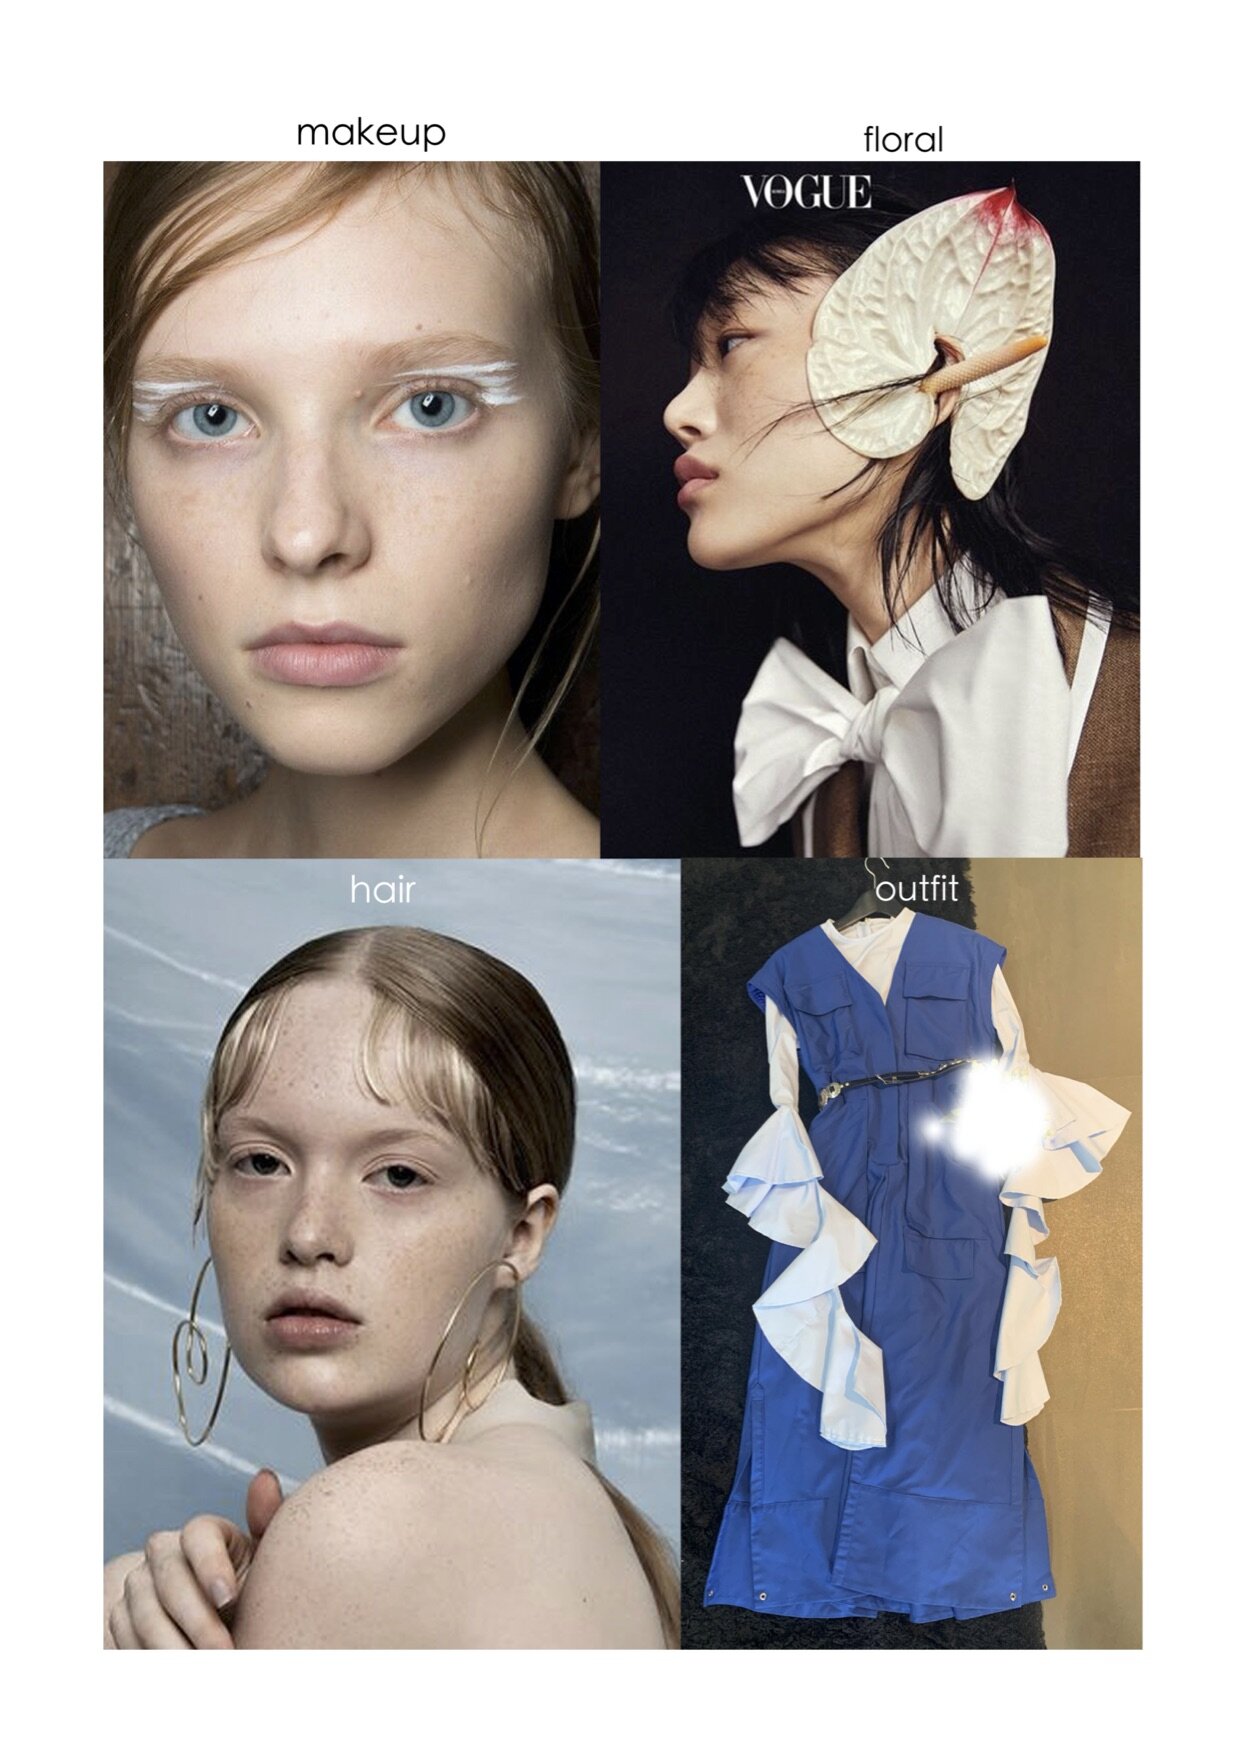
At this stage, the moodboard is ultra important because words can do just so much to explain visual concepts - you need pictures to clearly communicate with your team. The moodboard usually contains chunks of the finished look - some photos representing the eye makeup, some showing the hair, some showing props etc. It is seldom the case that you find a look that fits your current context perfectly as is, but there will be a few looks, each of which contains an element that you want to incorporate into your own look. In other words, the moodboard is going to be a mossaic of sub-sections of your overall look. I will substantiate this with my example below.
To collect photos for the moodboard, creatives typically source from Instagram, sometimes from their own previous work. There aren’t really rules in relation to this stage, because the only thing that matters is to get your ideas represented as accurately as possible. Ideally, everyone should be giving input, maybe not always the model, but ideally everyone should be on top of what everyone else is proposing. For instance, the MUA should know what props the set designer is suggesting and consider if it goes along with his ideas for makeup; the photographer should pay attention to the makeup designs the MUA is suggesting to make sure it works well with the background he chose. Everyone is allowed to say things about the others’ parts - no part is irrelevant!
My Example: Curating the Moodboard with my Crew
Our moodboard consisted of five main parts: 1) Makeup, 2) Hairstyle, 3) Props, 4) Outfit and 5) Background.
In my case, to kickstart the brainstorming process, I suggested the broad aesthetics to help point everyone towards the same direction. I told the group that we are featuring one colour per outfit, namely red, blue and yellow, and also we could play with the concept of flowers in our makeup.
So Yana (MUA) brainstormed based on that and started suggesting the types of paint we could use for the three looks respectively. We chose between matte and shiny paints, and also decided on the shade of the colour. The red look was more straightforward because simply everything can be painted red. The lips could be red, so as the eyeshadow and cheeks. For the yellow look though, we had to treat the lip colour carefully. We want the yellow paint on the cheeks to stand out, but the lips need to look shiny and ‘alive’ as well. As for the blue look, because we already had a plain blue backdrop paired with the long, oversized blue dress, we decided to go for white paint, a neutral colour to balance off the mix.
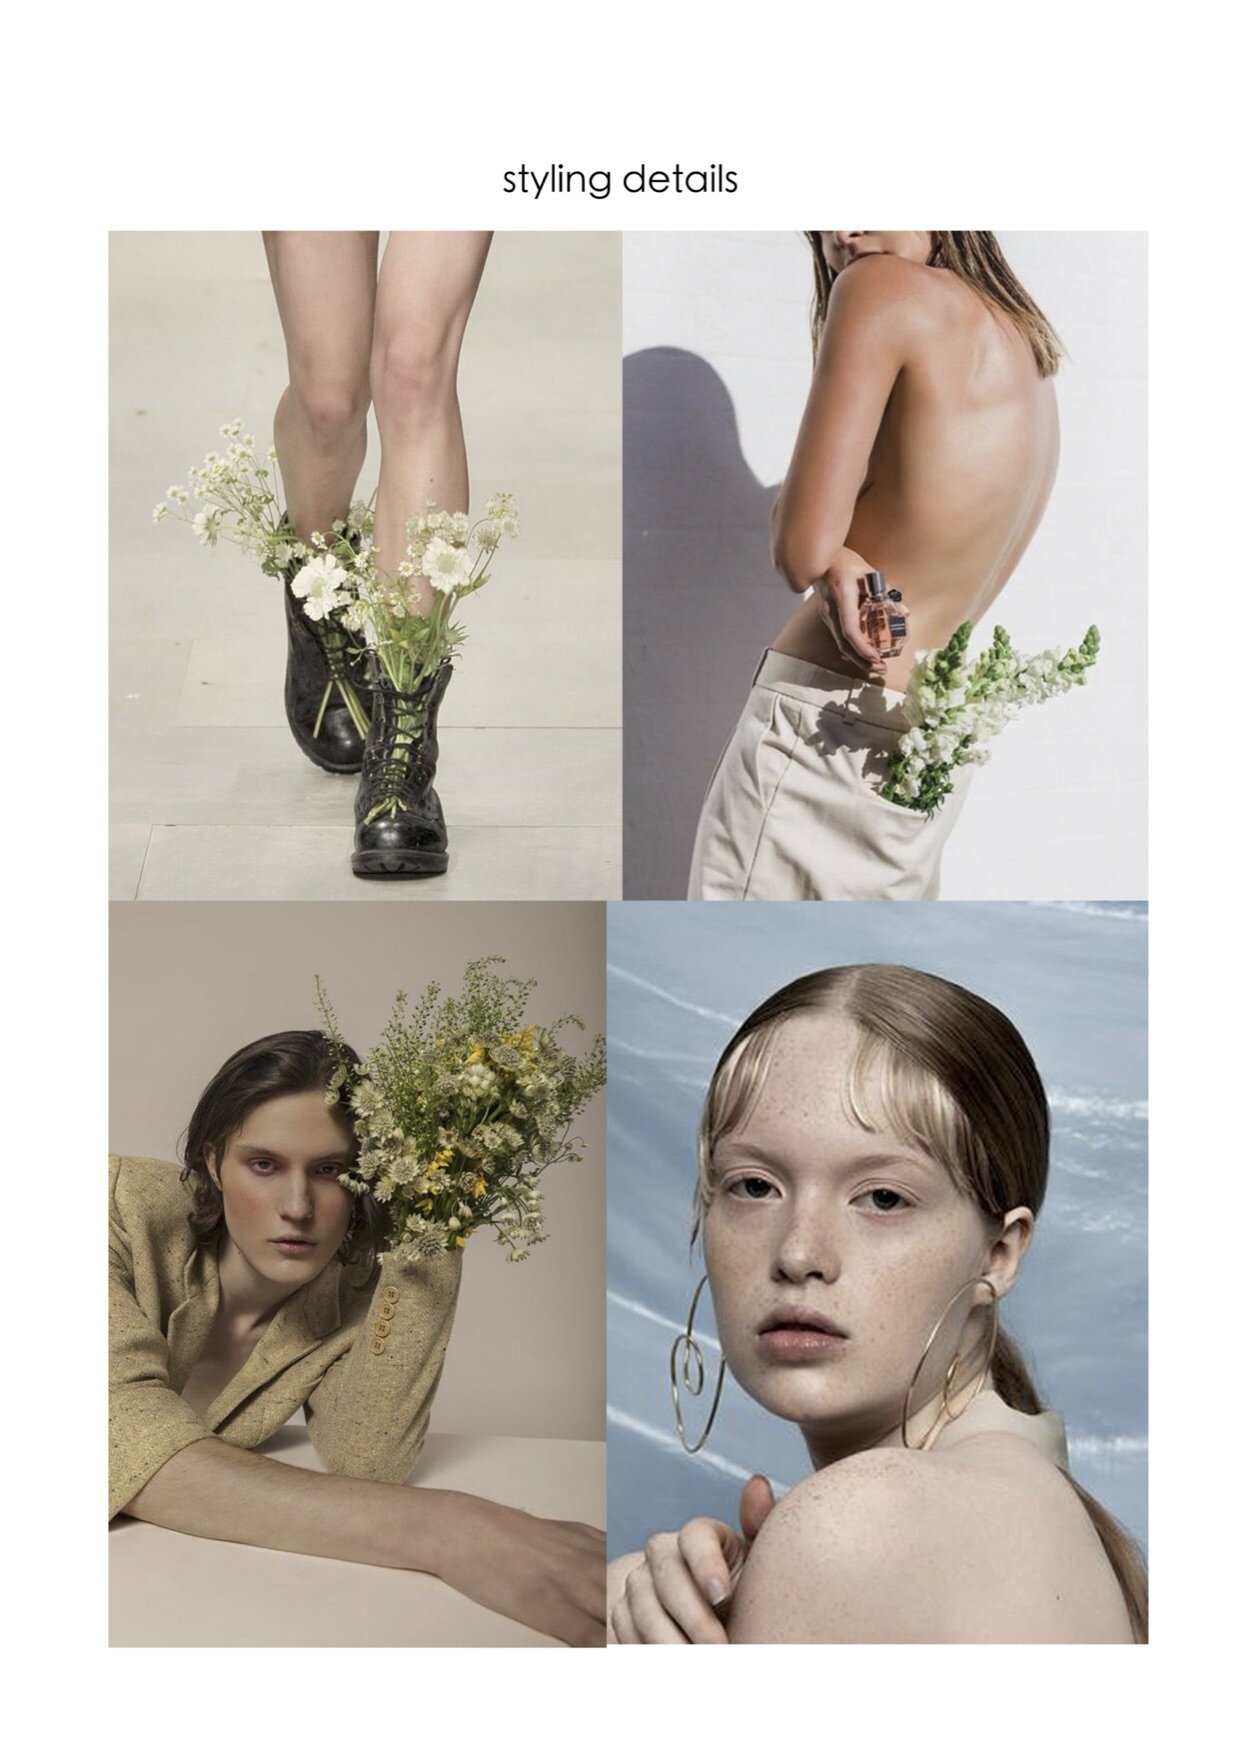
Charlotte and I also proposed to buy fresh flowers as props, and the case are similar for the red and yellow looks. We were inspired by other creative who simply integrated the flowers as part of the outfit, so we decided that we could either get Daria to hold the flowers, or to pluck them into pockets and sleeves.
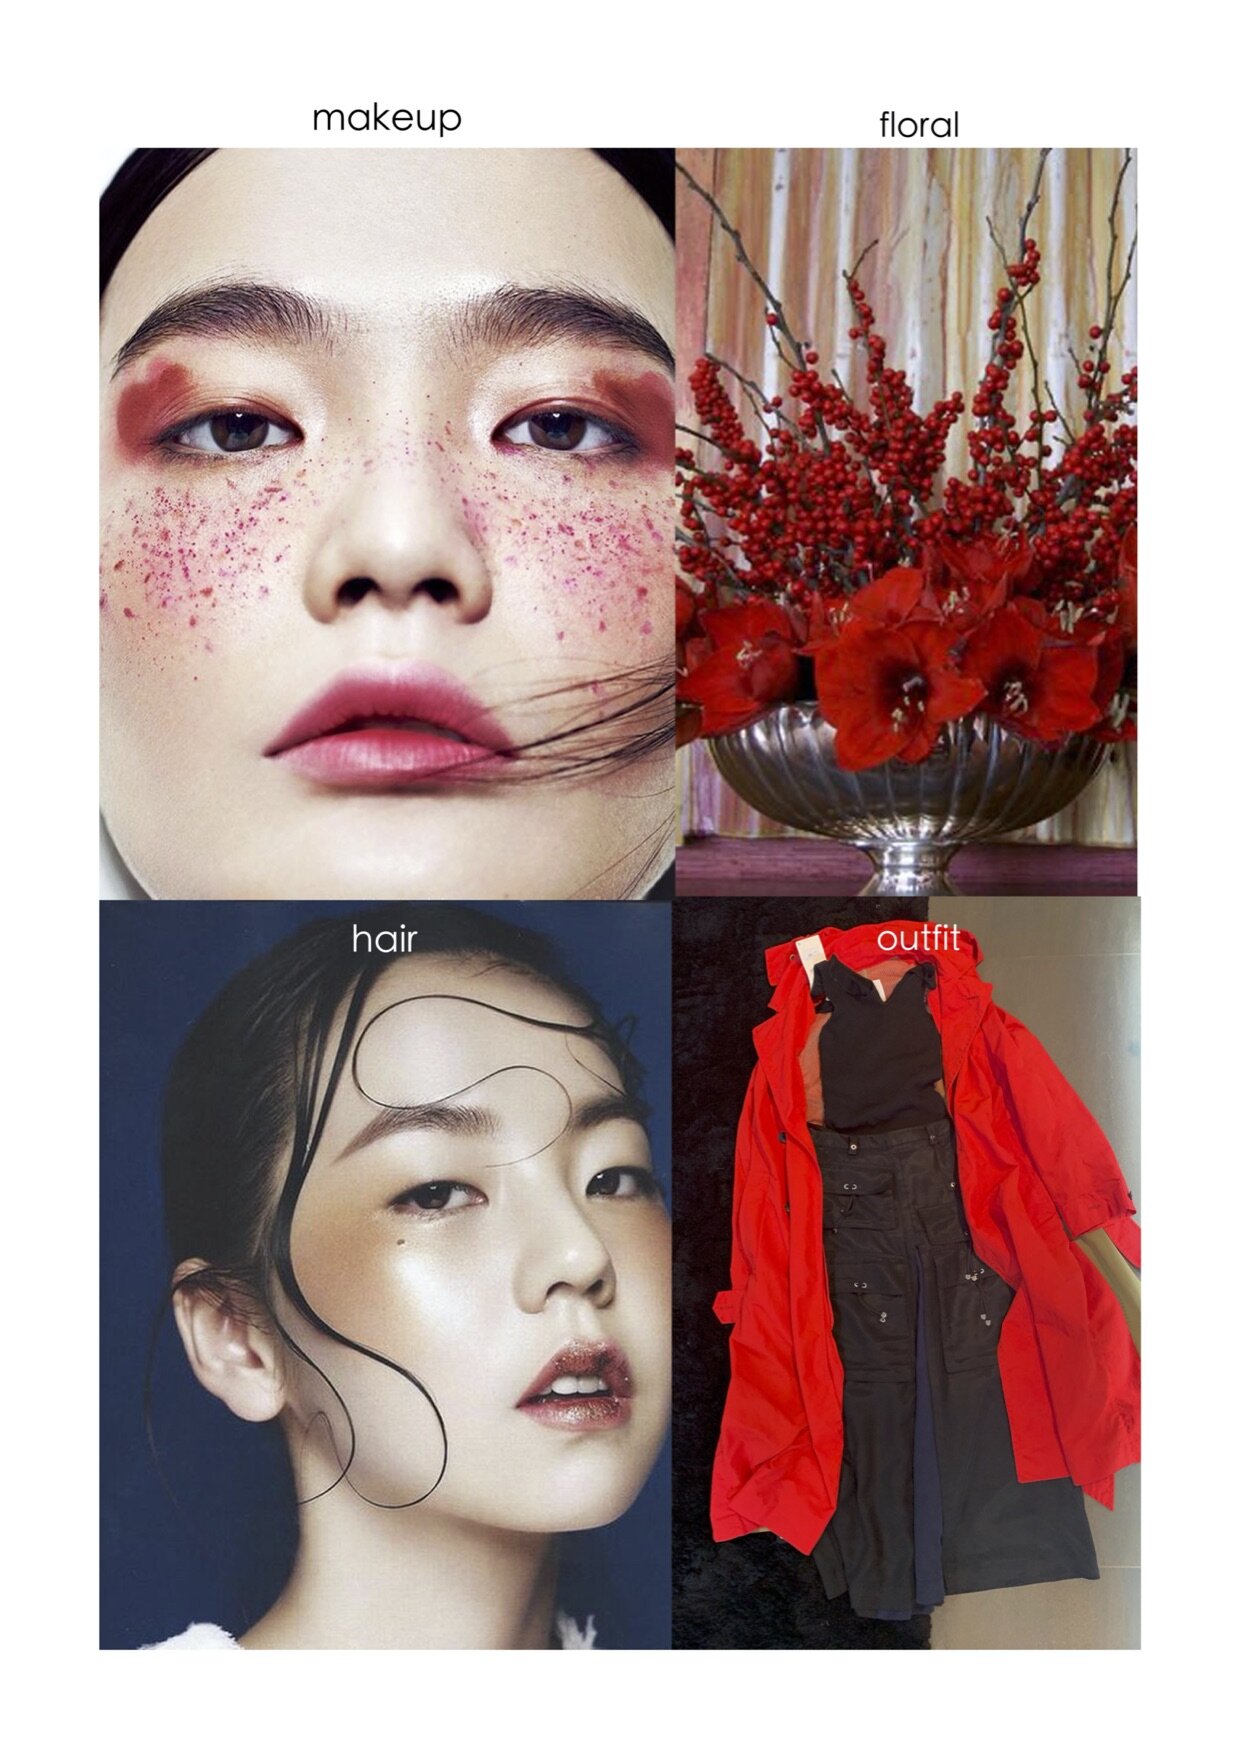
This is what our resulting moodboard looks like for the red look.
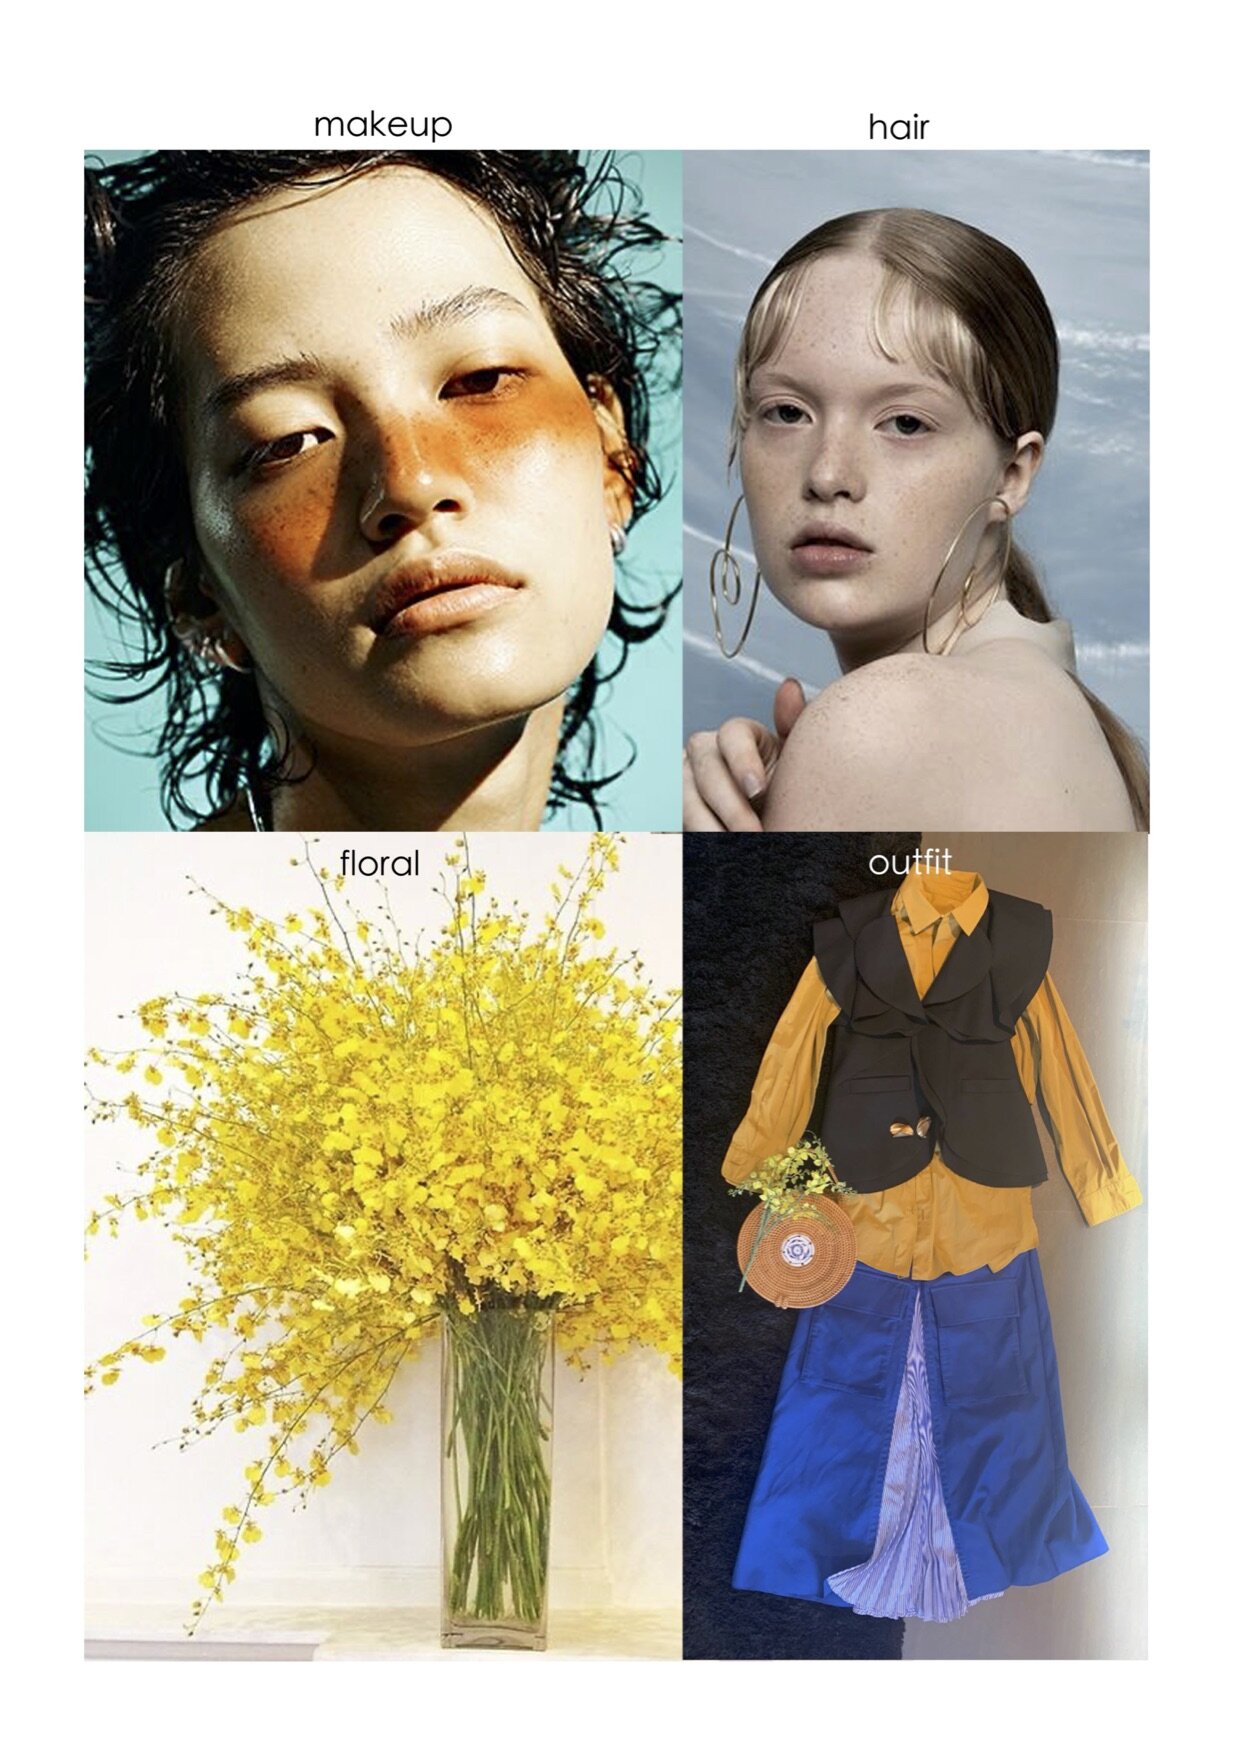
And here is the one for the yellow look.
For the blue look though, as I mentioned, you probably don’t want to get blue flowers (and they would look kind of queer). So we decided that since the makeup is predominantly in white, let’s get a white flower to go with this look. We browed through previous magazine covers and found one from Vogue, in which they cut a massive flower and placed it in the model’s hair. We loved this idea and so we took it.
Here is our plan for the blue look, and the alternative ways in which we can potentially utilise the freshly bought flowers, depending on what we managed to get on the shoot date.
That was a lot of work, but here we are - finally able to create a solid fashion editorial concept! To give you some more perspective, the time management is also done perfectly so that we had at least 3-4 days to cool down and rethink about the idea, without having to rush into it and then bump into issues due to inadequate planning.
There are other really amazing fashion work also featured on this year’s ND awards - be sure to check those out too for more inspiration!
Summary
In this article, we talked about:
Finding a stylist or brand to work with;
Building the preliminary outfits;
Determine the overall theme and shoot backdrop;
Forming the entire crew (eg. MUAs, Models, Hair Stylists, Set Designers);
Scouting out the proposed shoot location;
Creating hair, makeup and prop designs.
Here are other articles I have written that would provide a fuller picture for setting up a fashion shoot other than the concept part:
[Pho.Talk] Collaborate with Brands as a Photographer with Real Example I
[Pho.Talk] Collaborate with Brands as a Photographer with Real Example II
[Pho.Talk] First Portrait Collab Shoot: Industry Norms, FAQs, Do's and Don'ts
[Pho.Snap] Effective Ways to Direct your Model's Posing in Portrait Photography
[Pho.Snap] How to Find your Portrait Photography Style - Posing your Model
More sharing coming soon!
SUBSCRIBE via the box on the left for more PRO tips, and follow me on Instagram (@_bjiao__) and let me know what you think in the comments!
Share this article on Pinterest too!
Keep shooting, keep creating!
The mission of this blog is to provide the best insider information in the photography industry, as openly as possible. You have direct access to my
first-person experience as an aspiring photographer who talks, but also works.
Honest opinion are rarely available as public resources because this is a competitive industry. Huge sums are made when such information is delivered in the form of mentorship and workshops.
This blog is a great way in which I cover my daily expenses, but also provide real value.
If you have learnt something that would be worth at least $10, please consider donating to the page. This enables me to keep creating content and helping more people sustainably.
Your continued support for the blog is appreciated!